4.2. Pre-requisite for Inventory Creation
Before onboarding inventories, we have to configure Inventory category, Manufacturer, SKU, Stock Room, Location, Currency settings in the settings module.
Settings -> Inventories -> Inventory category:

1. Add Category: type category name in the text box and click on “Add category” button to add the individual category.
2. Bulk Upload: click on bulk upload button to create multiple categories at a time, download csv file and fill the data then upload.
3. Edit Category: Here you edit the already created category by clicking on edit icon available in each row of categories list.
4. Delete Category: Here you delete already created category by clicking on delete icon available in each row of categories list.
Settings -> Inventories -> Manufacturer

1. Add Manufacturer: type manufacturer name in the text box and click on “Add manufacturer” button to add the individual manufacturer.
2. Bulk Upload: click on bulk upload button to create multiple manufacturers at a time, download csv file and fill the data then upload.
3. Edit Manufacturer: Here you edit already created manufacturer by clicking on edit icon available in each row of manufacturer list.
4. Delete Manufacturer: Here you delete the already created manufacturer by clicking on delete icon available in each row of manufacturer list.
Settings -> Inventories -> SKU

1. Add SKU: type SKU name, Threshold, Min Threshold and Max Threshold in the related text boxes and click on “Add SKU” button to add the individual SKU.
Note: Every inventory has individual SKU, for every inventory type we have to create separate SKU in settings.
2. Bulk Upload: click on bulk upload button to create multiple SKU at a time, download csv file and fill in the data then upload.
3. Edit Manufacturer: Here you edit/update already created SKU by clicking on edit icon available in each row of SKU list.
4. Delete Manufacturer: Here you delete already created SKU by clicking on delete icon available in each row of SKU list.
Settings -> Inventories -> Stock Room

1. Add Stock Room: click on “Add Stock Room” button to add the individual Stock Room following page will be display. Fill the all-mandatory fields then only save button will be enabled, click on save button to create stock room.

Note: Every inventory has an individual Stock Room, for every inventory type we must create separate Stock Room in settings.
2. Bulk Upload: click on bulk upload button to create multiple Stock Room at a time, download csv file and fill in the data then upload.
3. Edit Stock Room: Here you edit/update already created Stock Room by clicking on edit icon available in each row of Stock Room list.
4. Delete Stock Room: Here you delete the already created Stock Room by clicking on the delete icon available in each row of Stock Room list.
Note: you cannot edit/update details in stock room if it is linked to an existing inventory, system display warning message as shown by following screenshot.

Settings -> My Organization -> Location

1. Add Location: click on the add location button to create individual location.
When click on “add location” button following page will appear, fill the mandatory fields then only save button will be enabled. Click on the save button, your location details will be saved and displayed in the table first row.

2. Bulk Upload Location: Click on bulk upload button to create multiple locations at a time, download csv file and fill the data then upload.
3. Export button: To download QR list (locations), you can export as with image or without image.
4. QR: Click on QR icon and Scan QR to view that location
5. Edit Location: Here you edit already created locations by clicking on edit icon available in each row of Location list.
6. Delete Location: Here you delete already created locations by clicking on delete icon available in each row of Location list.
Settings -> My Organization -> Building:

1. Add Building: click on the add building button to create individual building name.
When clicking on “add building” button following page will appear, fill the mandatory fields then only save button will be enabled. Click on the save button your building details will be saved and displayed in the table first row.

2. Bulk upload Building: Click on bulk upload button to create multiple buildings at a time, download csv file and fill the data then upload.
3. Export button: To download QR list (buildings), you can export as with image or without image.
4. QR: Click on QR icon and Scan QR to view that building name with location.
5. Edit Building: Here you edit already created building names by clicking on edit icon available in each row of building list.
6. Delete Building: Here you delete already created building names by clicking on delete icon available in each row of building list.
Settings -> My Organization -> Floor:

- Add Floor: Click on the add floor button to create individual floor name. When click on “add floor” button following page will appear, fill the mandatory fields then only save button will be enabled. Click on the save button, your floor details will be saved and displayed in the table first row.

- Bulk Upload Floor: Click on bulk upload button to create multiple floors at a time, download csv file and fill the data then upload.
- Export button: To download QR list (floors), you can export as with image or without image.
- Edit Floor: Here you edit already created floor names by clicking on edit icon available in each row of floor list.
5. Delete Floor: Here you delete already created floor names by clicking on delete icon available in each row of floor list.

6. QR: Click on QR icon and Scan QR to view that floor name with location.
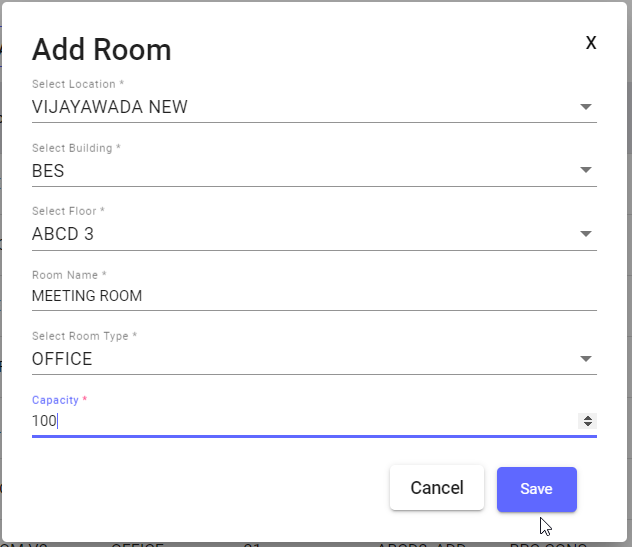
Settings -> My Organization -> Room:

- Add Room: click on the add room button to create individual room name. When click on “add room” button following page will appear, fill the mandatory fields then only save button will be enabled. Click on the save button your room details will be saved and displayed in the table first row.
- Bulk Upload Room: Click on bulk upload button to create multiple rooms at a time, download csv file and fill the data then upload.
- Export button: To download QR list (rooms), you can export as with image or without image.
- QR: Scan QR to view that room with building and location.
- Edit Room: Here you edit already created room names by clicking on edit icon available in each row of floor list.
- Delete Room: Here you delete already created room names by clicking on delete icons available in each row of floor list.

Settings -> My Organization -> Currency settings:
Select your currency type from the dropdown as shown by the screenshot below .
