3.2. Pre-Requisites For Asset Creation
To onboard assets, the assets,following youconfigurations havemust tobe configurecompleted in the settings module(Asset category, Manufacturer, Model, Location, Currency, Roles, Skillset settings in the settings module.Skillset.:
·
settingsSettings and open assetsAssets to configure Category, Manufacturer, and Model.
· settingsSettings and open organizationOrganization to configure Currency settings,Settings, Location, and Roles.
· settingsSettings and open agentsAgents to configure skillset.
· agentsthe Agents module and create new agents with rolesroles. These agents can then be selected as Supervisor and Assignee from the dropdown when creating a new asset. supervisor and assignee from the dropdown while creating a new asset.
·i. Go to vendor module and create new vendor to select vendor from dropdown while creating new asset.
i. Go to settings and open assets to configure Category, Manufacturer, Model
Settings -> Assets -> Category
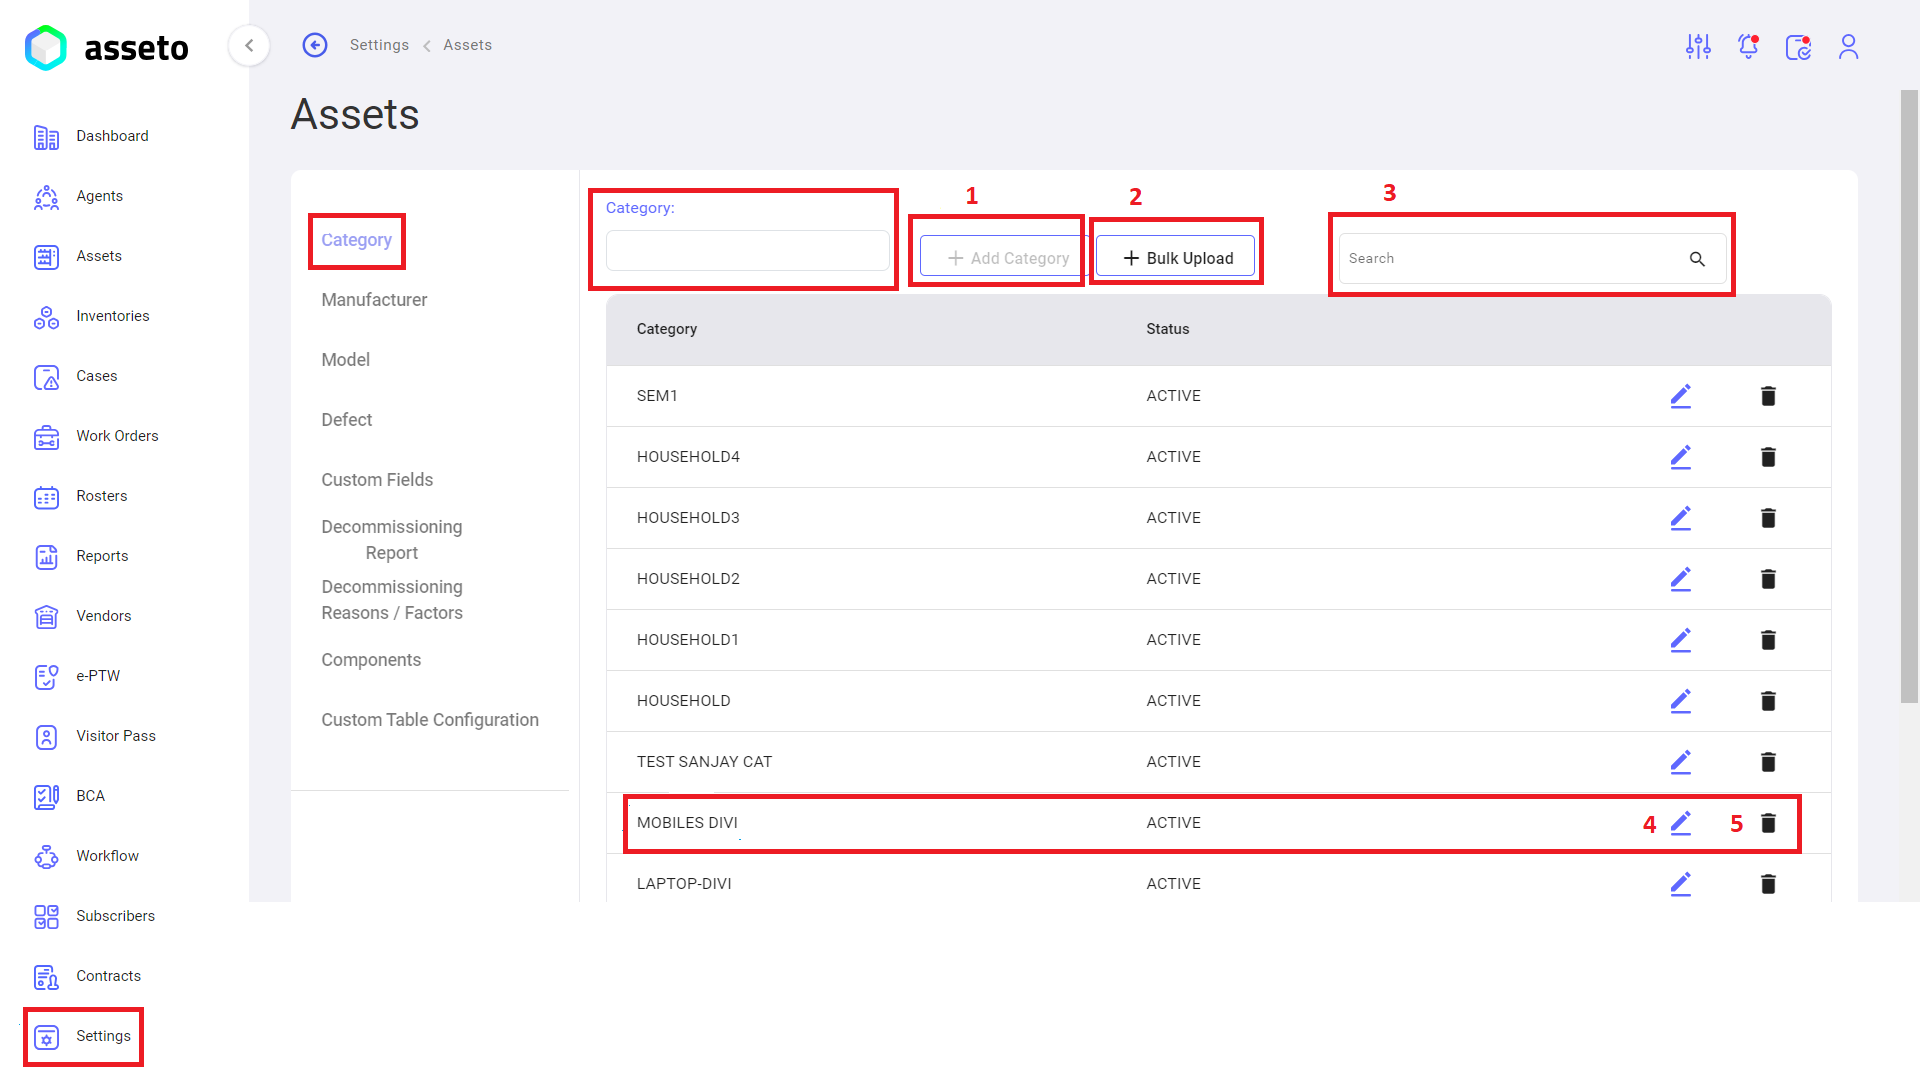
.Add Asset Category:HereEnteryouthecan type Categorycategory name in the text box and clickonthe“add"Addcategory”Category" button to create an individualCategory.category..Asset Category BulkUpload:Upload: Clickonthe bulk upload button to create multipleCategoriescategories ataonce.time,DownloaddownloadthecsvCSVfilefile, fill in the data, andfill the datathenupload.upload it..Search:you can searchSearch for any categorywithbya categoryits name.HereEdityouancan editexisting categorywhich is created earlierby clickingonthe edit iconavailablenexteachtorowtheofdesired category in the list.HereDeleteyouancan delete the already createdexisting category by clickingonthe delete iconavailablenexteachtorowtheofdesired category in the list.
Settings -> Assets -> Manufacturer:
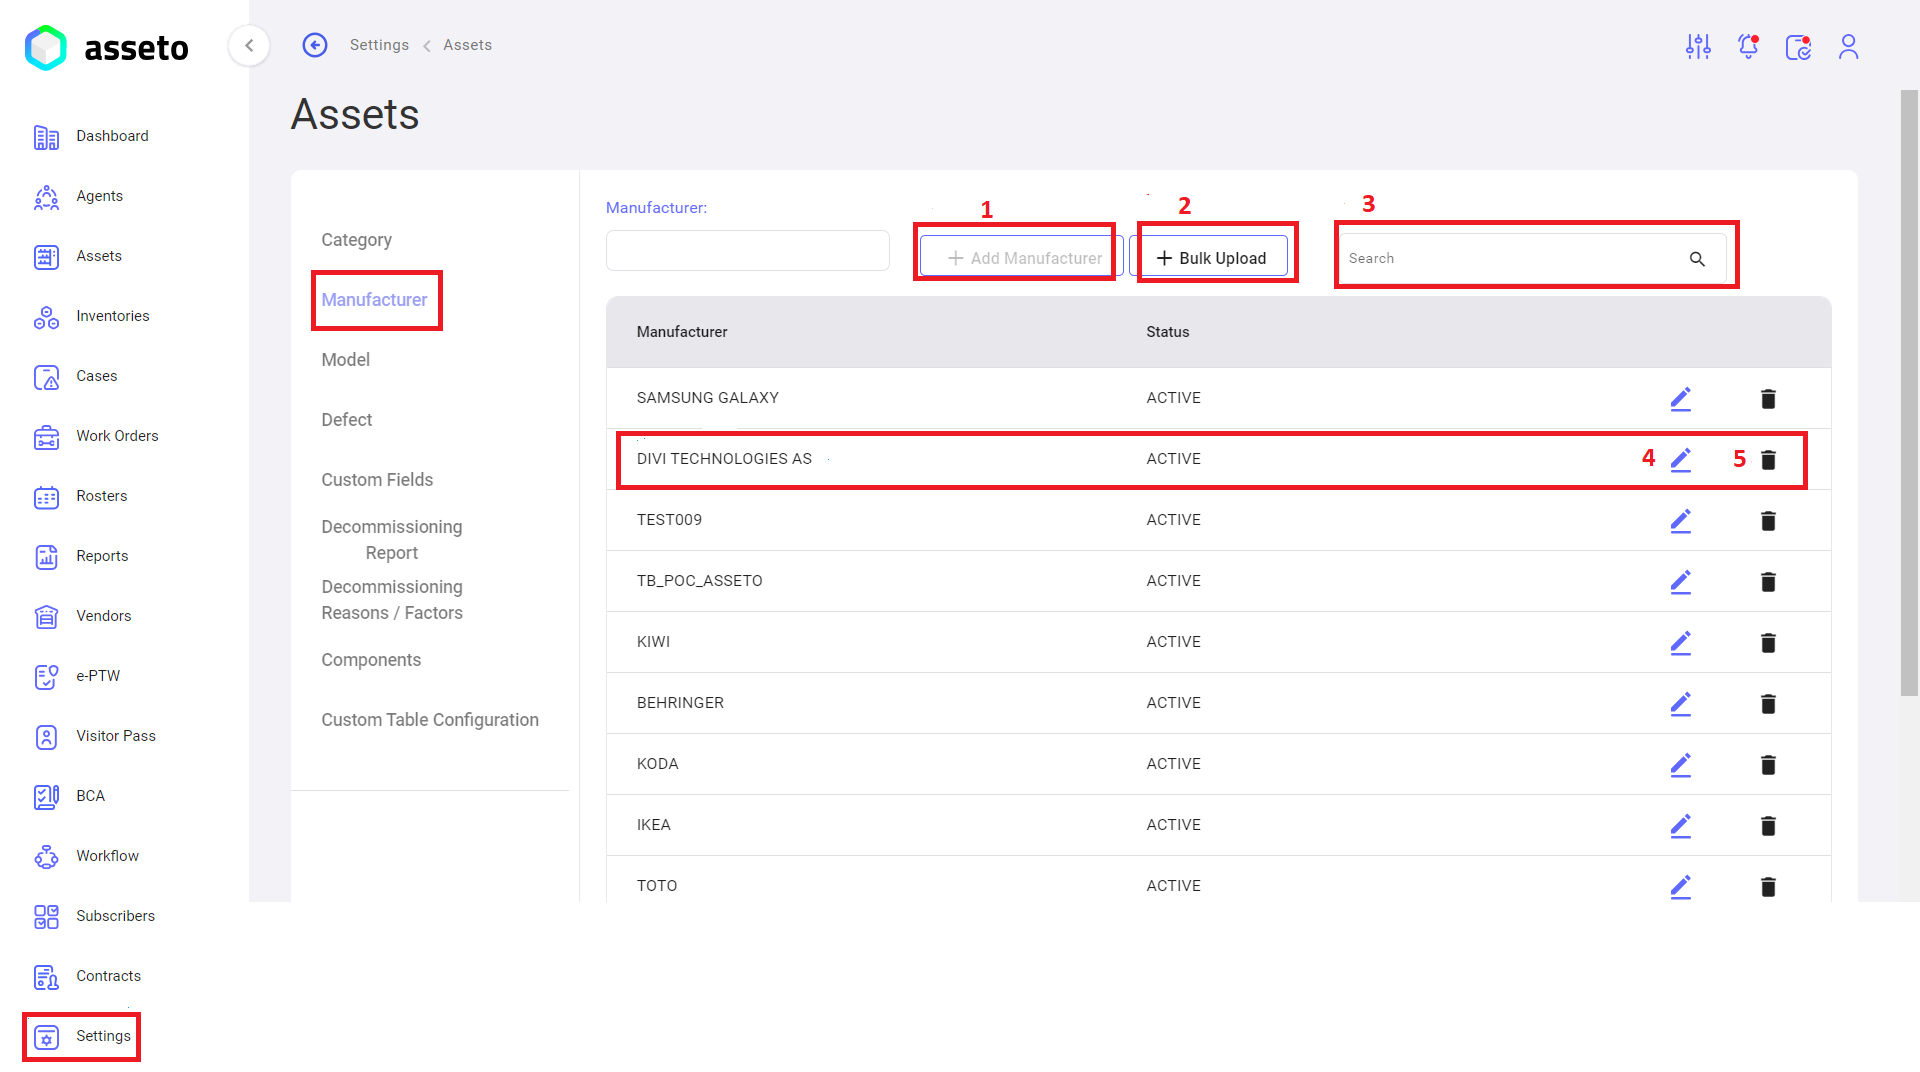
.Add Manufacturer:HereEnteryouthecan type Manufacturermanufacturer name in the text box and clickonthe“add"Addmanufacturer”Manufacturer" button to onboardonboardan individual manufacturer..Bulk Upload Manufacturer: Clickonthe bulk upload button to onboard multipleManufacturer’smanufacturers ataonce.time,DownloaddownloadthecsvCSVfilefile, fill in the data, andfilluploadthe data then upload.it..Search:you can searchSearch for any manufacturerwith the manufacturerby name.ManufacturerManufacturer::EditHereanyouexistingcan edit the already created Manufacturermanufacturer by clickingonthe edit iconavailablenexteachtorowtheofdesired manufacturerManufacturerin the list.ManufacturerManufacturer::HereDeleteyouancanexistingdelete the already created Manufacturermanufacturer by clickingonthe delete iconavailablenext to the desired manufacturer ineach row of Manufacturerthe list.
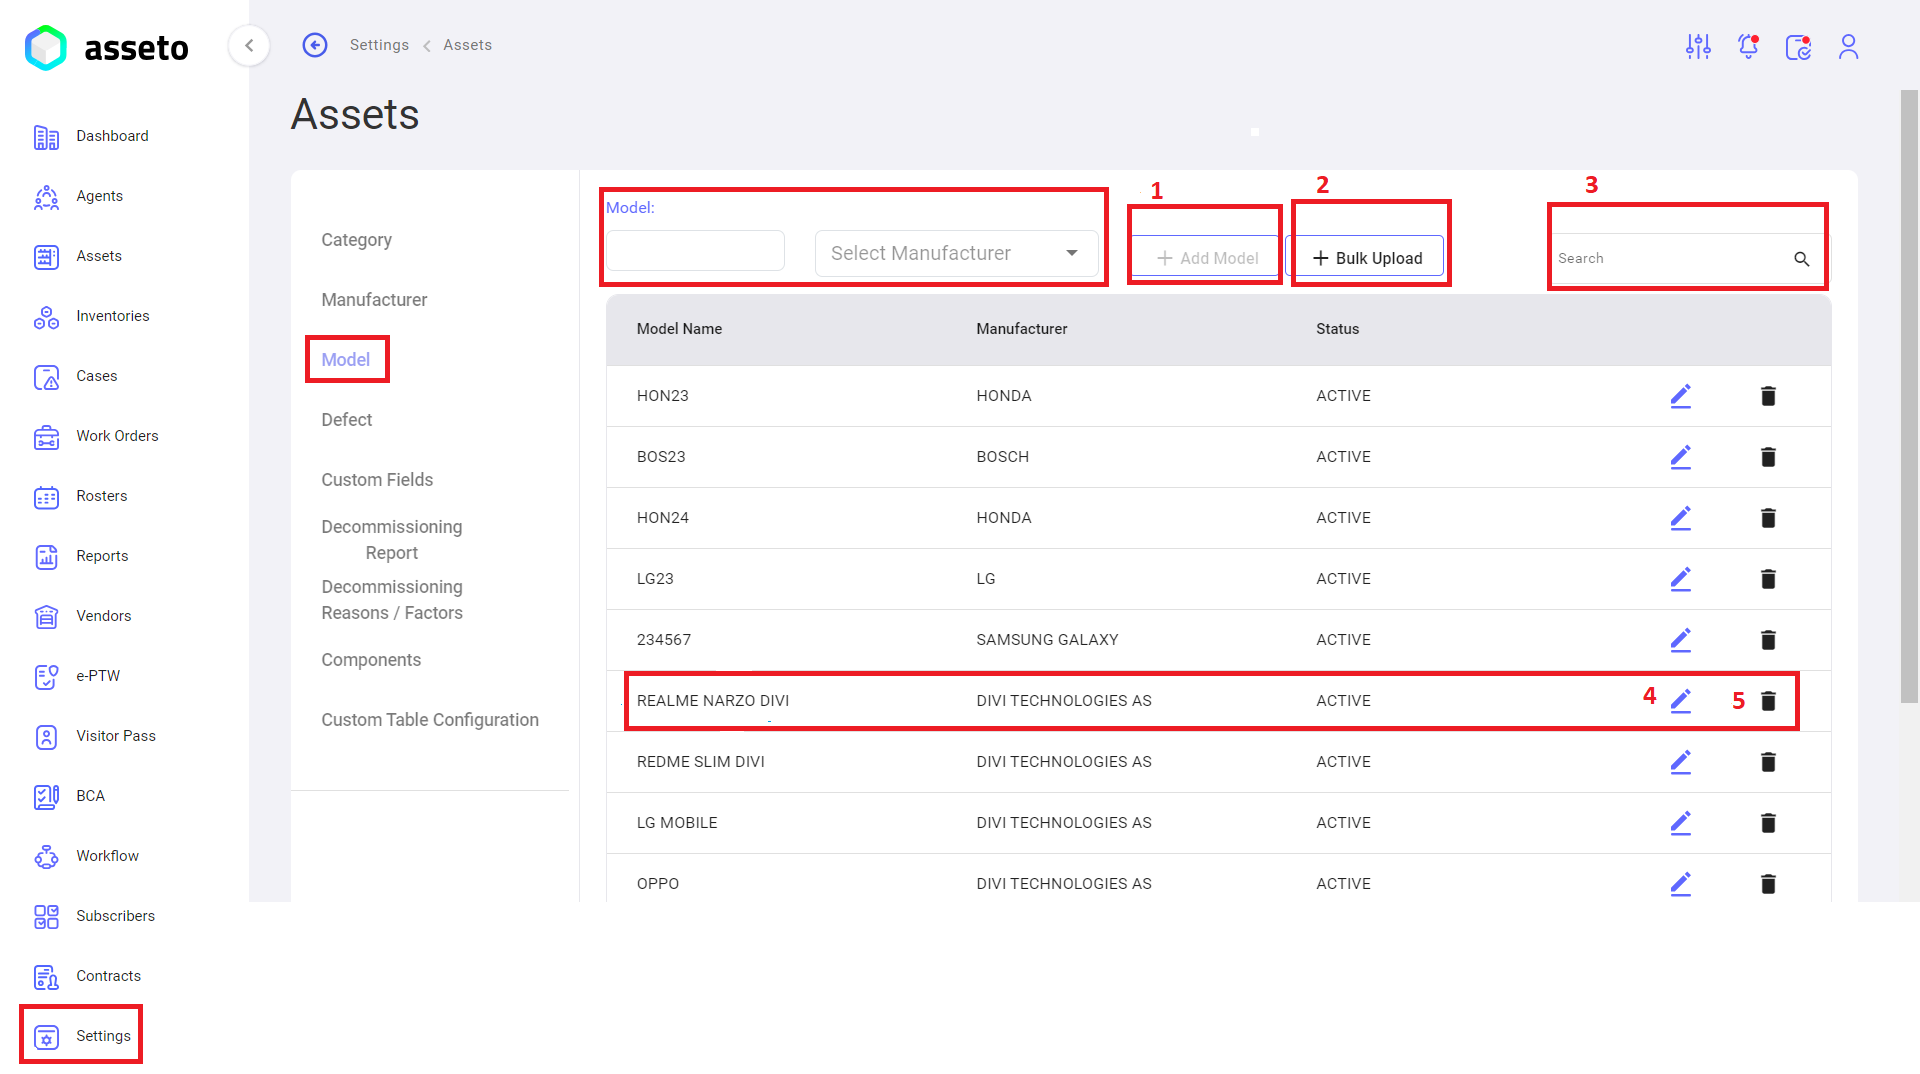
Settings -> Assets -> Model:
1.
Model:Model: HereEnter you typethe asset model name in the text boxbox, select the manufacturer, and select manufacturer then click onthe “add"Add model”Model" button to create a new model.
2. Model:Model: YouClick canthe bulk upload button to create multiple models at aonce. timeDownload bythe clickingCSV onfile, bulkfill in the data, and upload button,it.download csv file and fill the data then upload.
3. boxBox: You can searchSearch for any model withby modelits namename, and the results will be displayed in belowthe table.
4.below.
Model:Model: YouEdit canan edit the already createdexisting model names by clicking onthe edit icon available in each row of the model list.
5. Model:Model: YouDelete canan delete the already createdexisting model names by clicking on the delete icon available in each row of the model list.
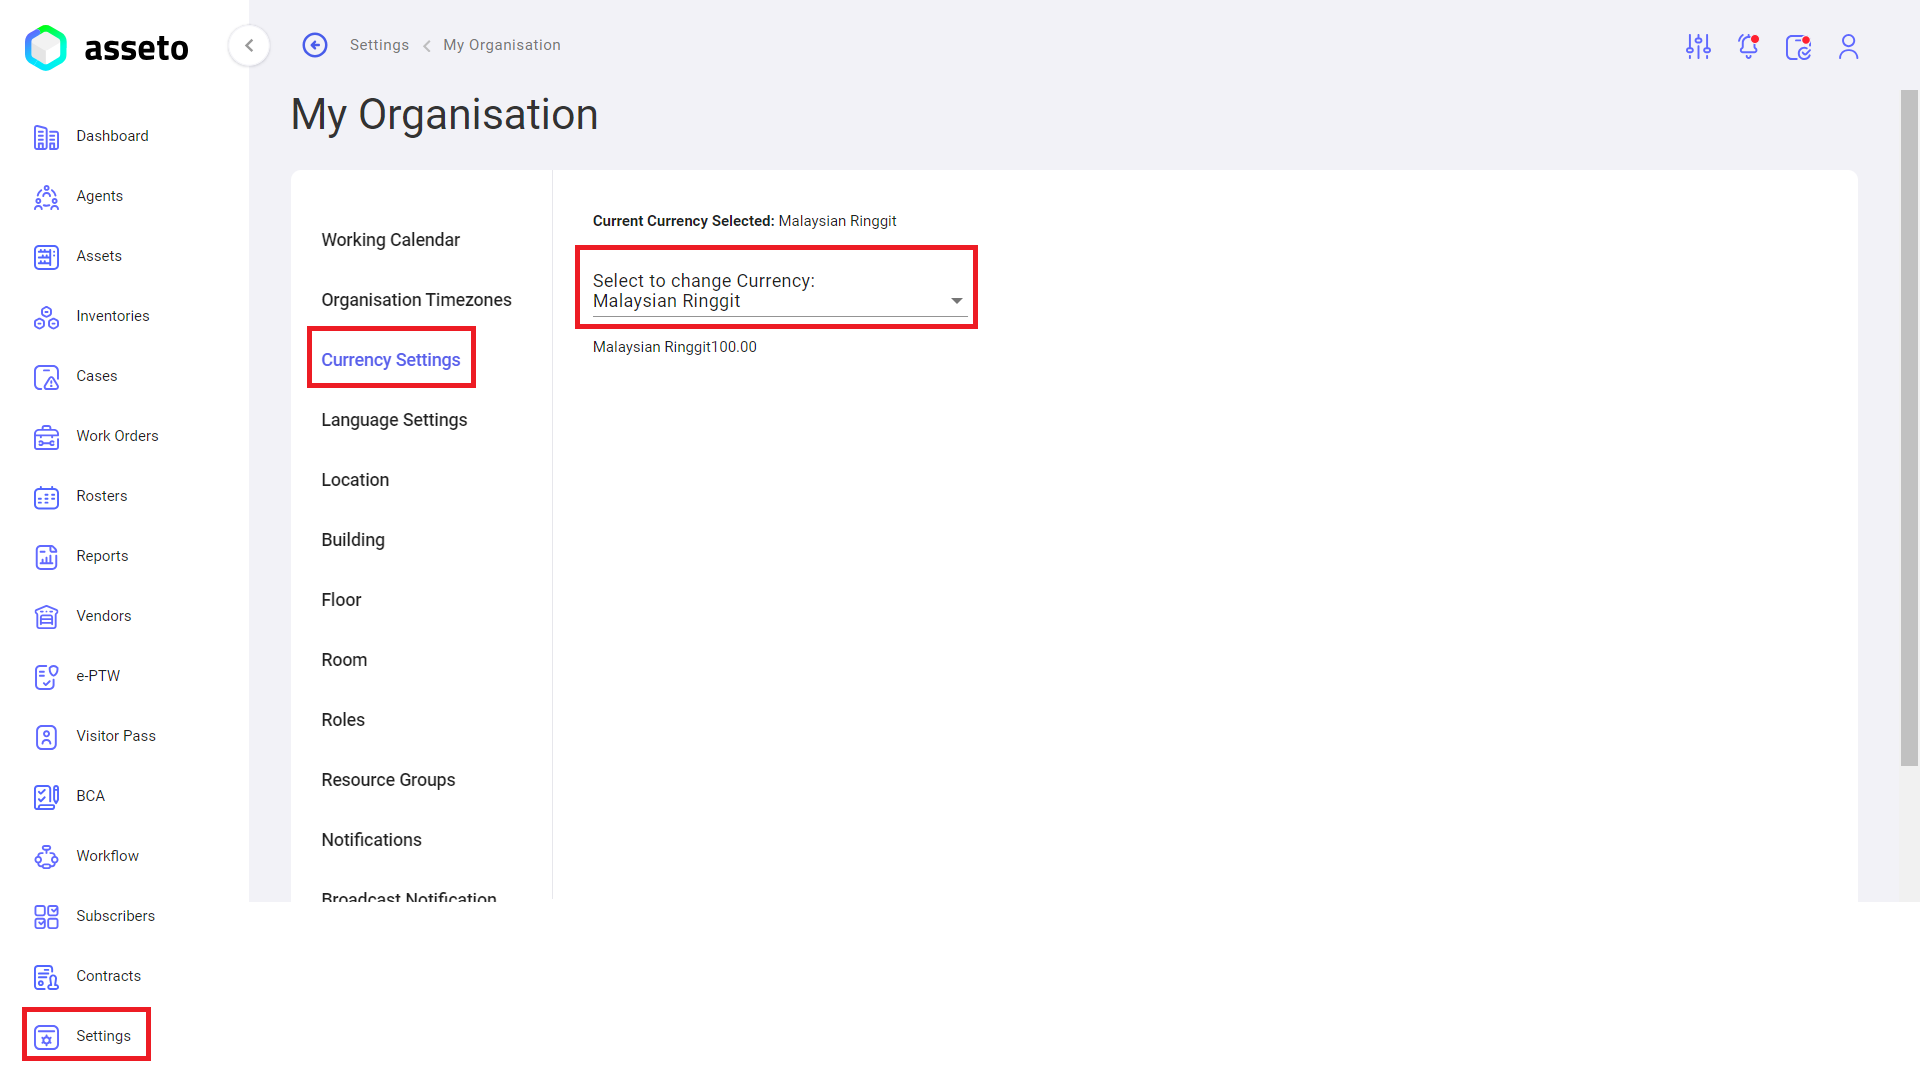
ii. GotoGo settingsto andSettings open-> organizationMy Organization to configure Currency settings,Settings, Location, RolesRoles, and Resource Groups.
Settings:
yourthe currency type from the dropdowndropdown, as shown byin the belowfollowing screenshot.
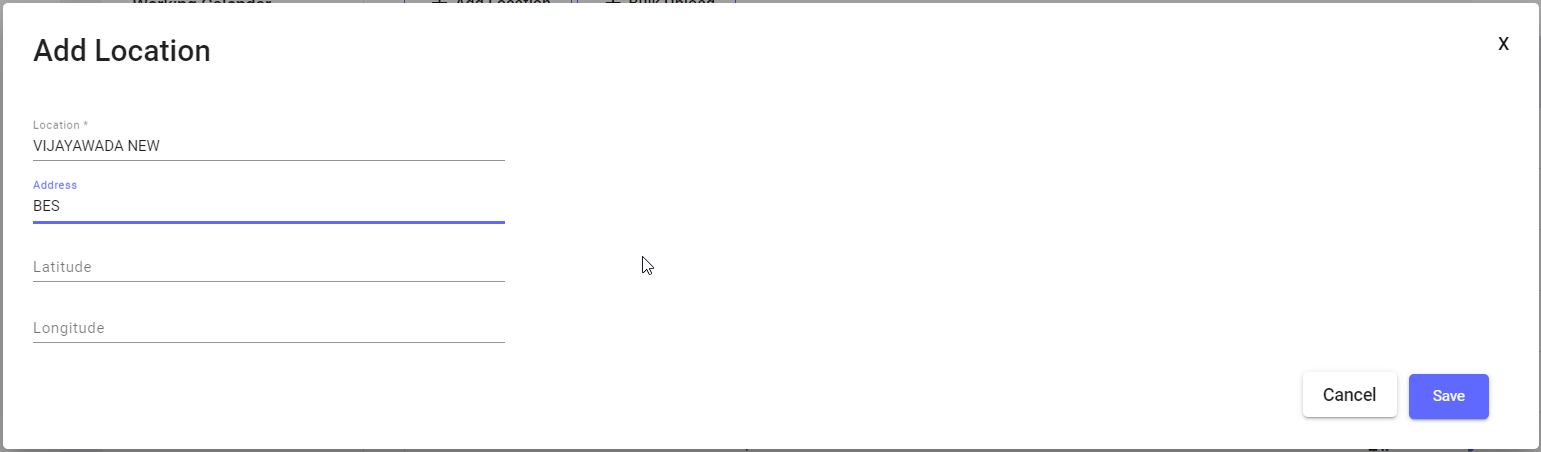
Settings -> My Organization -> Location:
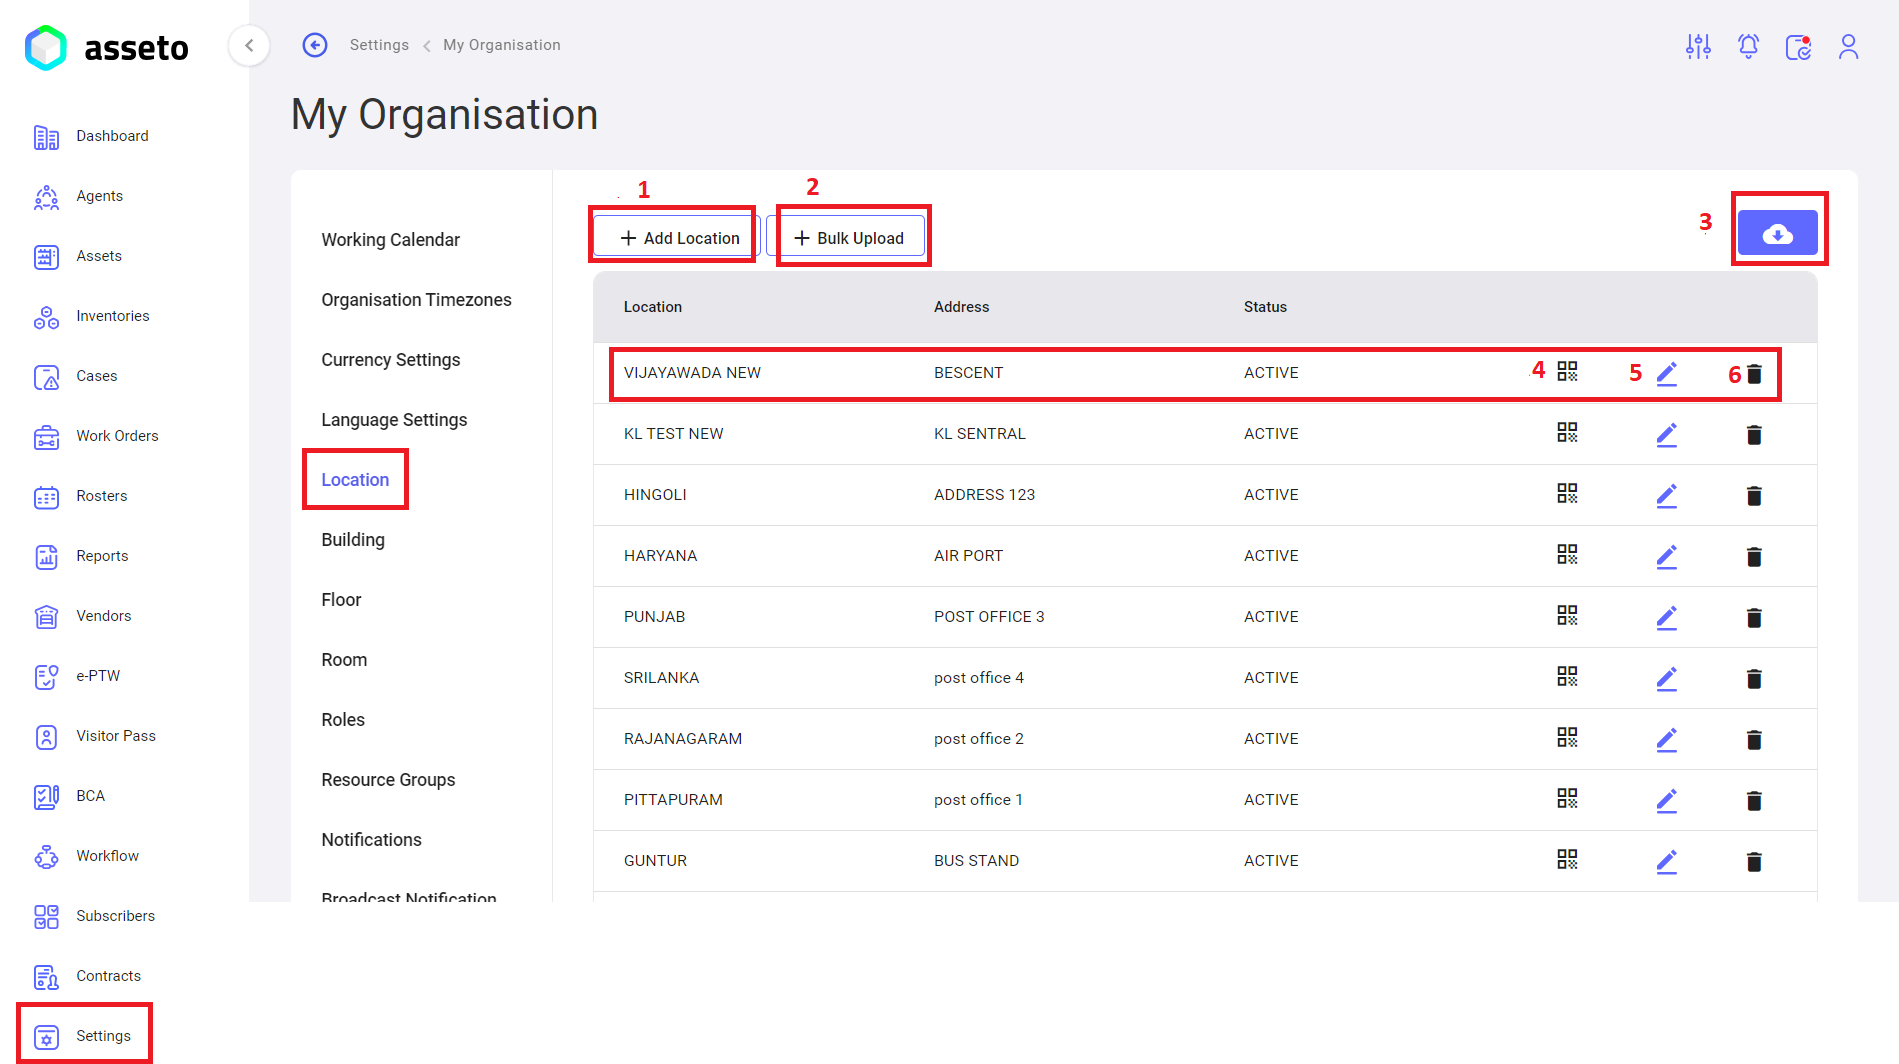
clickClick on theadd"AddlocationLocation" button to create an individual location. Whenclicktheon"Add“add location”Location" button is clicked, the following page willappear,appear.fillFill in all the mandatoryfieldsfields,thenafteronlywhich the save button will be enabled. Clickonthe "Save" button to save thesave button, yourlocationdetailsdetails, which will then besaved anddisplayed in thetablefirstrow.row of the table.

Location:Location:clickClickonthe bulk upload button to create multiple locations ataonce.time,DownloaddownloadthecsvCSVfilefile, fill in the data, andfilluploadthe data then upload.it.buttonButton:toDownloaddownloadthe QR list(locations),ofyoulocations,canwith options to exportaseither with image or without image..QR:clickClickonthe QR icon andScanscan the QR code to viewthatthelocationspecific location..Edit Location:HereEdityou edit already createdexisting locations by clickingonthe edit iconavailablein each row ofLocationthe location list..DeleteLocation:Location:HereDeleteyou delete already createdexisting locations by clickingonthe delete iconavailablein each row ofLocationthe location list.
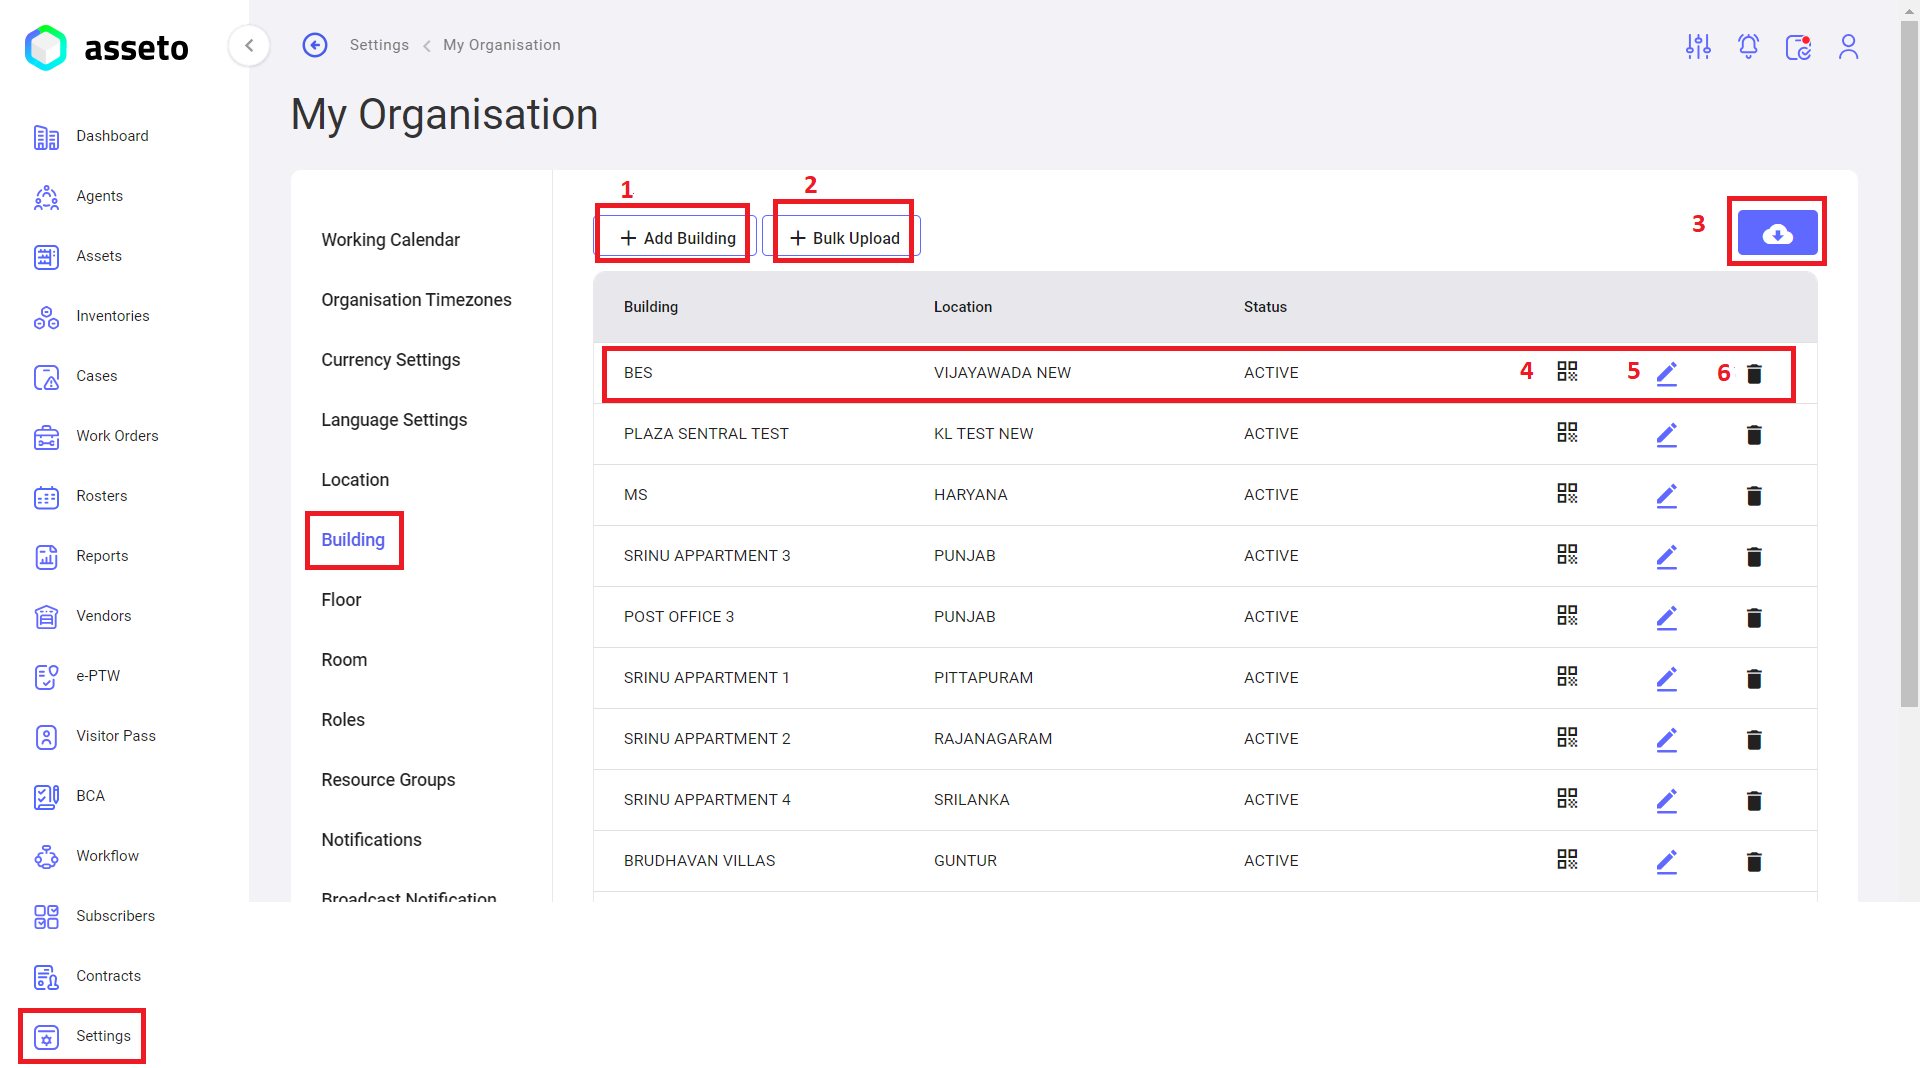
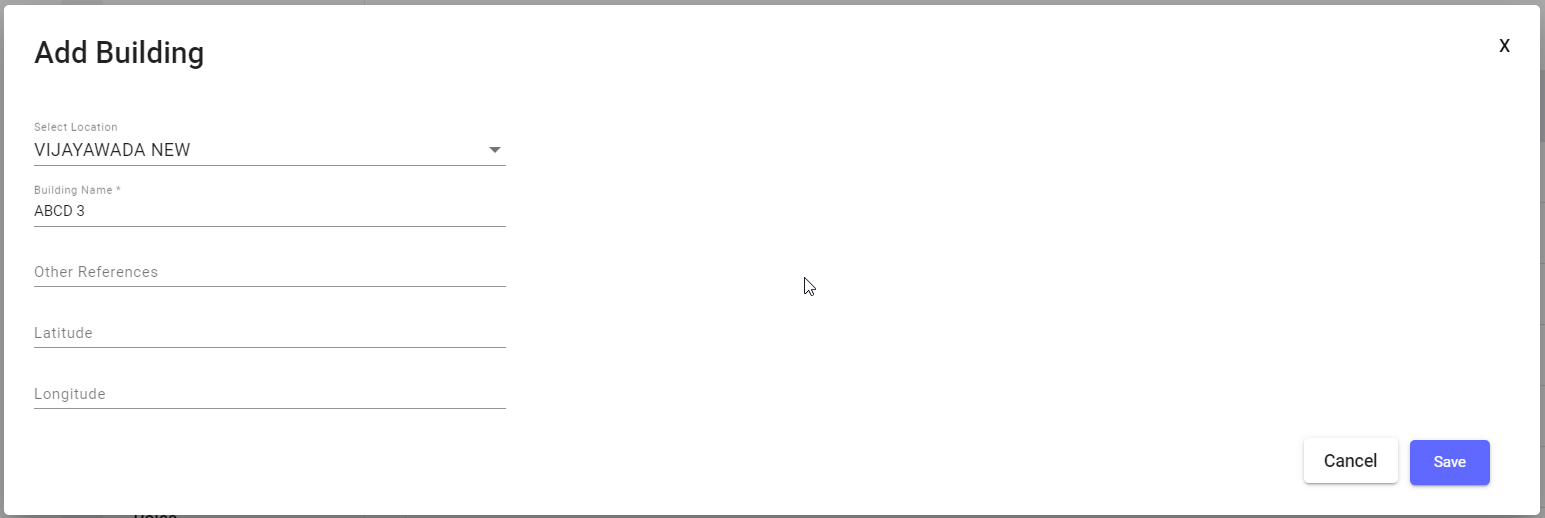
Settings -> My Organization -> Building:
1.
 When clicking
 onthe “add"Add building”Building" buttonbutton, the following page will appear,appear. fillFill in the mandatory fields thento only save button will be enabled. Click onenable the save"Save" buttonbutton. yourAfter clicking the "Save" button, the building details will be saved and displayed in the table first row.row of the table.
2. uploadUpload Building:Building: clickClick onthe bulk upload button to create multiple buildings at aonce. time,Download downloadthe csvCSV filefile, fill in the data, and fillupload theit.data then upload.
3. buttonButton: toDownload downloadthe QR list (buildings),of youbuildings, canwith options to export aseither with image or without image.
4. clickClick onthe QR icon and Scanscan the QR code to view thatthe building name along with its location.
5. HereEdit you edit already createdexisting building names by clicking onthe edit icon available in each row of the building list.
6. HereDelete you delete already createdexisting building names by clicking onthe delete icon available in each row of the building list.
Settings -> My Organization -> Floor:
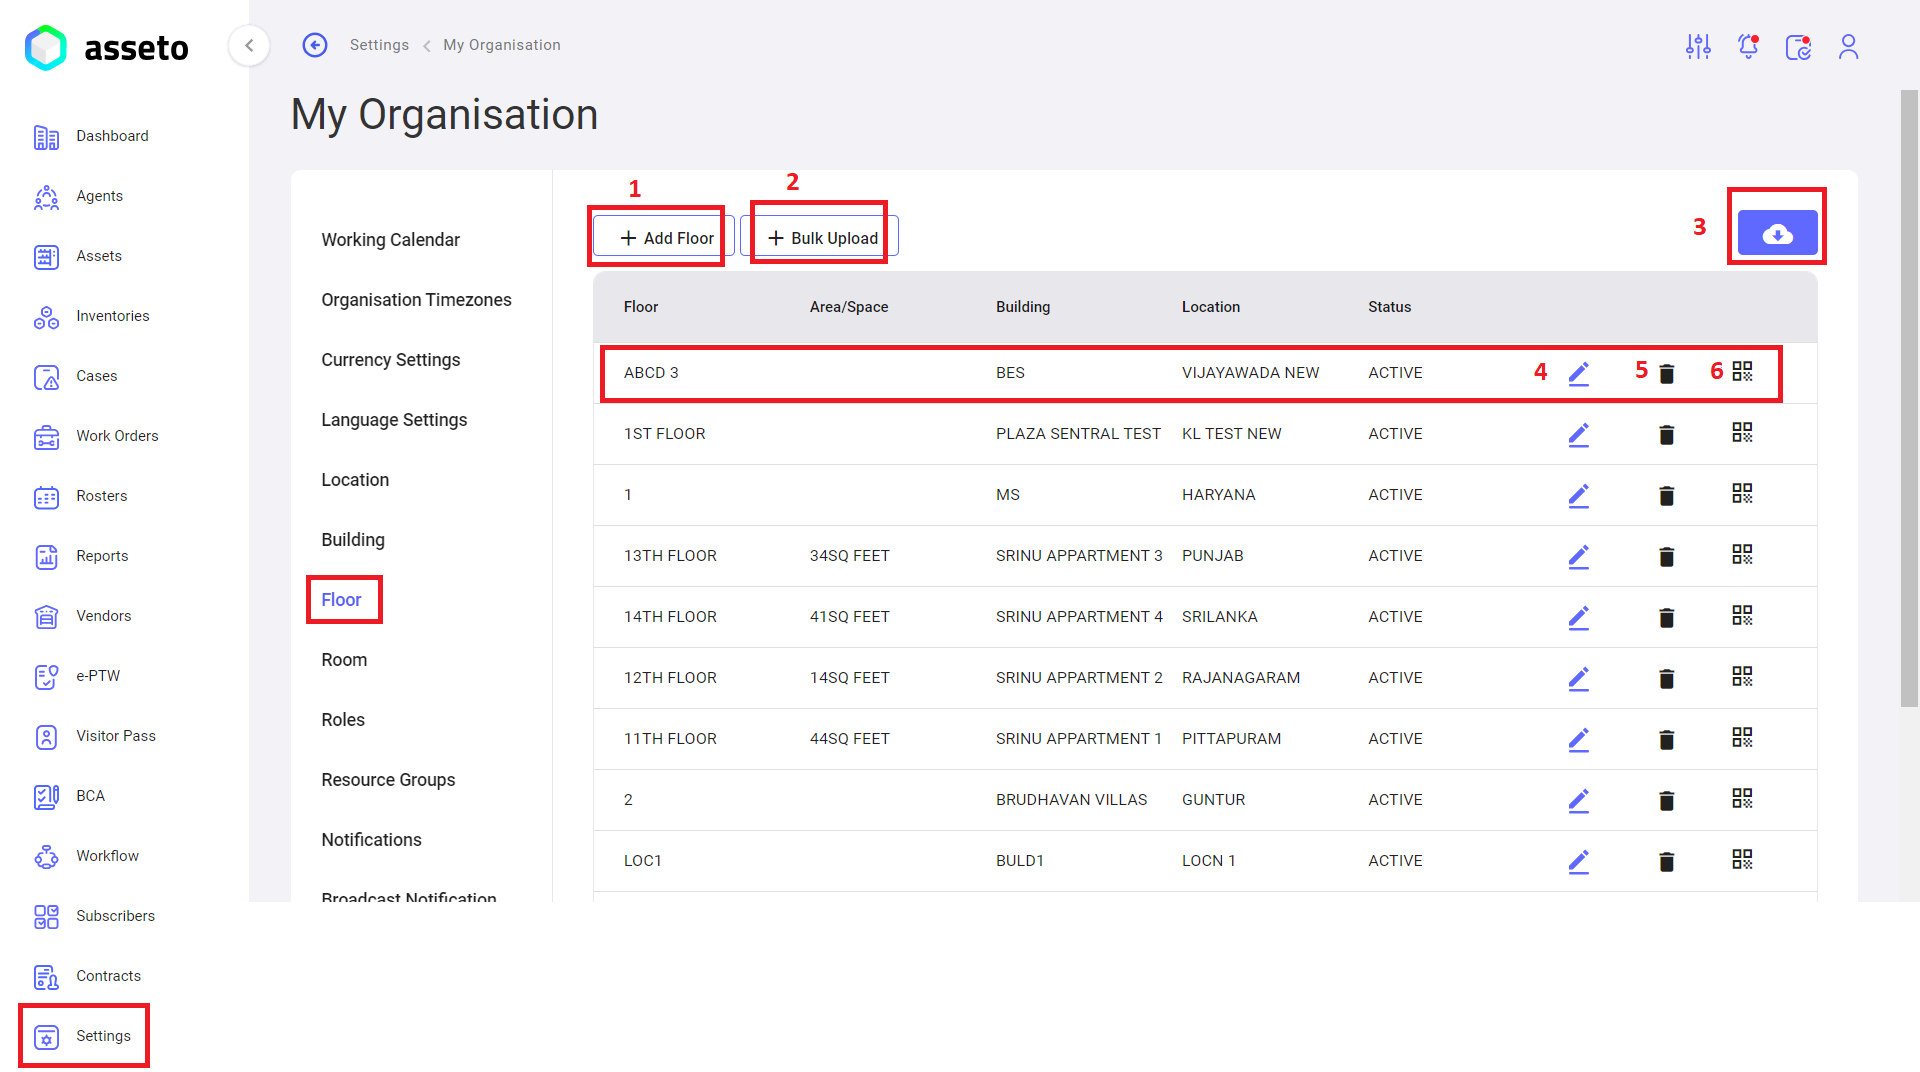
ontheadd"AddfloorFloor" button to create an individual floor name.
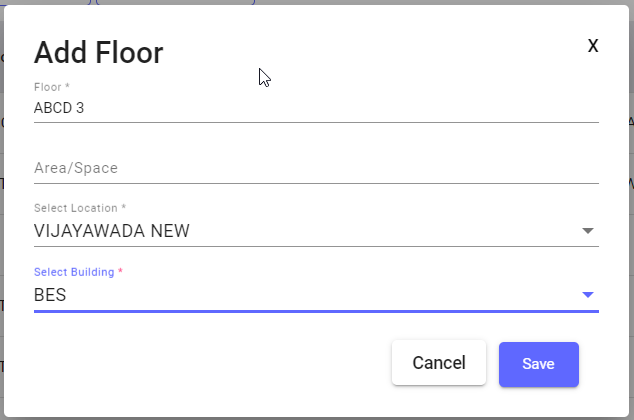

table.
2 2.
4.
5.
6.
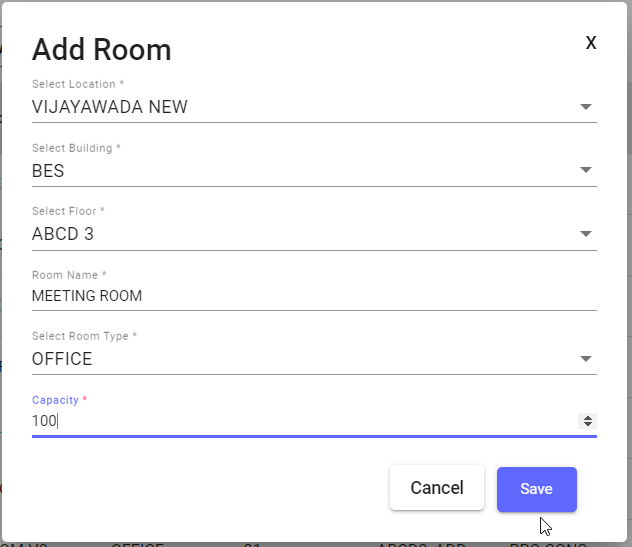
Settings -> My Organization -> Room:
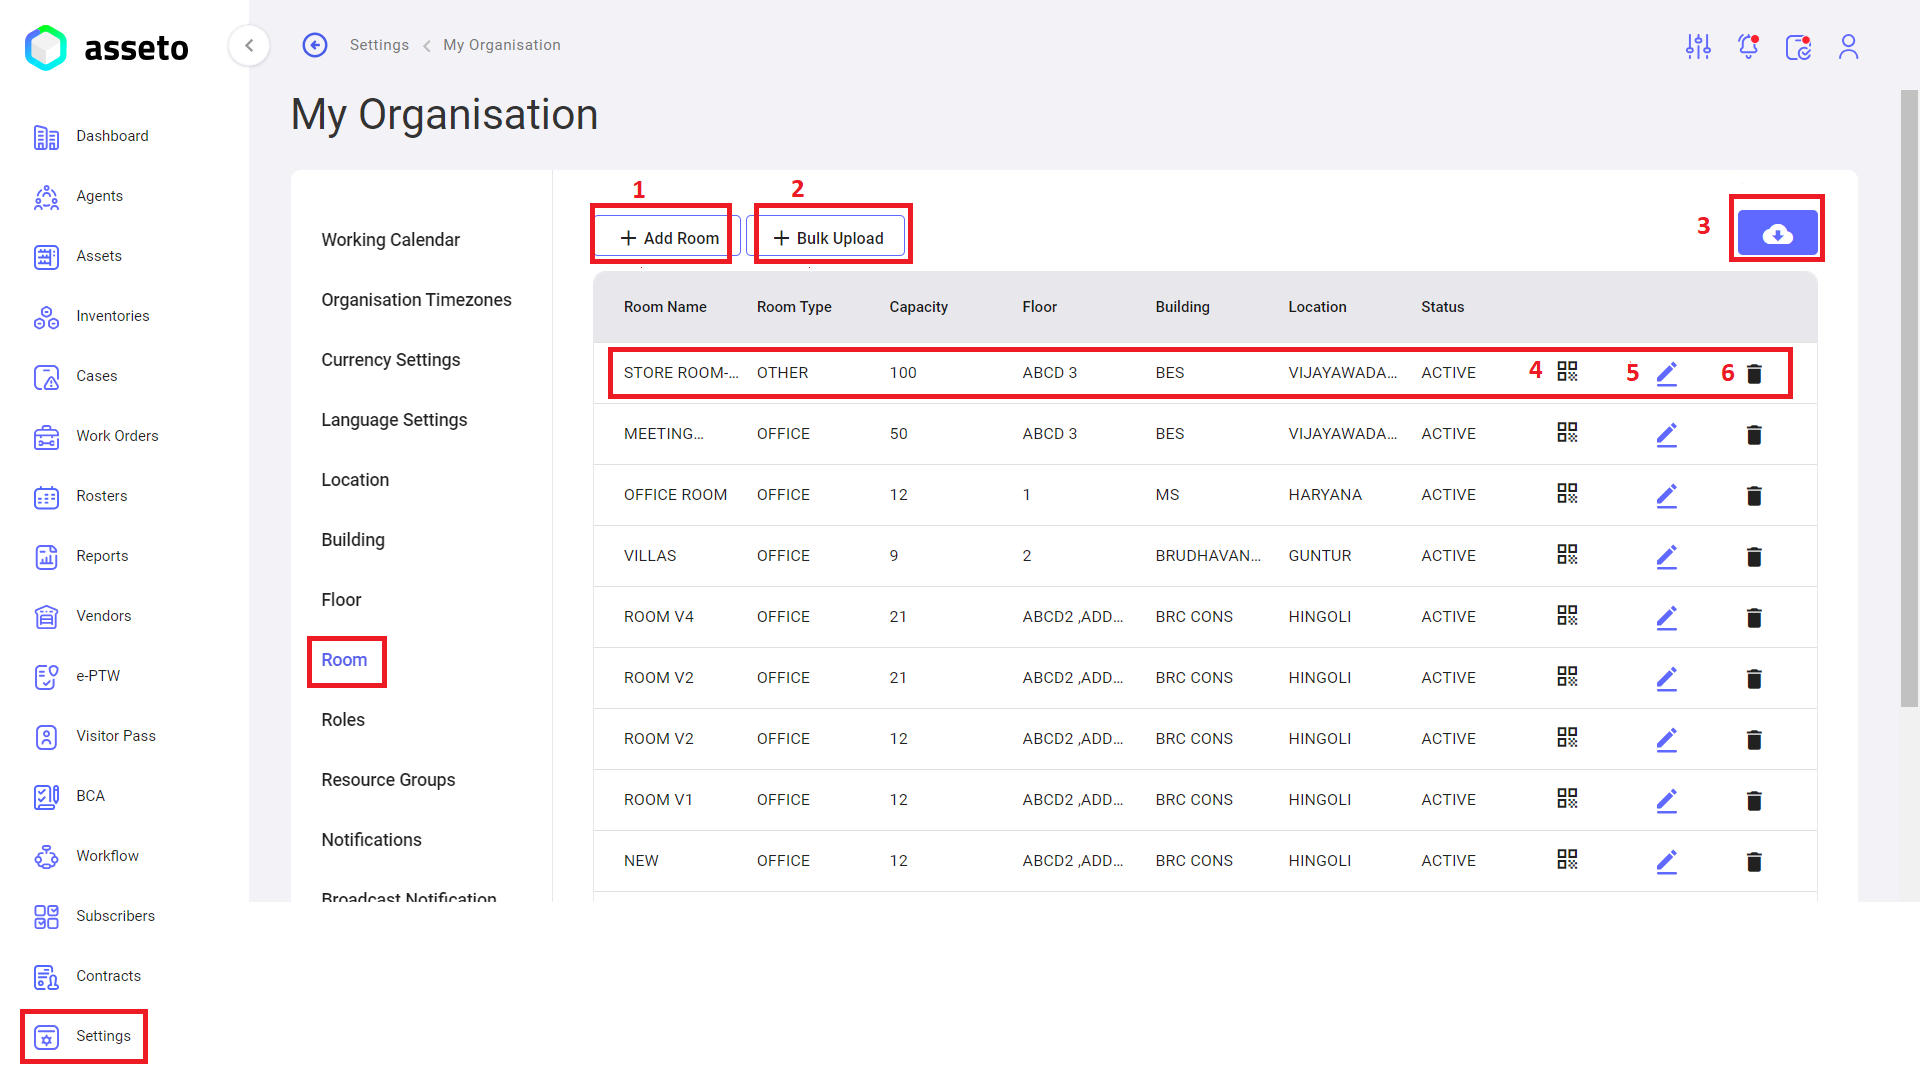
click onWhen theadd"AddroomRoom" buttontoiscreateclicked,an individual room name.When click on “add room” buttonthe following page willappear,appear.fillFill in all the mandatory fieldsthentoonly save button will be enabled. Click onenable thesave"Save"buttonbutton.yourAfter clicking the "Save" button, the room details will be saved and displayed in thetablefirstrow.row of the table.

Room:Room:clickClickonthe bulk upload button to create multiple rooms ataonce.time,DownloaddownloadthecsvCSVfilefile, fill in the data, andfilluploadthe data then upload.it.buttonButton:toDownloaddownloadthe QR list(rooms),ofyourooms,canwith options to exportaseither with image or without image.thatthe room along with its associated building and location.HereEdityou edit already createdexisting room names by clickingonthe edit iconavailablein each row offloorthe room list.HereDeleteyou delete already createdexisting room names by clickingonthe deleteicons availableicon in each row offloorthe room list.
Settings -> My Organization -> Roles:
HereHere, youusers can create a new role for users onboarding, which we can usebe inused across various modules likesuch agents,as assetsagents and asset creation.
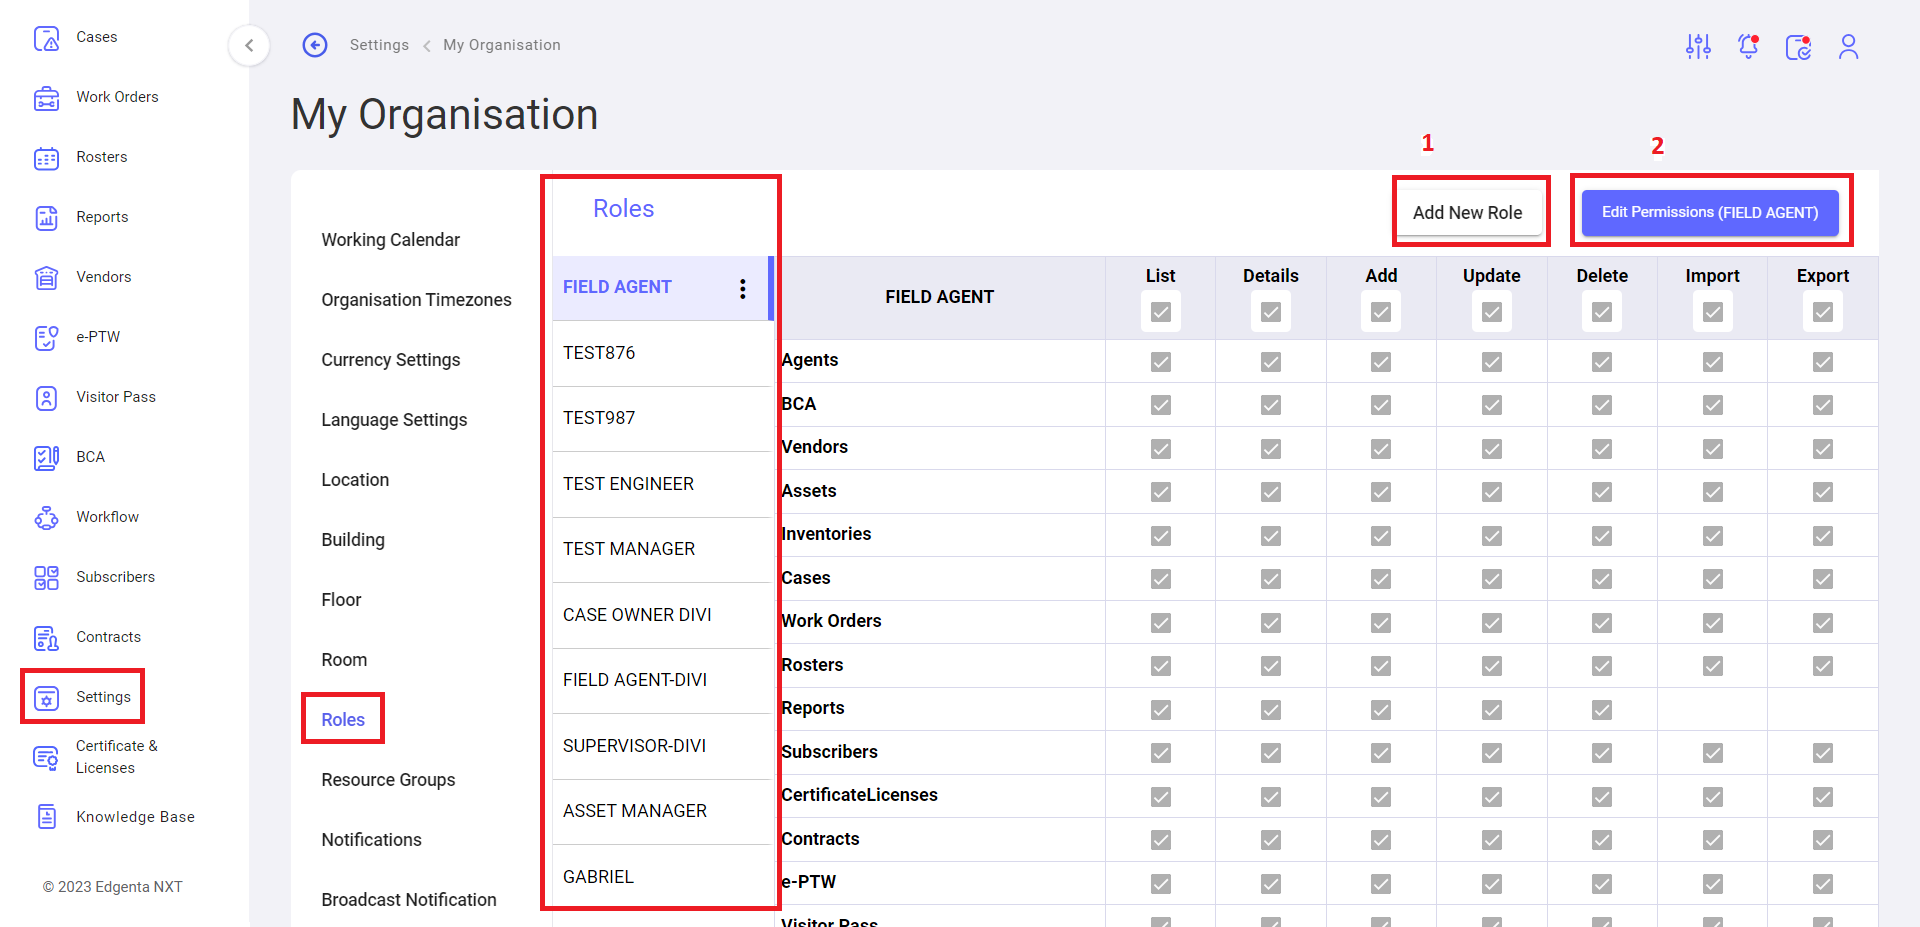
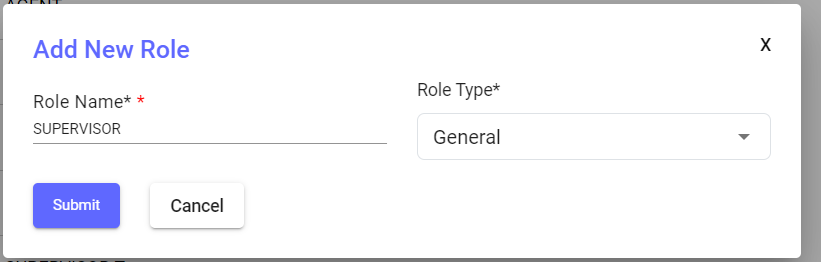
1.
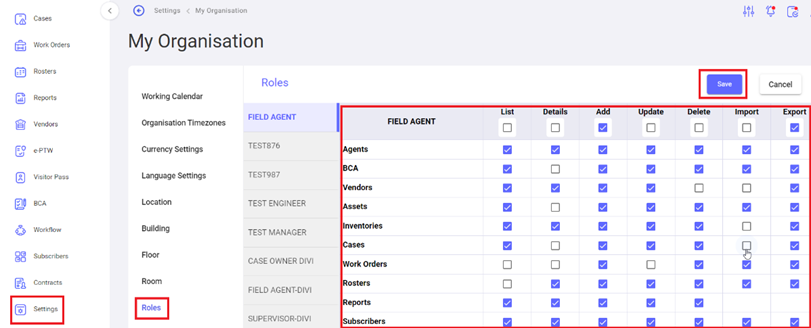
2.YouPermissions cangivebepermissionsassigned torole,aclickrole by clicking oneditthepermissions"EditbuttonPermissions"selectbutton.checkSelectboxesthe checkboxes togivegrant permissions forselectedtherole which ispreviously createdearlierrole, as shownbyinbelowthescreenshot.screenshot below.

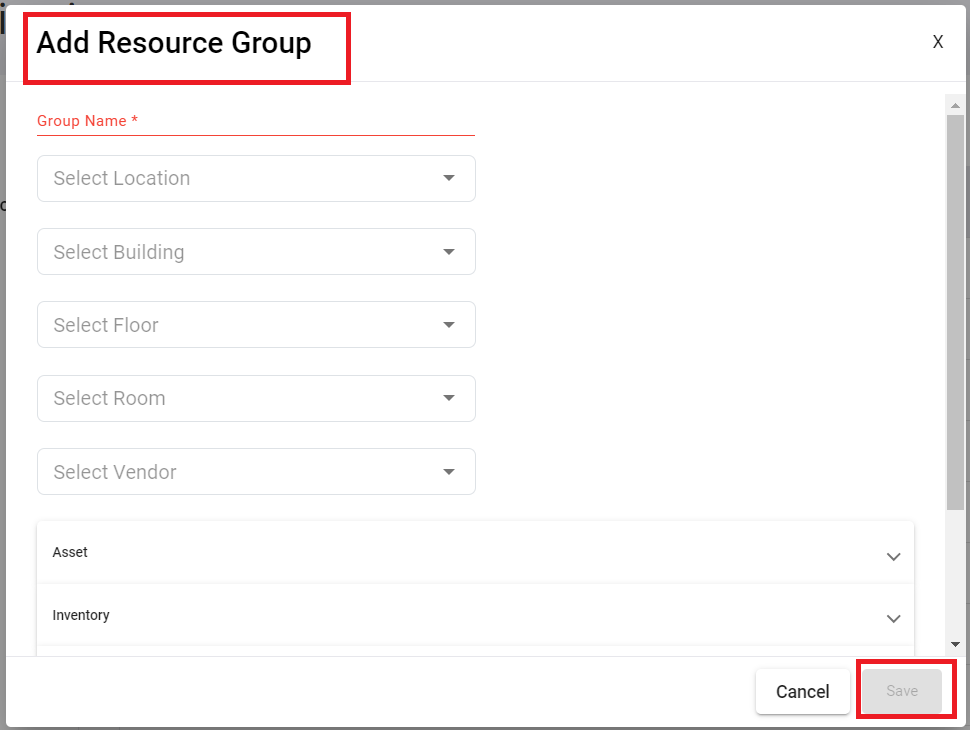
Settings -> My Organization -> Resource Groups:
UserThe user can create a new resource group by clicking on the add"Add Resource Group" button. This resource group button, which we can then usebe inused across various modulesmodules, likesuch as agents and assetsasset creation.
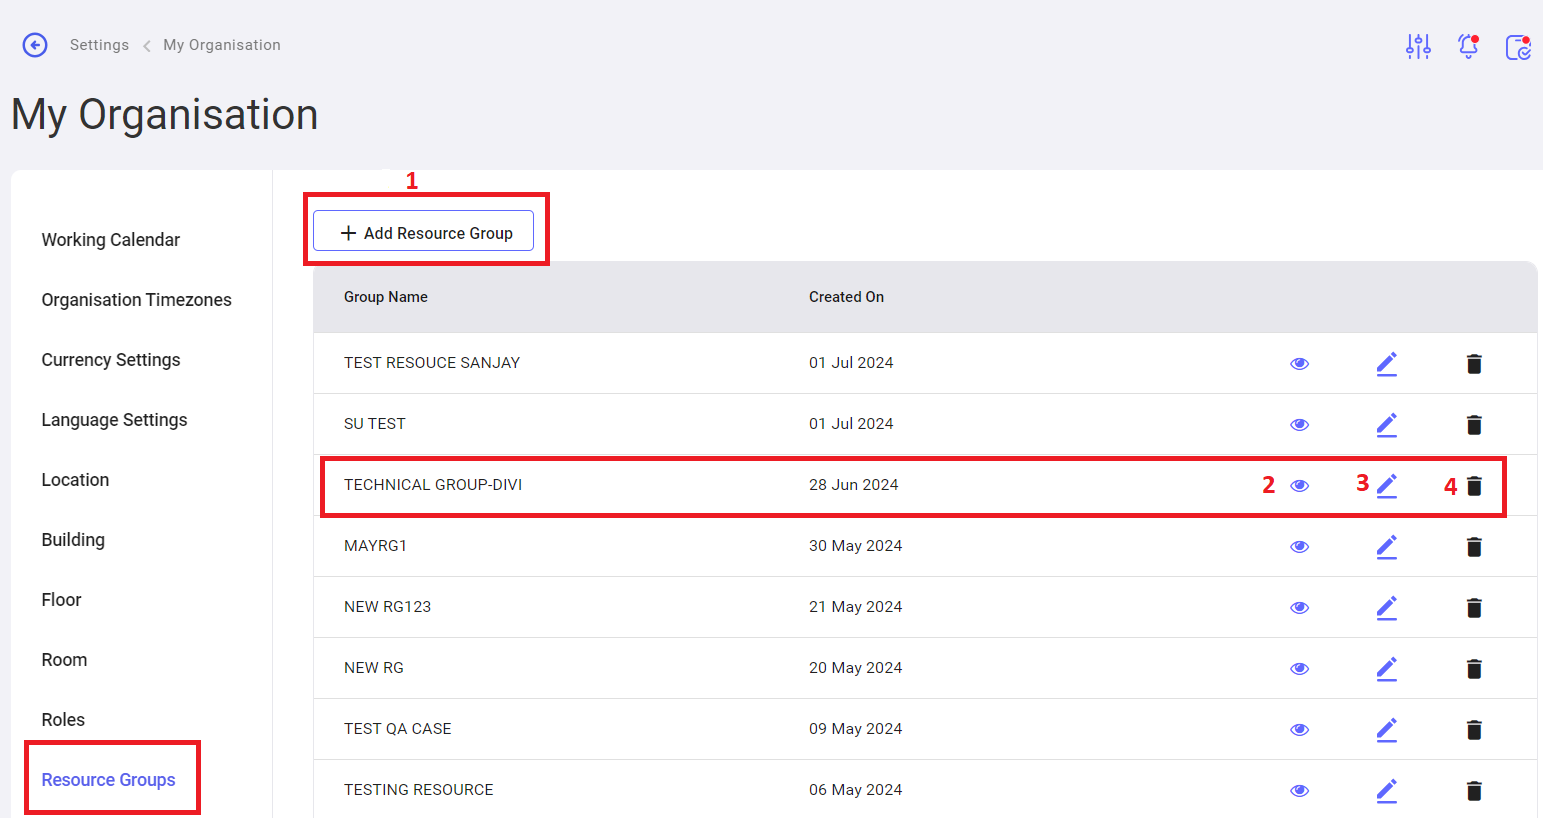
1.
youthe click"Add onResource “add resource group”Group" button is clicked, the following page will be displayed,displayed. fillFill in all the all- mandatory fields thento onlyenable savethe button"Save" willbutton. beClick enabled,the click on save"Save" button to save the resource group.
2. HereView youthe candetails viewof the selected resource group whichthat iswas created earlier.
3. HereEdit youthe candetails editof the selected resource group whichthat iswas created earlier.
4. Here you can deleteDelete the selected resource group whichthat iswas created earlier.
iii. SSettingsettings -> Agents -> Skillset:

1. skillset:Skillset Here you can add new skillset to use in various modules like agents and assets.: To create a new skillset, you can type the skillset name in skillsetthe text box thenand click onthe “add"Add skillset”Skillset" button.
2. a time,once, click onthe bulk upload button,button. downloadDownload csvthe fileCSV andfile, fill in the datadata, then and upload the file to save multiple skillsets.
3. YouEdit canan existing skillset by clicking the edit icon in each row of the skillset whichlist.
is added earlier by clicking on edit icons available in every row of skillset list.
4. YouDelete canan delete the already addedexisting skillset by clicking onthe delete icons availableicon in everyeach row of the skillset list.
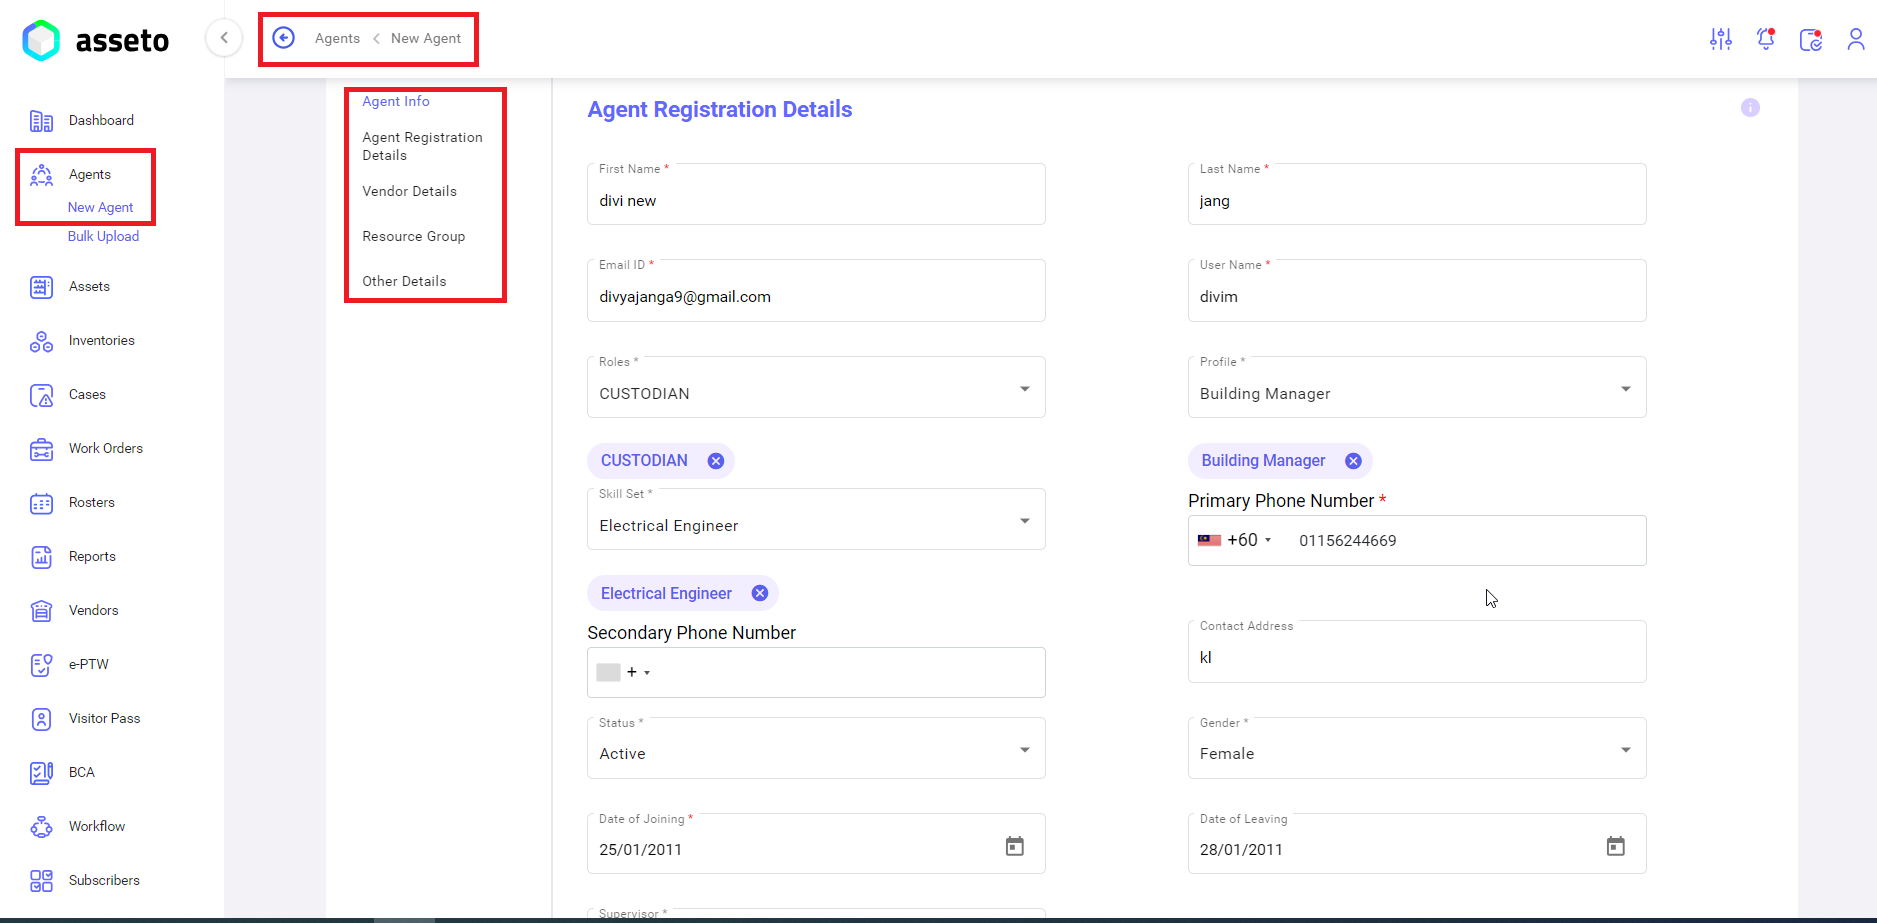
Fill in all mandatory and non-mandatory fields to save the agent details.
Note: For more details, please review 2. Agents module 2.2. Pre-requisites for agent(s) creation and 2.3. New Agent.
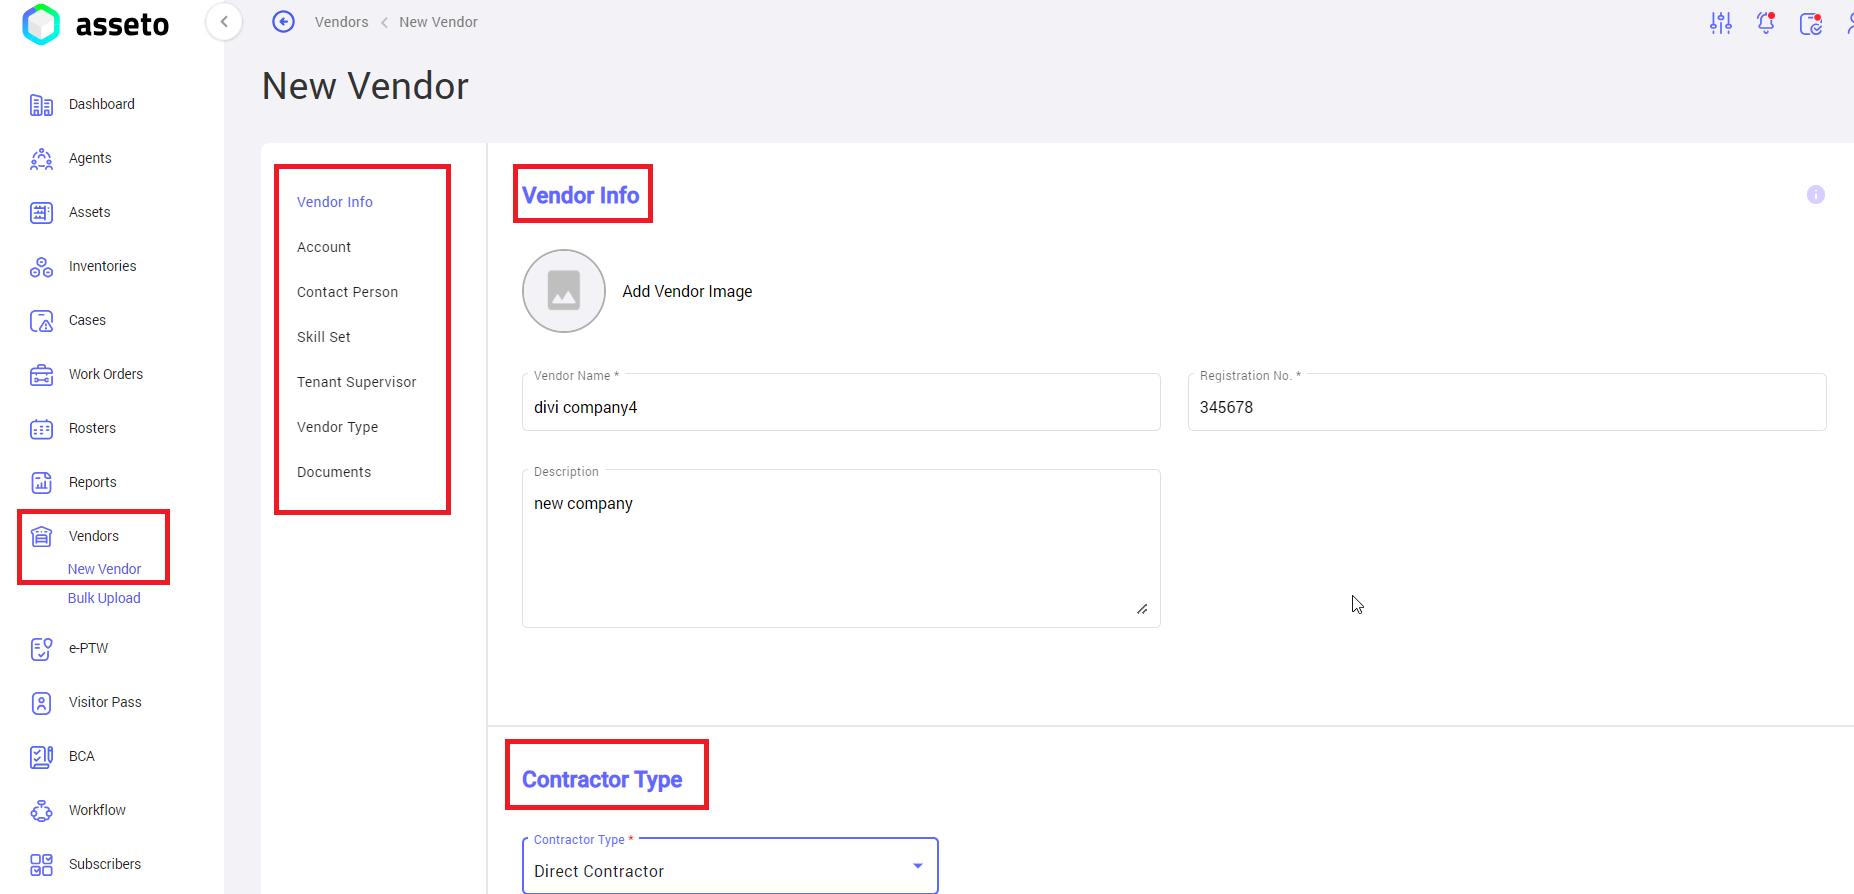
Fill the mandatory and non-mandatory fields to save the vendor details.
Note: For more details, please review 9. Vendor module 9.2. Pre-requisites for vendor creation and 9.3. New Vendor.