4. Inventories
By using this feature user can onboard the inventories and edit (based on permissions assigned to user).
This module has the following features.
- New Inventory
- Bulk Upload
- StockTake
- StockUpdate
- 4.1. Inventories Dashboard
- 4.2. Pre-requisite for Inventory Creation
- 4.3. New Inventory
- 4.4. Bulk Upload
- 4.5. Inventory Detail View
- 4.6. Inventory Edit
- 4.7. Stocktake
- 4.8. StockUpdate
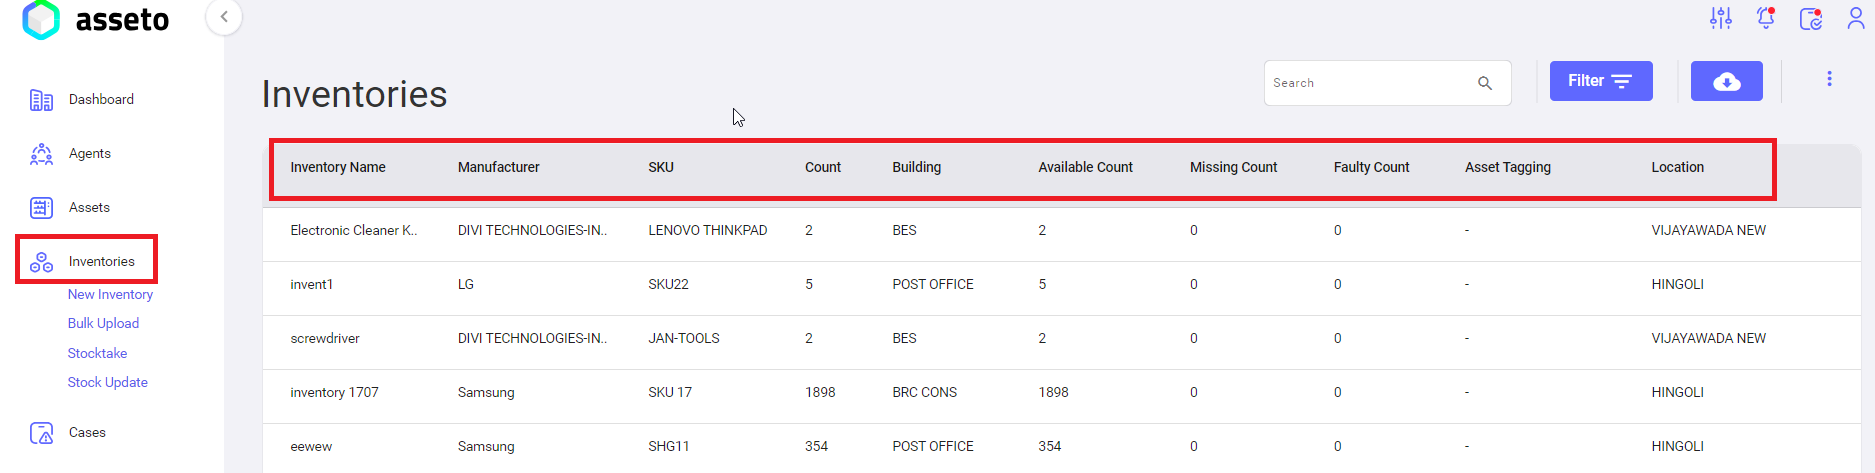
4.1. Inventories Dashboard
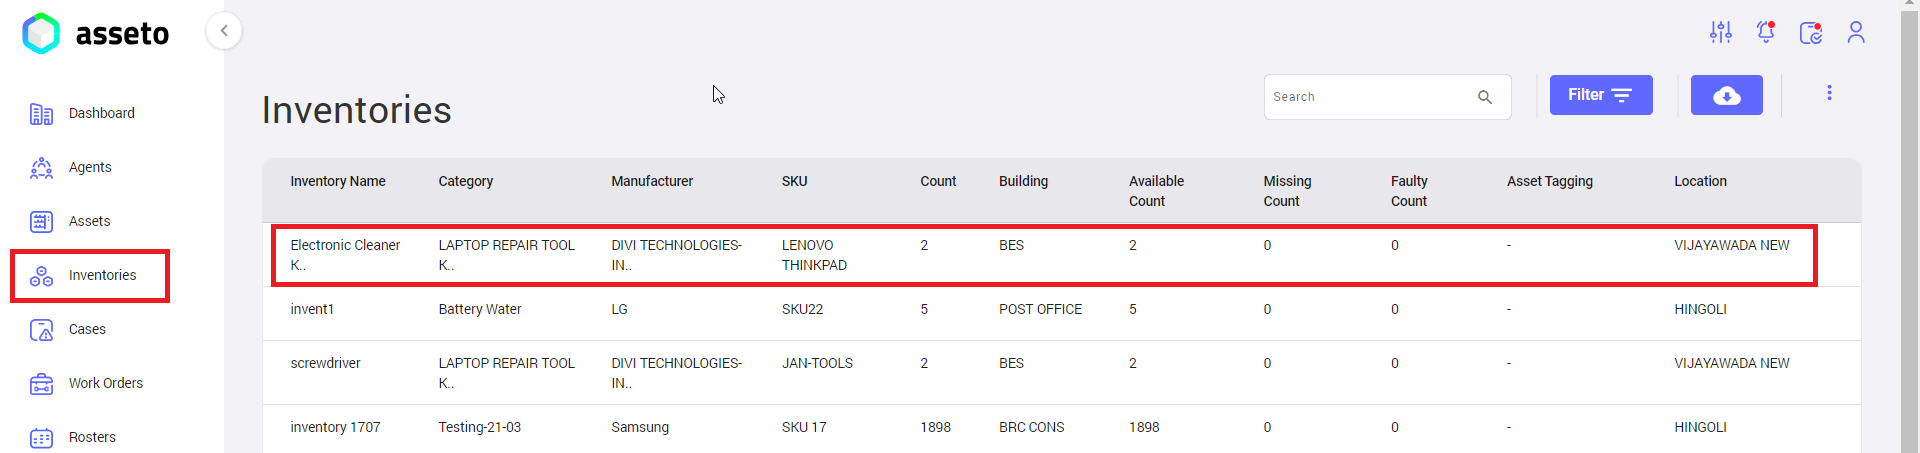
In this section, users can view all inventories within the system. They also have the option to edit inventory details through the detailed view page.
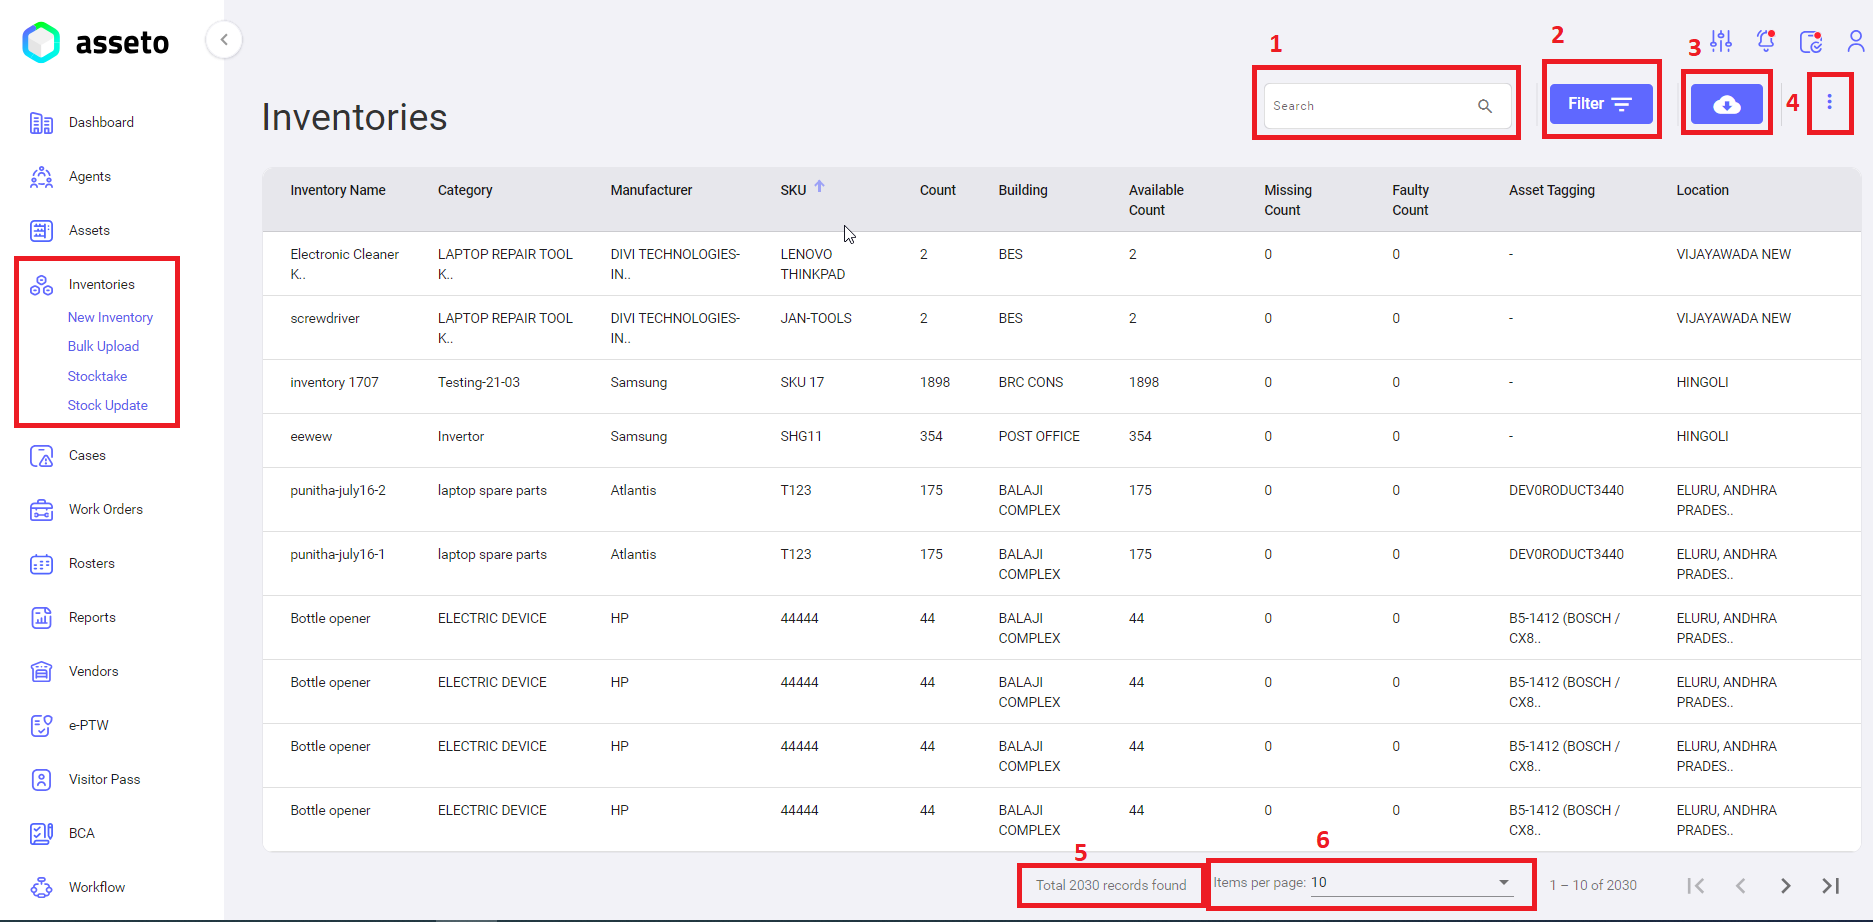
Inventories dashboard having following features
1. Search: Users can search for any inventory by entering the inventory name. The relevant information will be displayed in the inventory table, along with the count of the records found.
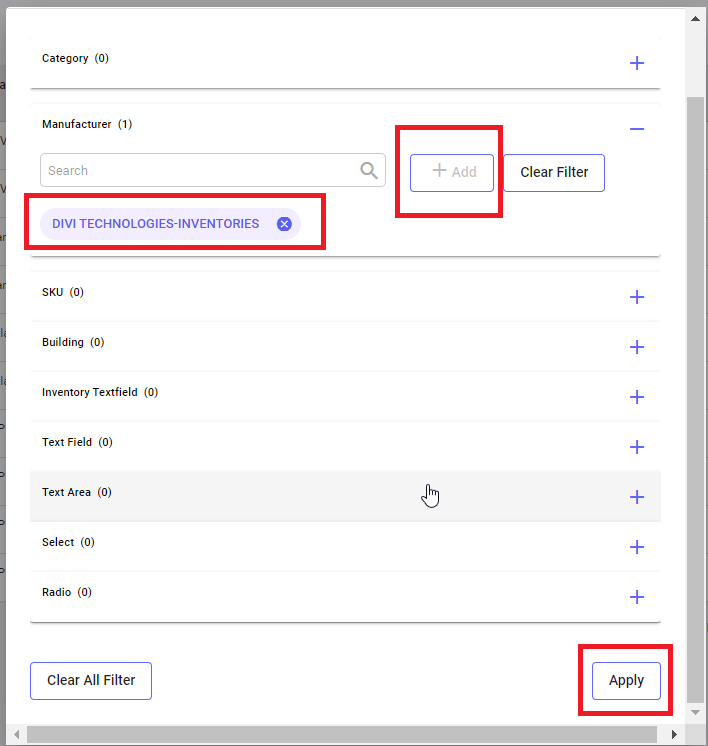
2. Filter: This feature allows users to refine their search by selecting filters such as Category, Manufacturer, and Model. After selecting the desired options from the displayed list, clicking the "Apply" button will populate the relevant information in the table, showing results that match the selected criteria.
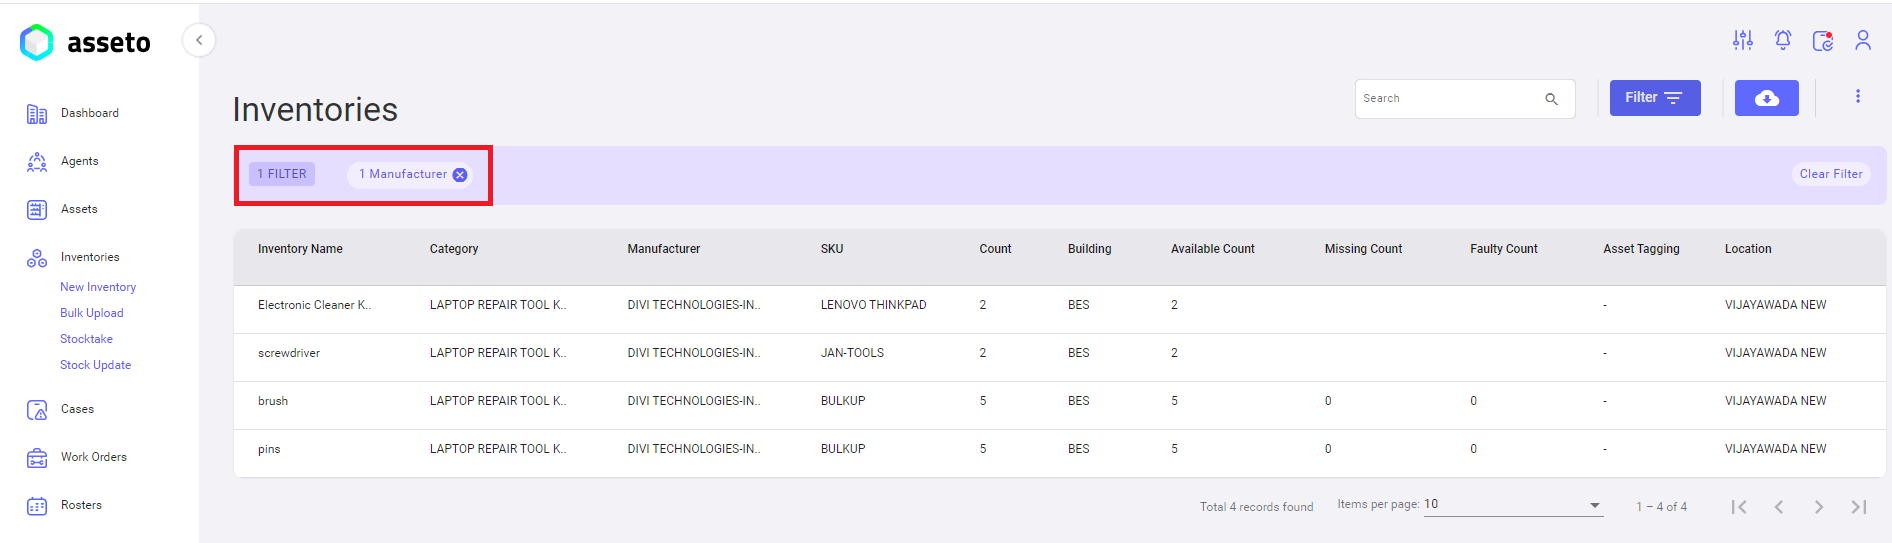
Users can view the filtered results in the inventories table columns, as displayed in the following screenshot. The table will show the relevant inventory details based on the applied filter criteria.
3. Export: To export the inventory list, inventory history, stocktake template, and stock update template, the user can select the desired option from the export feature available on the page

4. Customize Table View: The user can customize the table by selecting various columns and then clicking the "Save" button. This will update the displayed table according to the chosen columns, as shown in the following screenshot.
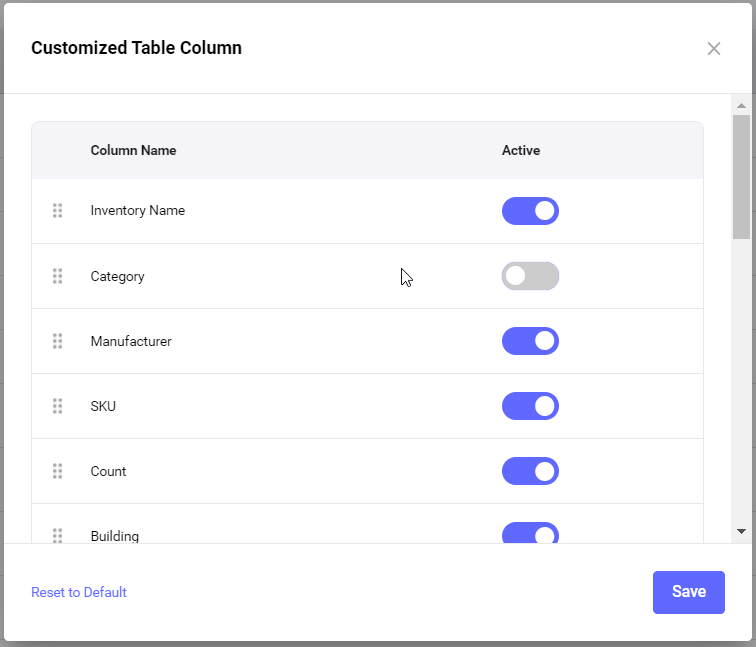
The selected columns will populate in the Inventory list table, displaying the corresponding data, as shown in the following screenshot.
5. Total Records: The total number of inventory records in the system is displayed at the bottom of the inventory list.
6. Pagination: The user can select pagination options (5, 10, 25, 100) to display the desired number of records in the list. The pagination view is available next to the total number of records displayed at the bottom of the inventory list.
4.2. Pre-requisite for Inventory Creation
Before onboarding inventories, the user must configure the necessary settings such as Inventory Category, Manufacturer, SKU, Stock Room, Location, and Currency within the Settings module.
Settings -> Inventories -> Inventory category:
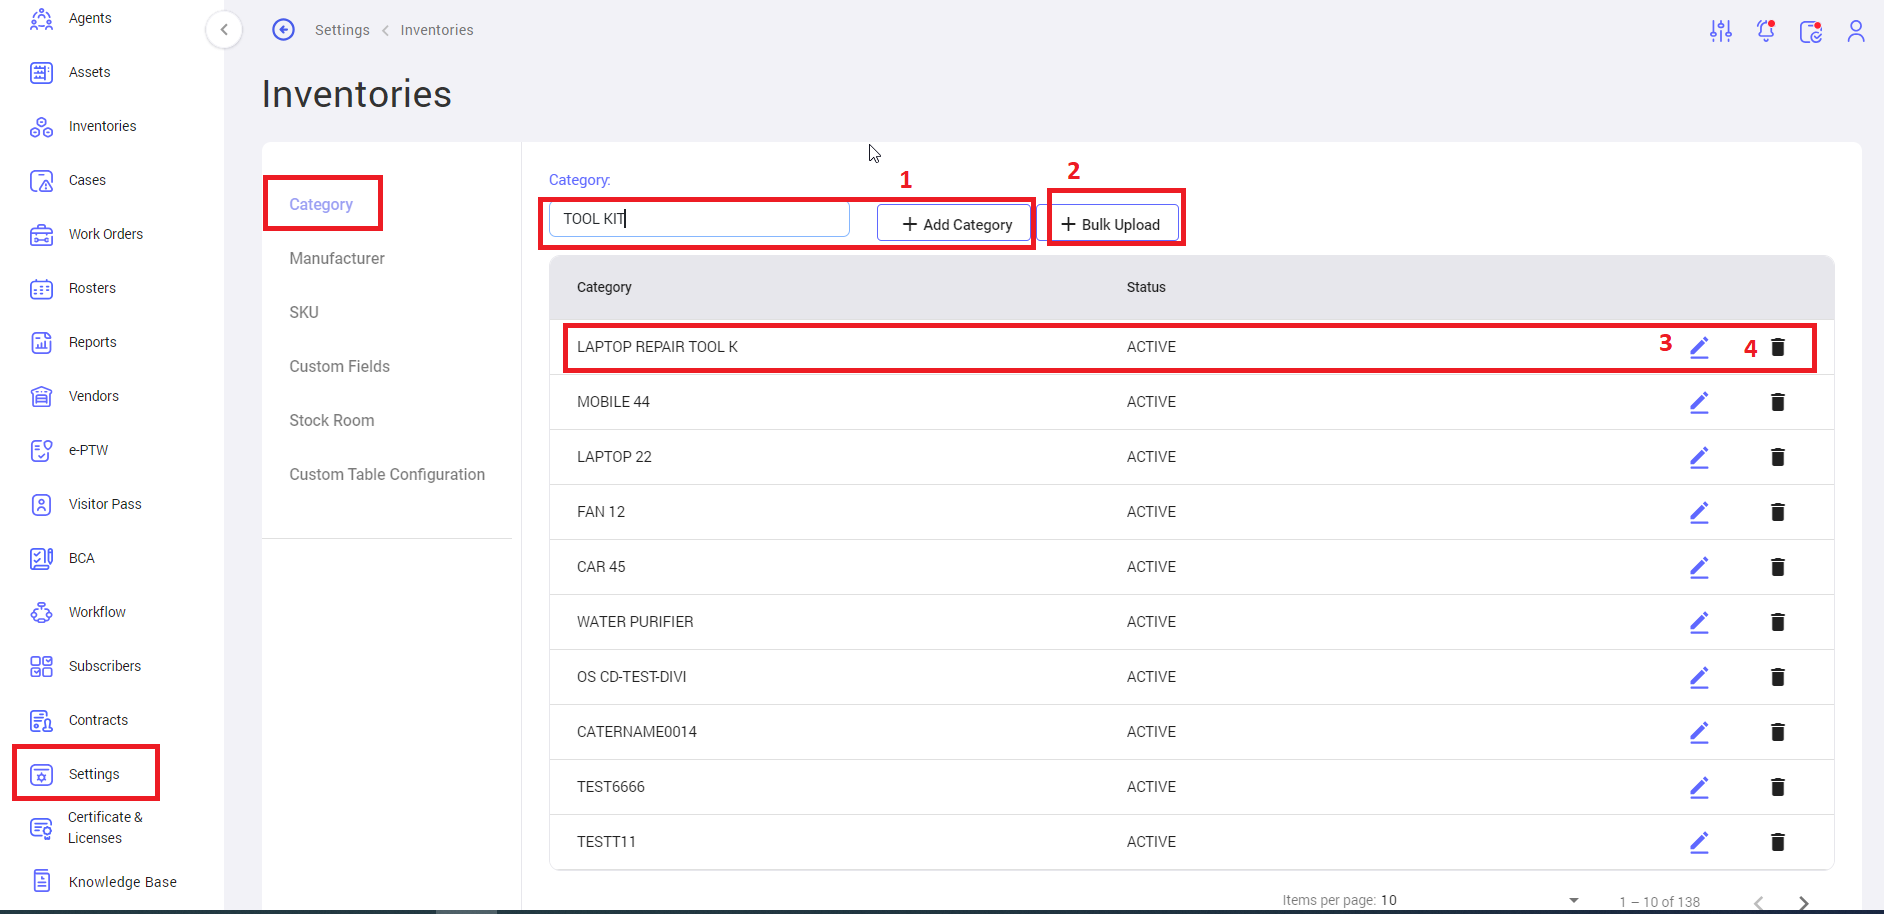
- Add Category: The user can type the category name in the text box and click on the "Add Category" button to add an individual category.
- Bulk Upload: The user can click on the bulk upload button to create multiple categories at a time. Download the CSV file, fill in the data, and upload it.
- Edit Category: The user can edit already created categories by clicking on the edit icon available in each row of the categories list.
- Delete Category: The user can delete already created categories by clicking on the delete icon available in each row of the categories list.
Settings -> Inventories -> Manufacturer
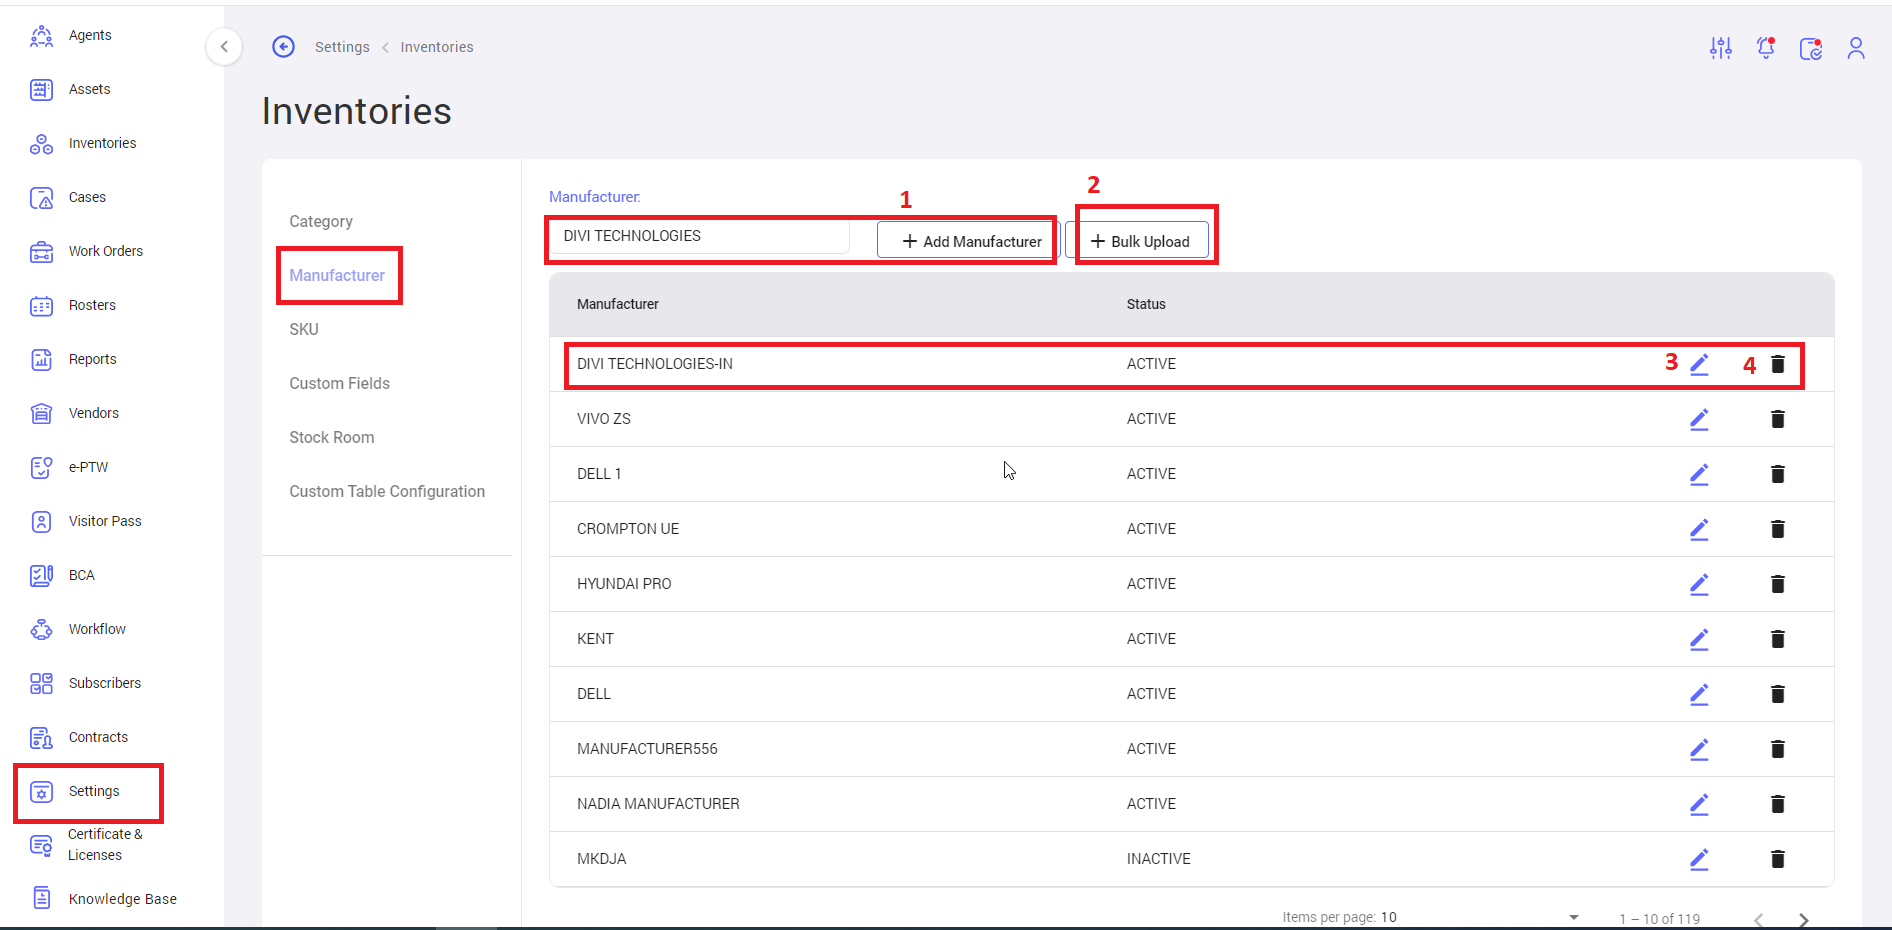
- Add Manufacturer: The user can type the manufacturer name in the text box and click on the "Add Manufacturer" button to add an individual manufacturer.
- Bulk Upload: The user can click on the bulk upload button to create multiple manufacturers at once. Download the CSV file, fill in the data, and upload it.
- Edit Manufacturer: The user can edit already created manufacturers by clicking on the edit icon available in each row of the manufacturer list.
- Delete Manufacturer: The user can delete already created manufacturers by clicking on the delete icon available in each row of the manufacturer list.
Settings -> Inventories -> SKU
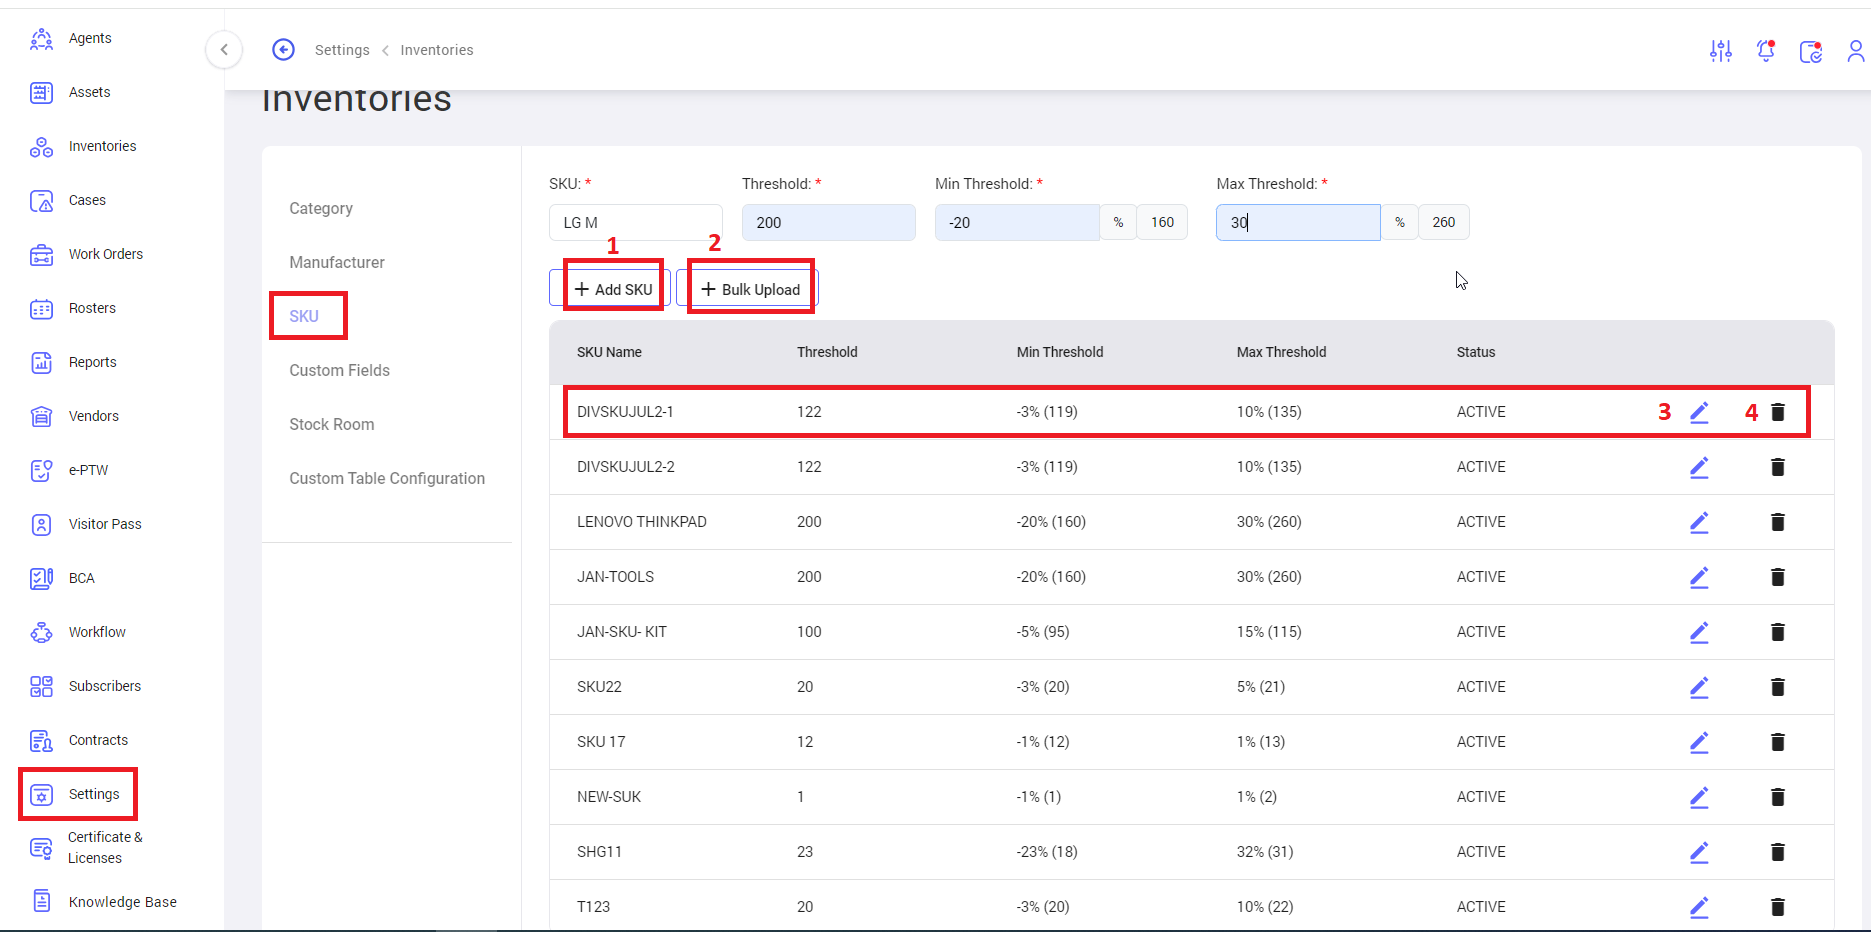
- Add SKU: The user can type the SKU name, Threshold, Min Threshold, and Max Threshold in the respective text boxes and click on the "Add SKU" button to add an individual SKU. (Note: Every inventory has individual SKU, for every inventory type we have to create separate SKU in settings.)
- Bulk Upload: The user can click on the bulk upload button to create multiple SKUs at once. Download the CSV file, fill in the data, and upload it.
- Edit SKU: The user can edit or update already created SKUs by clicking on the edit icon available in each row of the SKU list.
- Delete SKU: The user can delete already created SKUs by clicking on the delete icon available in each row of the SKU list.
Settings -> Inventories -> Stock Room
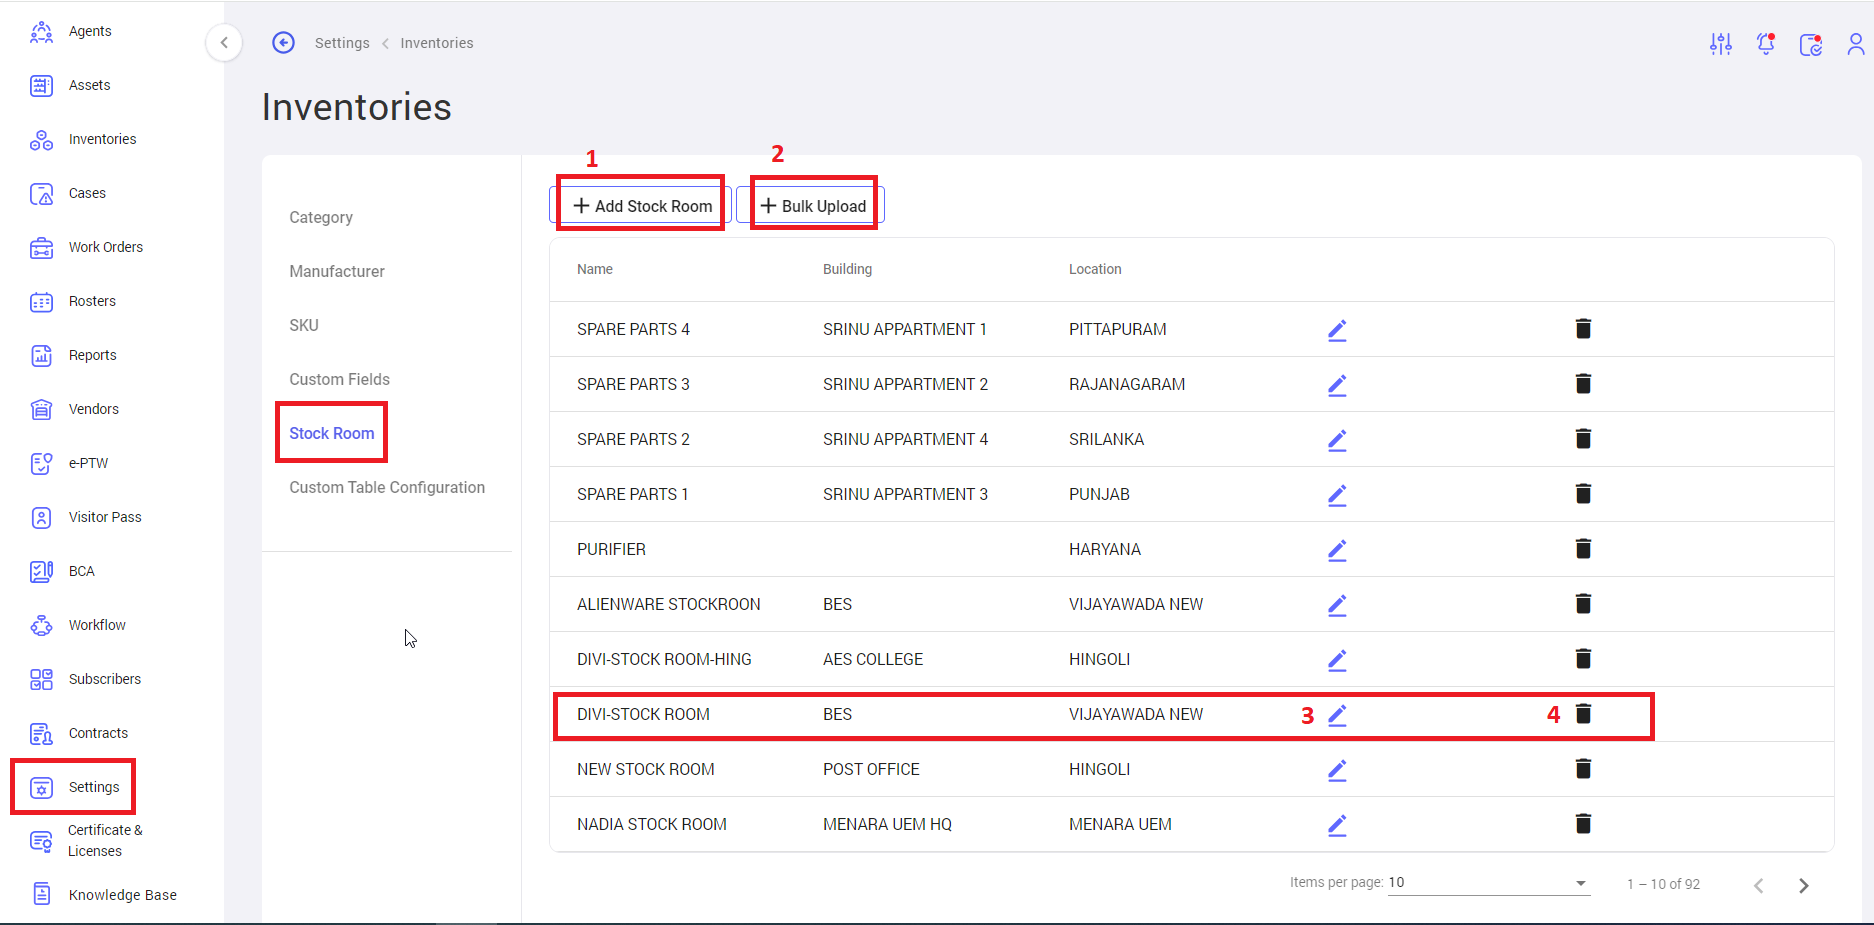
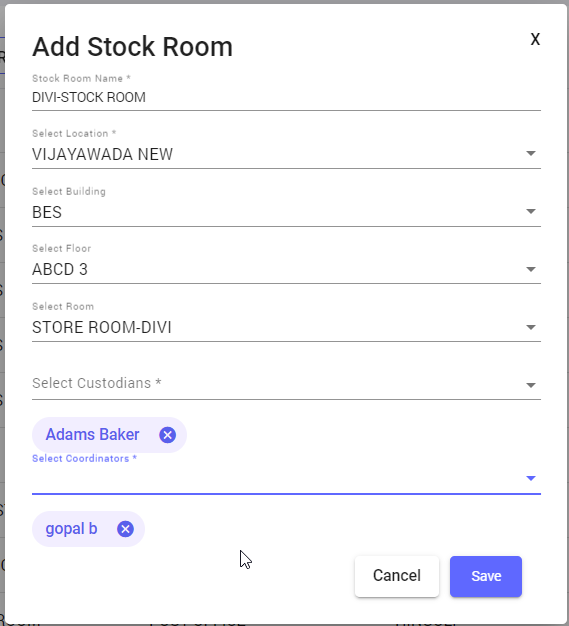
- Add Stock Room: The user can click on the "Add Stock Room" button to add an individual stock room. A page will be displayed where the user must fill in all mandatory fields for the save button to be enabled. Upon clicking the save button, the stock room will be created.
 Note: Every inventory has an individual stock room, and for each inventory type, a separate stock room must be created in the settings.
 - Bulk Upload: The user can click on the bulk upload button to create multiple stock rooms at once. Download the CSV file, fill in the required data, and upload it.
- Edit Stock Room: The user can edit or update an already created stock room by clicking on the edit icon available in each row of the stock room list.
- Delete Stock Room: The user can delete an already created stock room by clicking on the delete icon in each row of the stock room list.
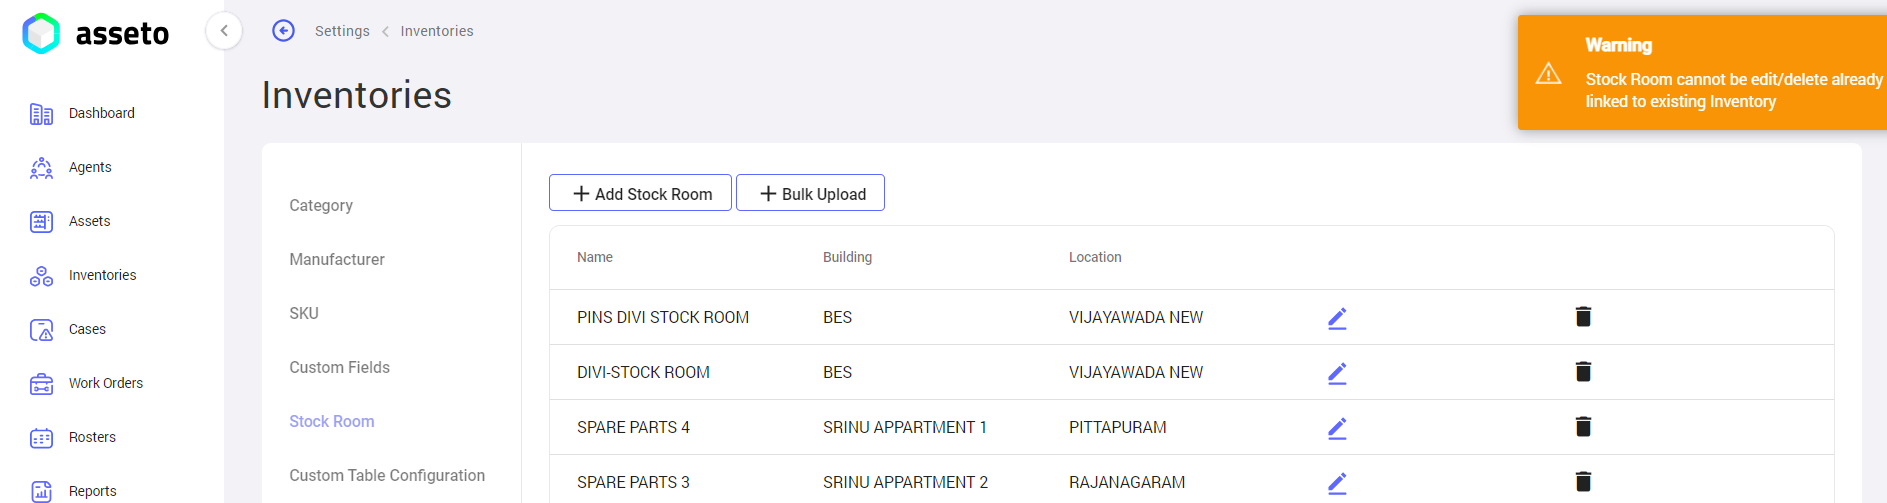
 Note: If a stock room is linked to an existing inventory, the user cannot edit or update the details, and the system will display a warning message.
Settings -> My Organization -> Location
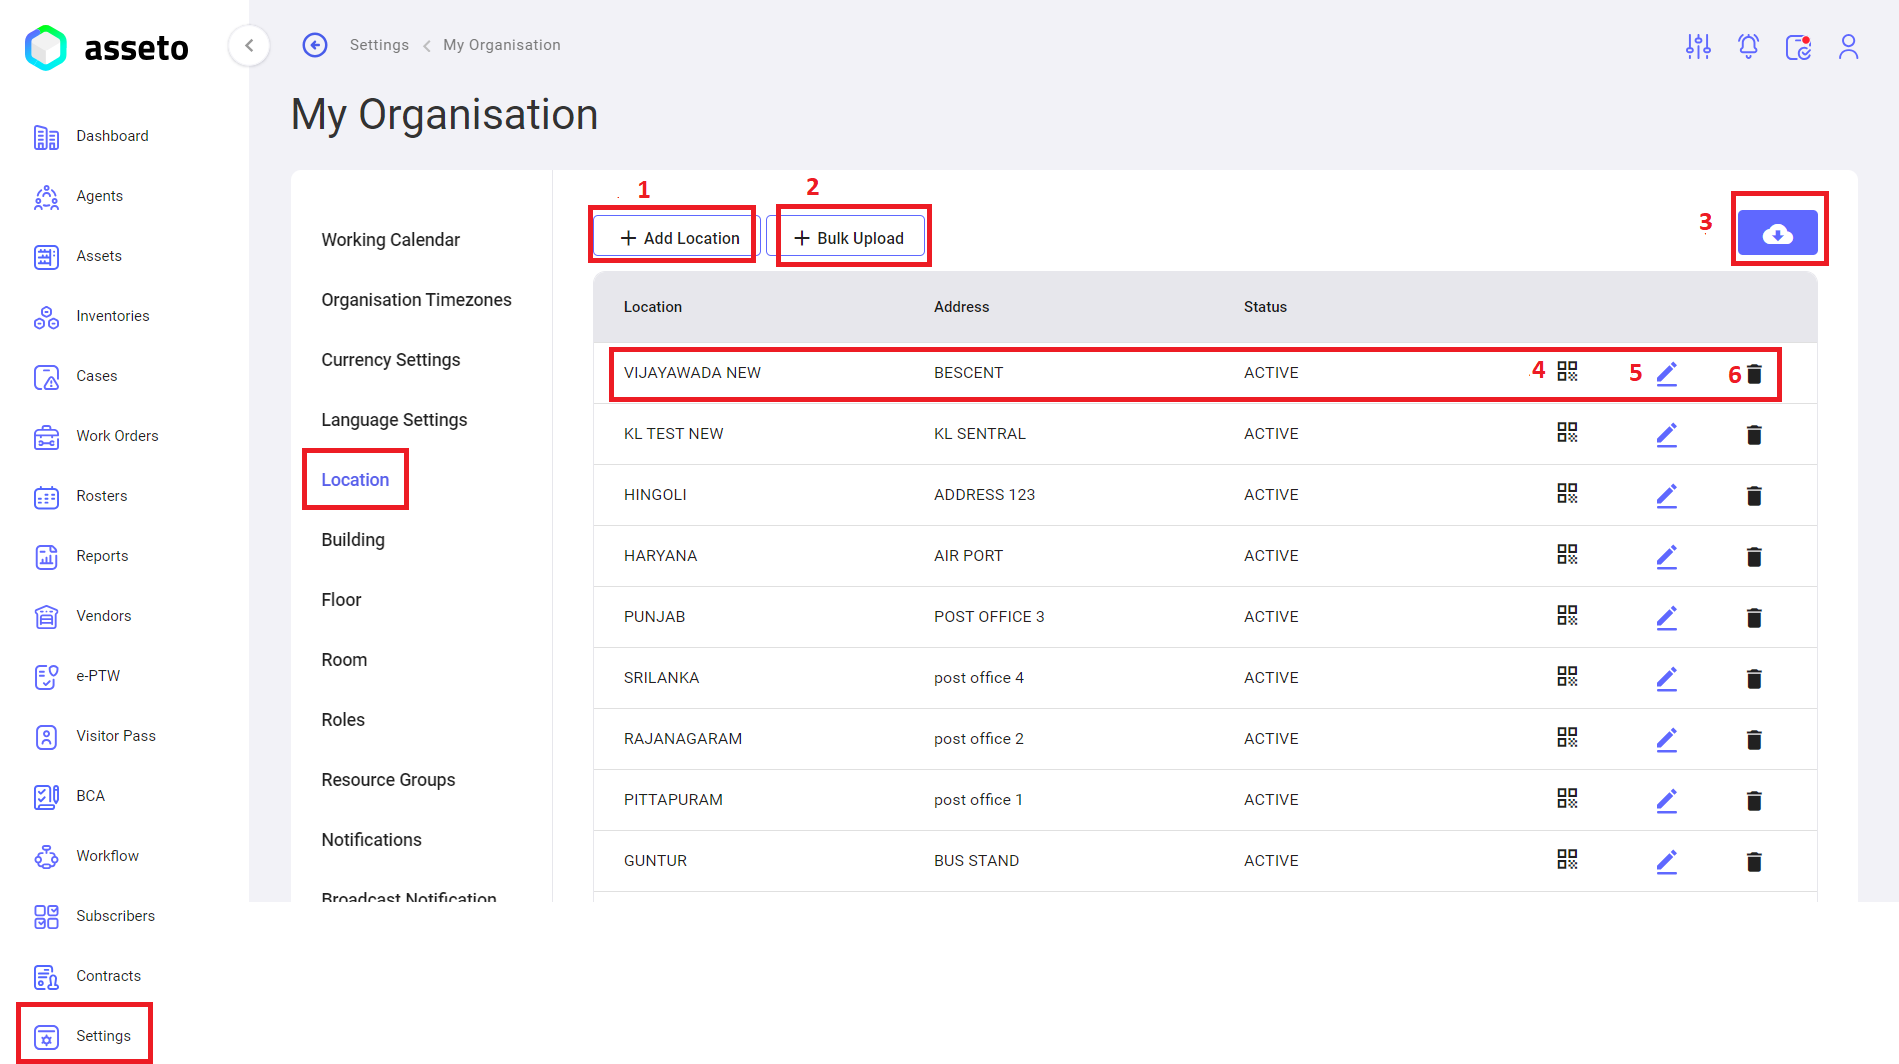
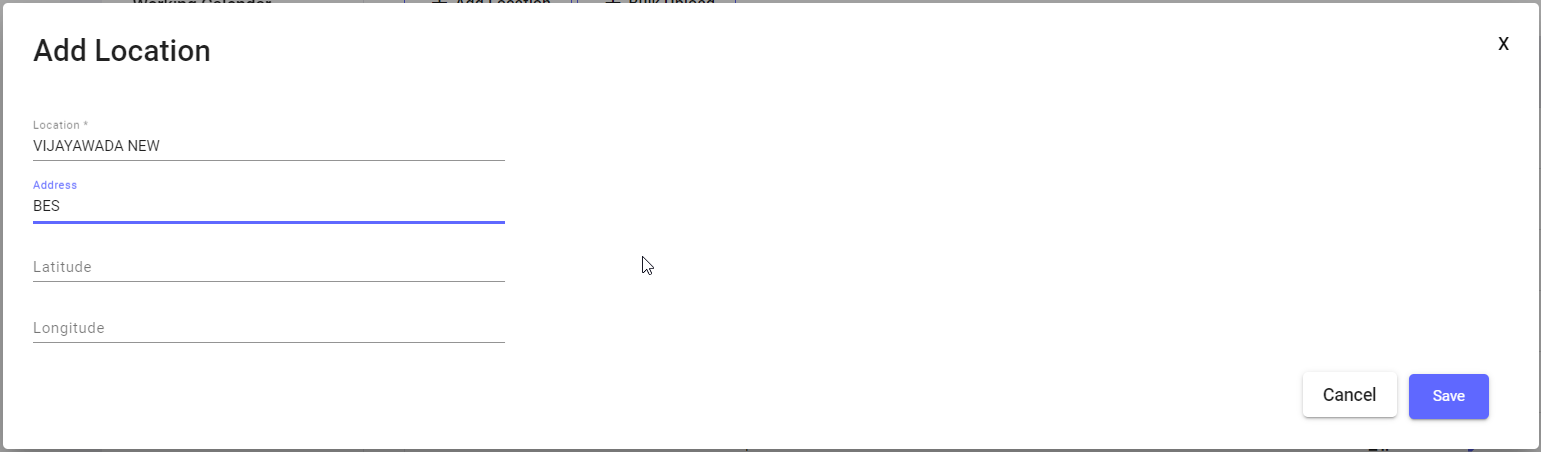
- Add Location: The user can click on the "Add Location" button to create an individual location.
 When the button is clicked, a page will appear where the user must fill in the mandatory fields. Once all required fields are completed, the save button will be enabled. Upon clicking the save button, the location details will be saved and displayed in the first row of the table.
 - Bulk Upload Location: The user can click on the bulk upload button to create multiple locations simultaneously. Download the CSV file, fill in the necessary data, and upload it.
- Export Button: To download the QR list (locations), the user can export the data either with or without images.
- QR: The user can click on the QR icon and scan the QR code to view the respective location.
- Edit Location: The user can edit already created locations by clicking on the edit icon available in each row of the location list.
- Delete Location: The user can delete already created locations by clicking on the delete icon available in each row of the location list.
Settings -> My Organization -> Building: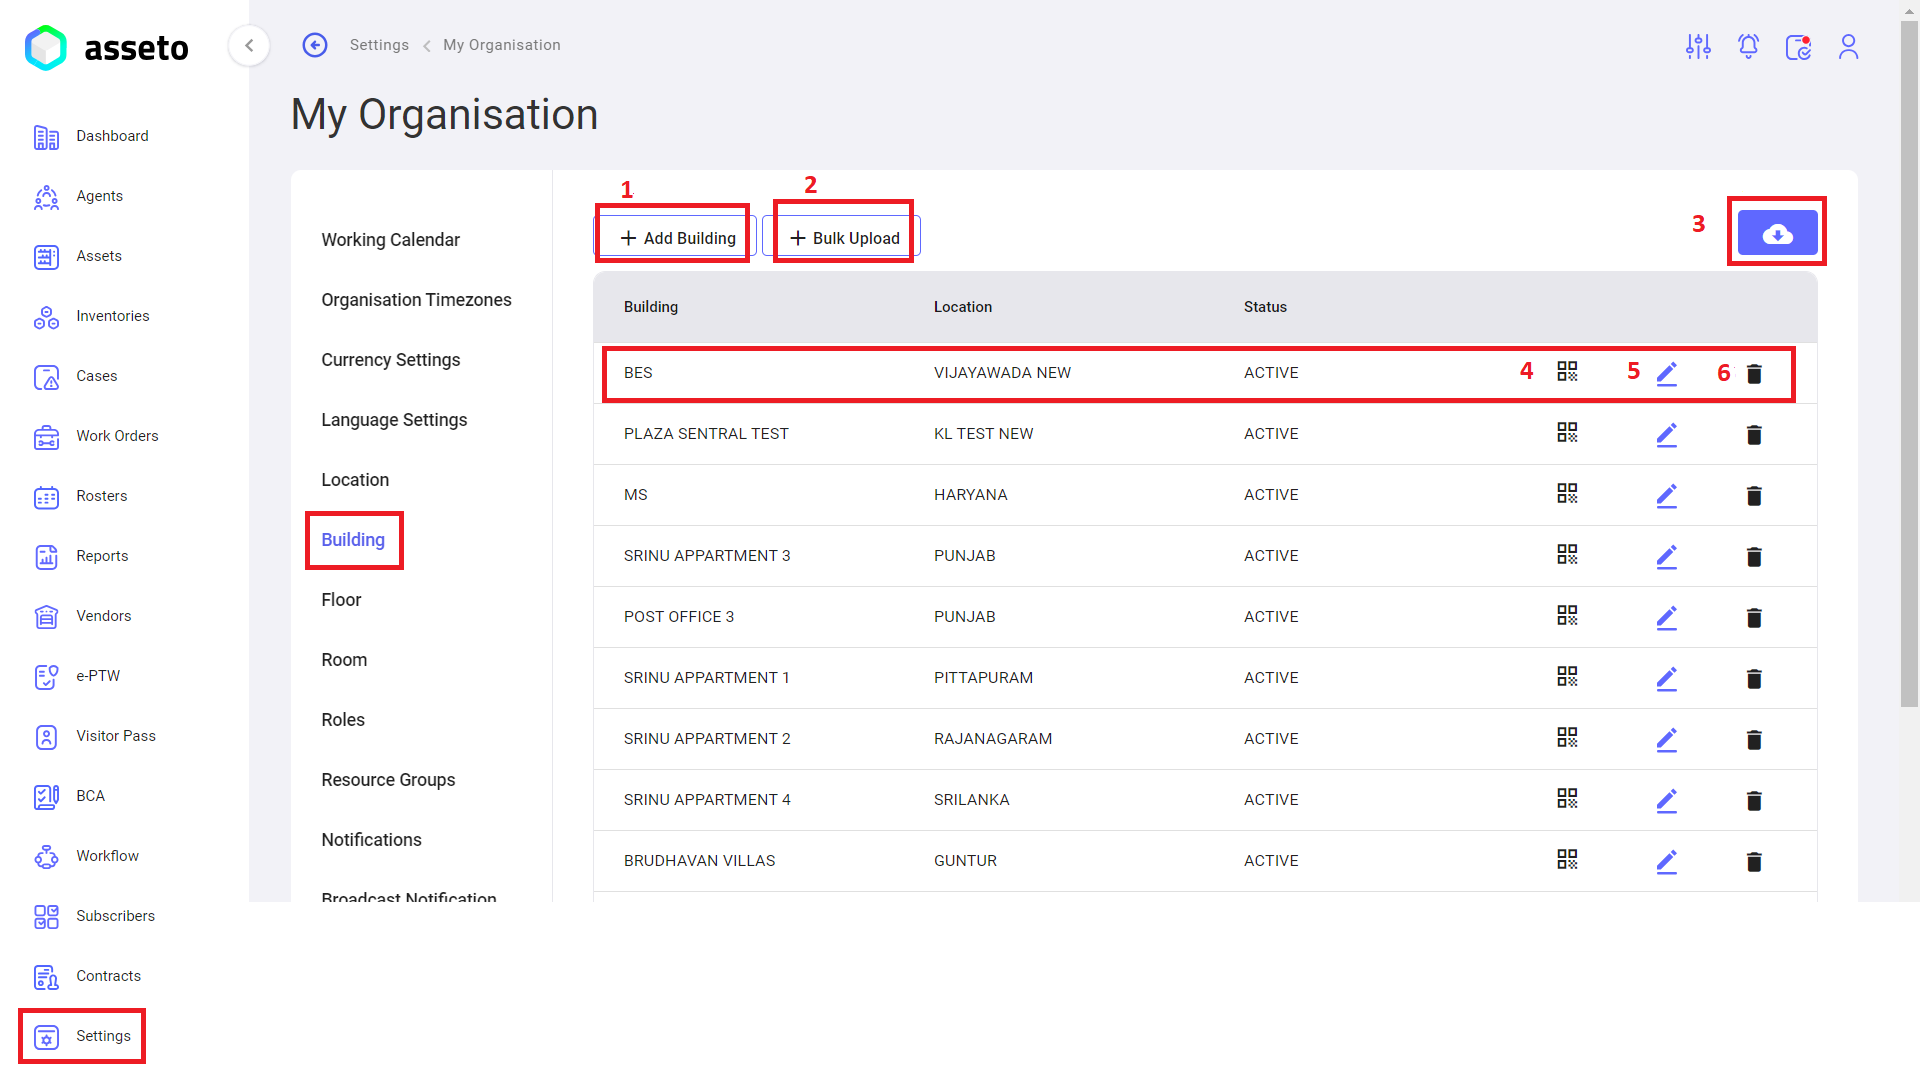
- Add Building: Click on the "Add Building" button to create an individual building name.
 When clicking on the “Add Building” button, the following page will appear. Fill in the mandatory fields; only then will the save button be enabled. Click on the save button, and your building details will be saved and displayed in the first row of the table.
 - Bulk Upload Building: Click on the bulk upload button to create multiple buildings at once. Download the CSV file, fill in the data, and then upload it.
- Export button: To download a QR list (buildings), you can export it with or without an image.
- QR: Click on the QR icon and scan the QR code to view the building name along with the location.
- Edit Building: Edit already created building names by clicking on the edit icon available in each row of the building list.
- Delete Building: Delete already created building names by clicking on the delete icon available in each row of the building list.
Settings -> My Organization -> Floor:
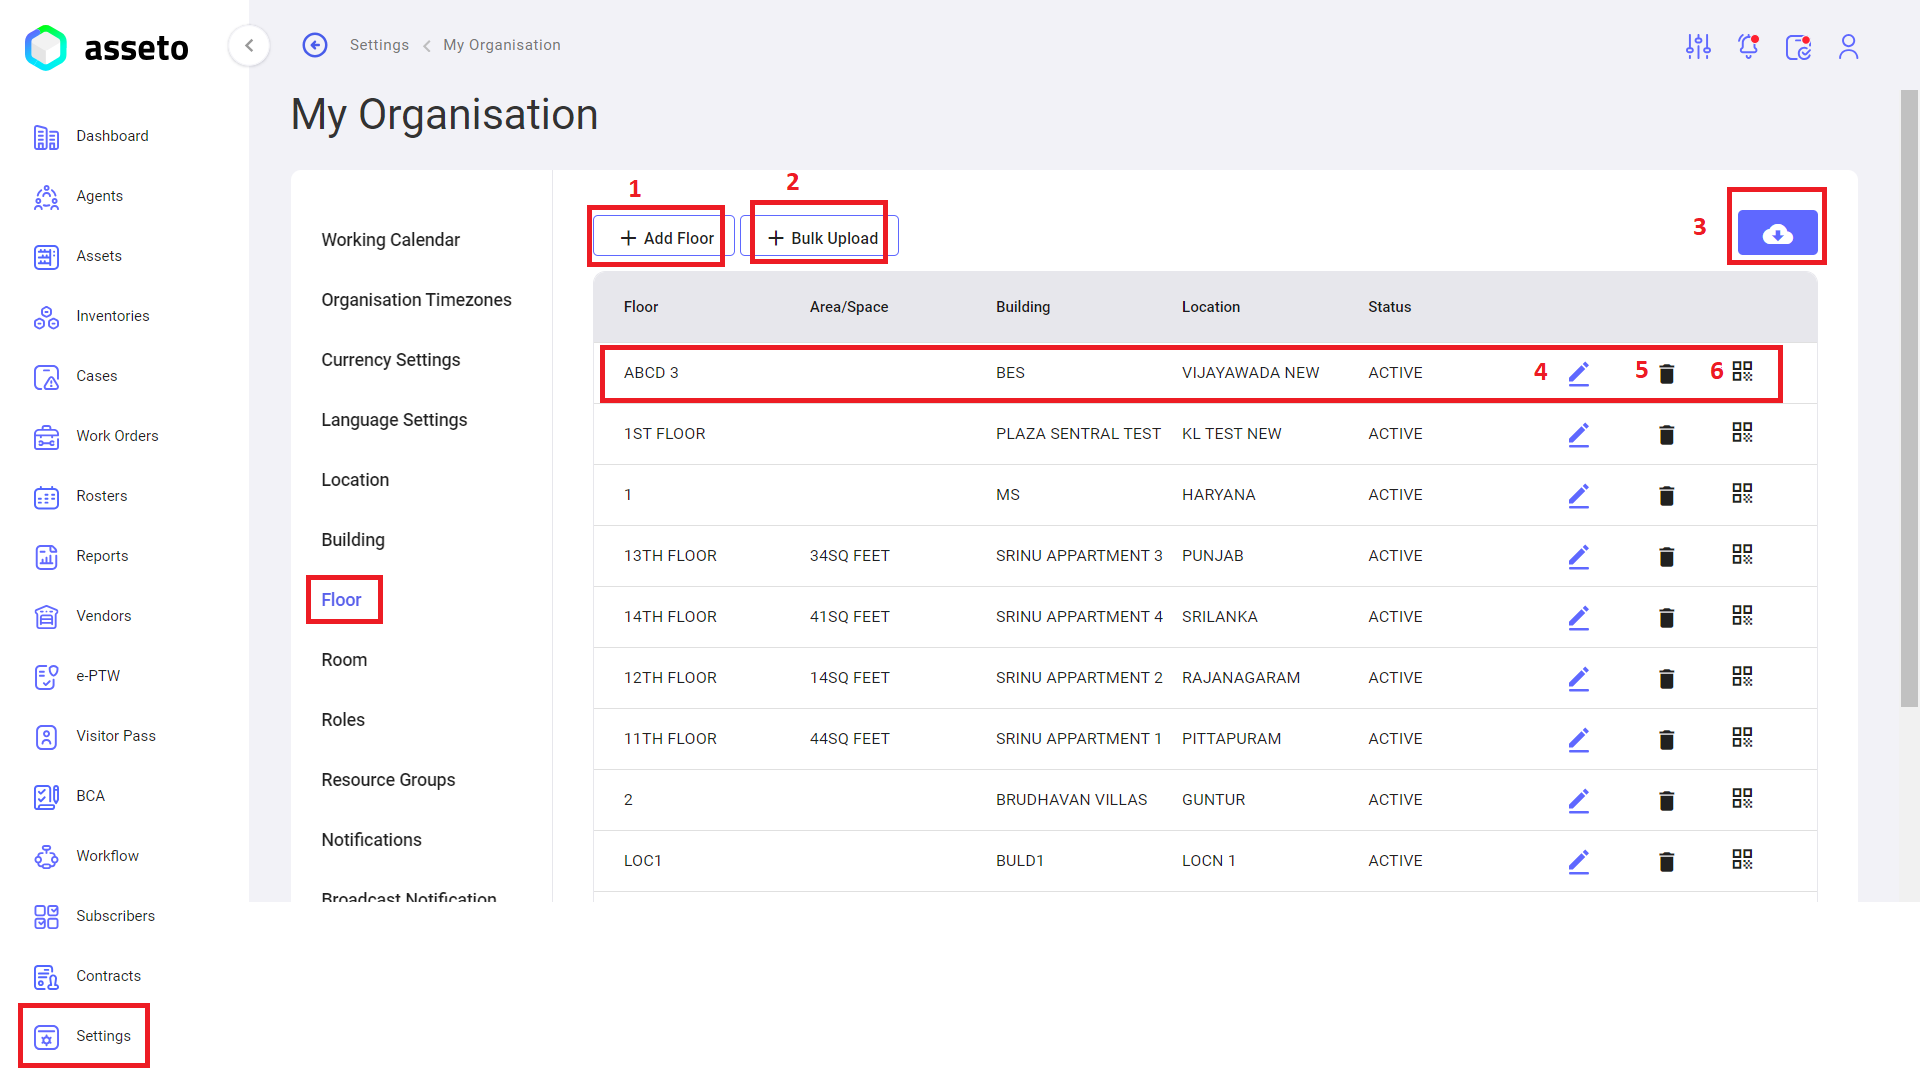
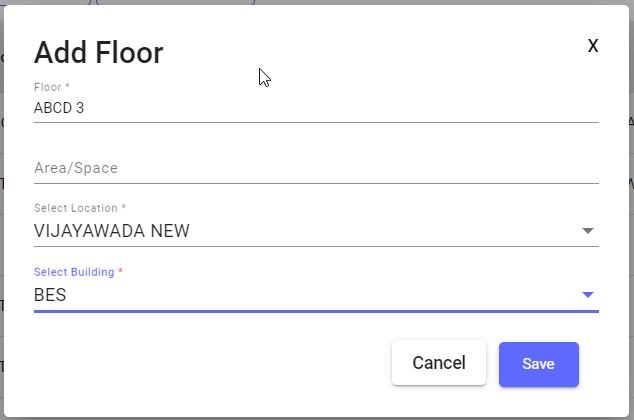
- Add Floor: Click on the "Add Floor" button to create an individual floor name.
 When the "Add Floor" button is clicked, the following page will appear. Fill in all mandatory fields, and once complete, the "Save" button will be enabled. Click on "Save" to store the floor details, which will then be displayed in the first row of the table.
 - Bulk Upload Floor: Click on the "Bulk Upload" button to create multiple floors at once. Download the CSV file, fill in the required data, and upload it.
- Export: Use the "Export" button to download the QR list of floors, with the option to export with or without images.
- Edit Floor: To modify an existing floor, click on the "Edit" icon available in each row of the floor list.
- Delete Floor: To remove a floor, click on the "Delete" icon in each row of the floor list.
- QR: Click on the QR icon to generate and scan the QR code, allowing the user to view the floor name along with its location.
Settings -> My Organization -> Room:
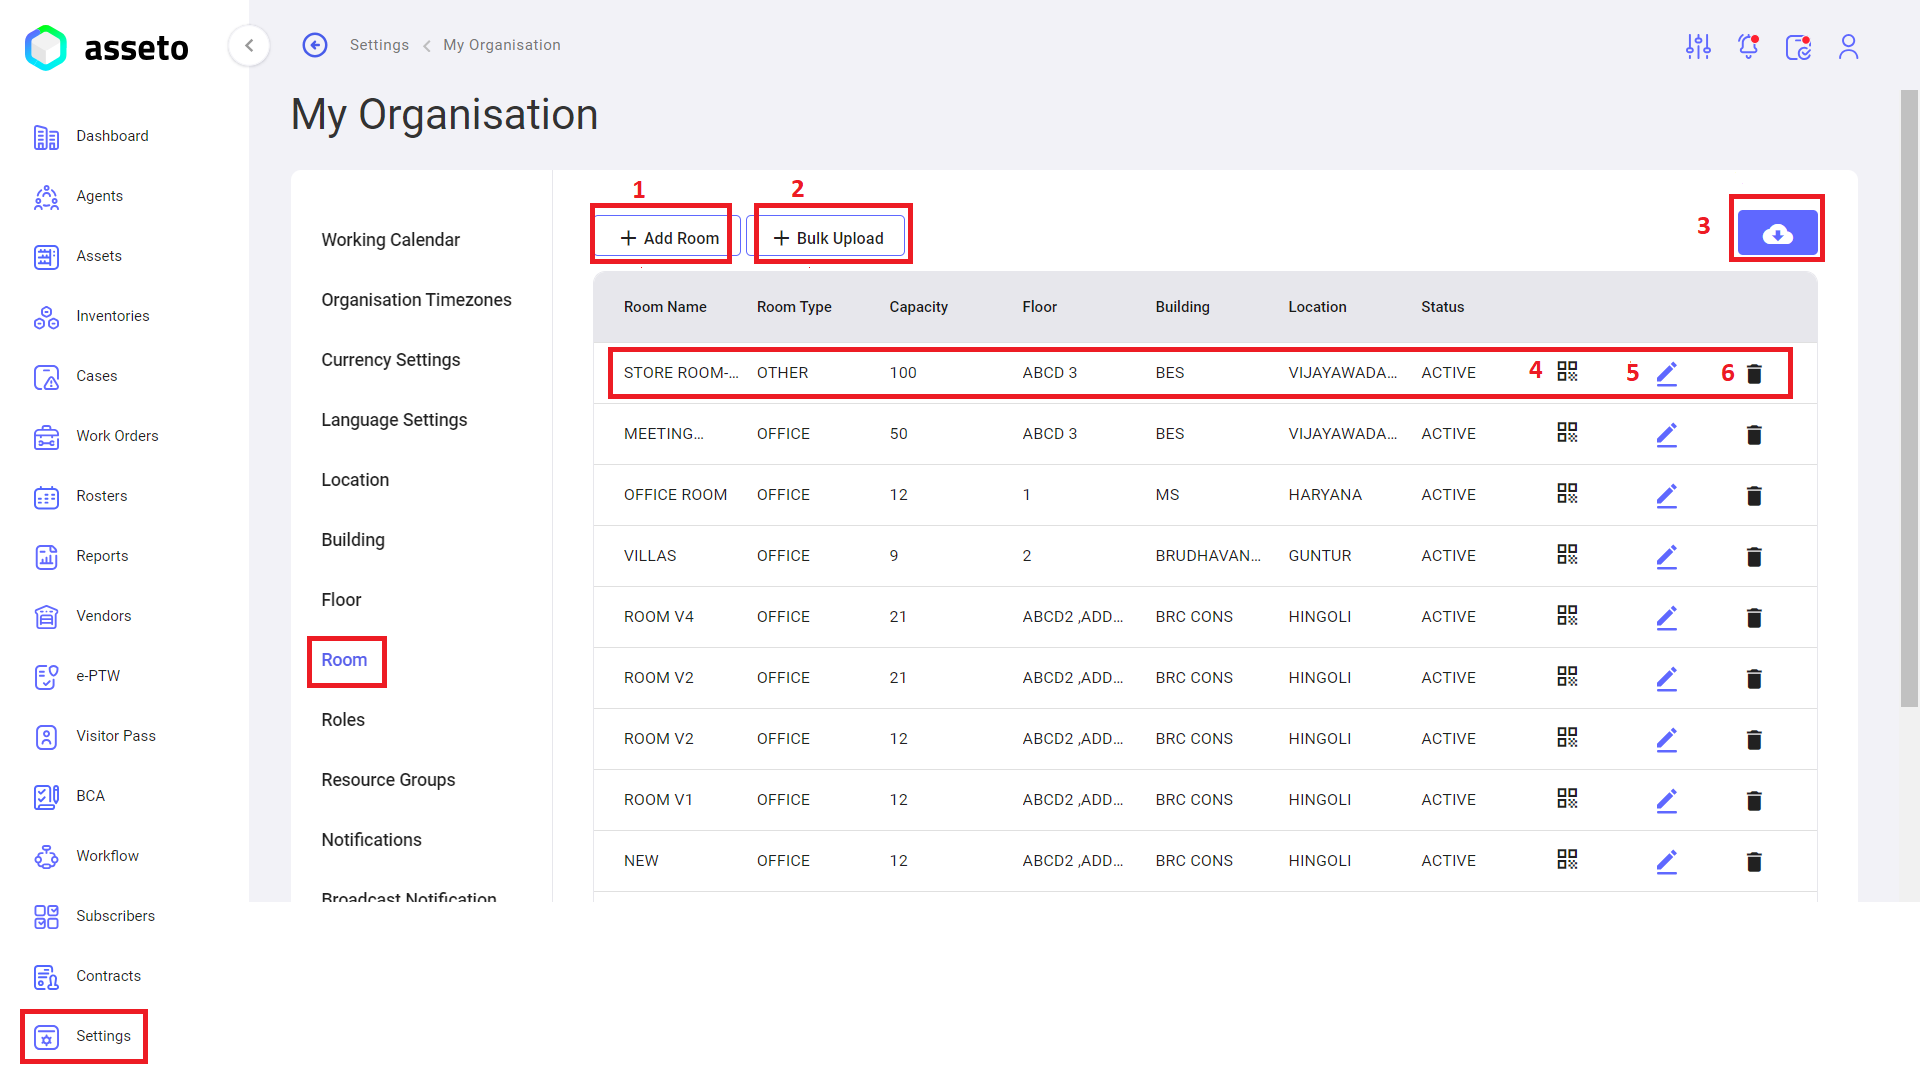
Add Room: Click on the "Add Room" button to create an individual room name. 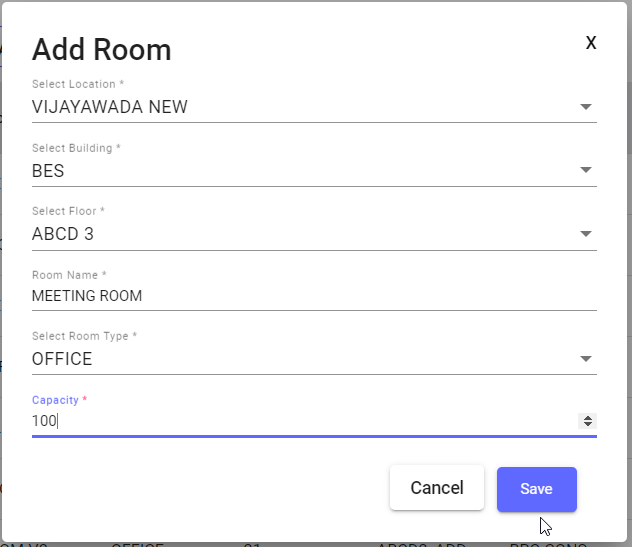 When the "Add Room" button is clicked, a new page will appear. Fill in all mandatory fields, and the "Save" button will be enabled. Click "Save" to store the room details, which will then be displayed in the first row of the table.
Bulk Upload Room: Click on the "Bulk Upload" button to create multiple rooms simultaneously. Download the CSV file, fill in the necessary data, and upload it.
Export: Use the "Export" button to download the QR list of rooms, with the option to export with or without images.
QR: Scan the QR code to view the room details, including building and location.
Edit Room: To modify an existing room, click on the "Edit" icon in each row of the room list.
Delete Room: To remove a room, click on the "Delete" icon in each row of the room list.
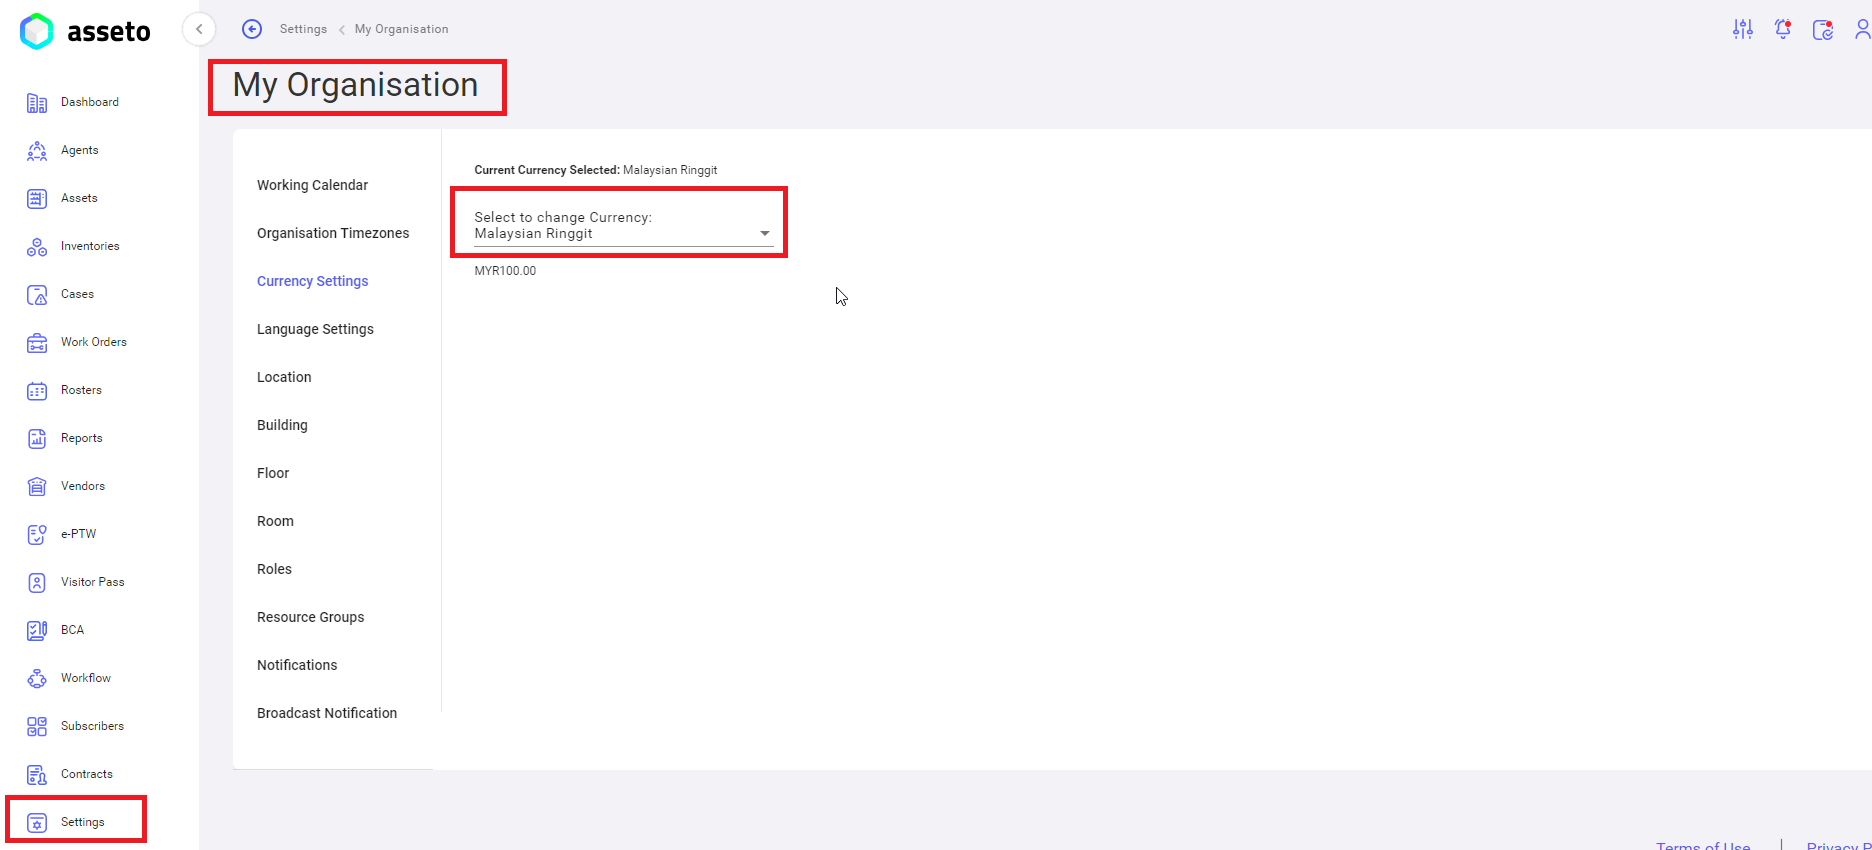
Settings -> My Organization -> Currency settings:
Select your currency type from the dropdown as shown by the screenshot below .
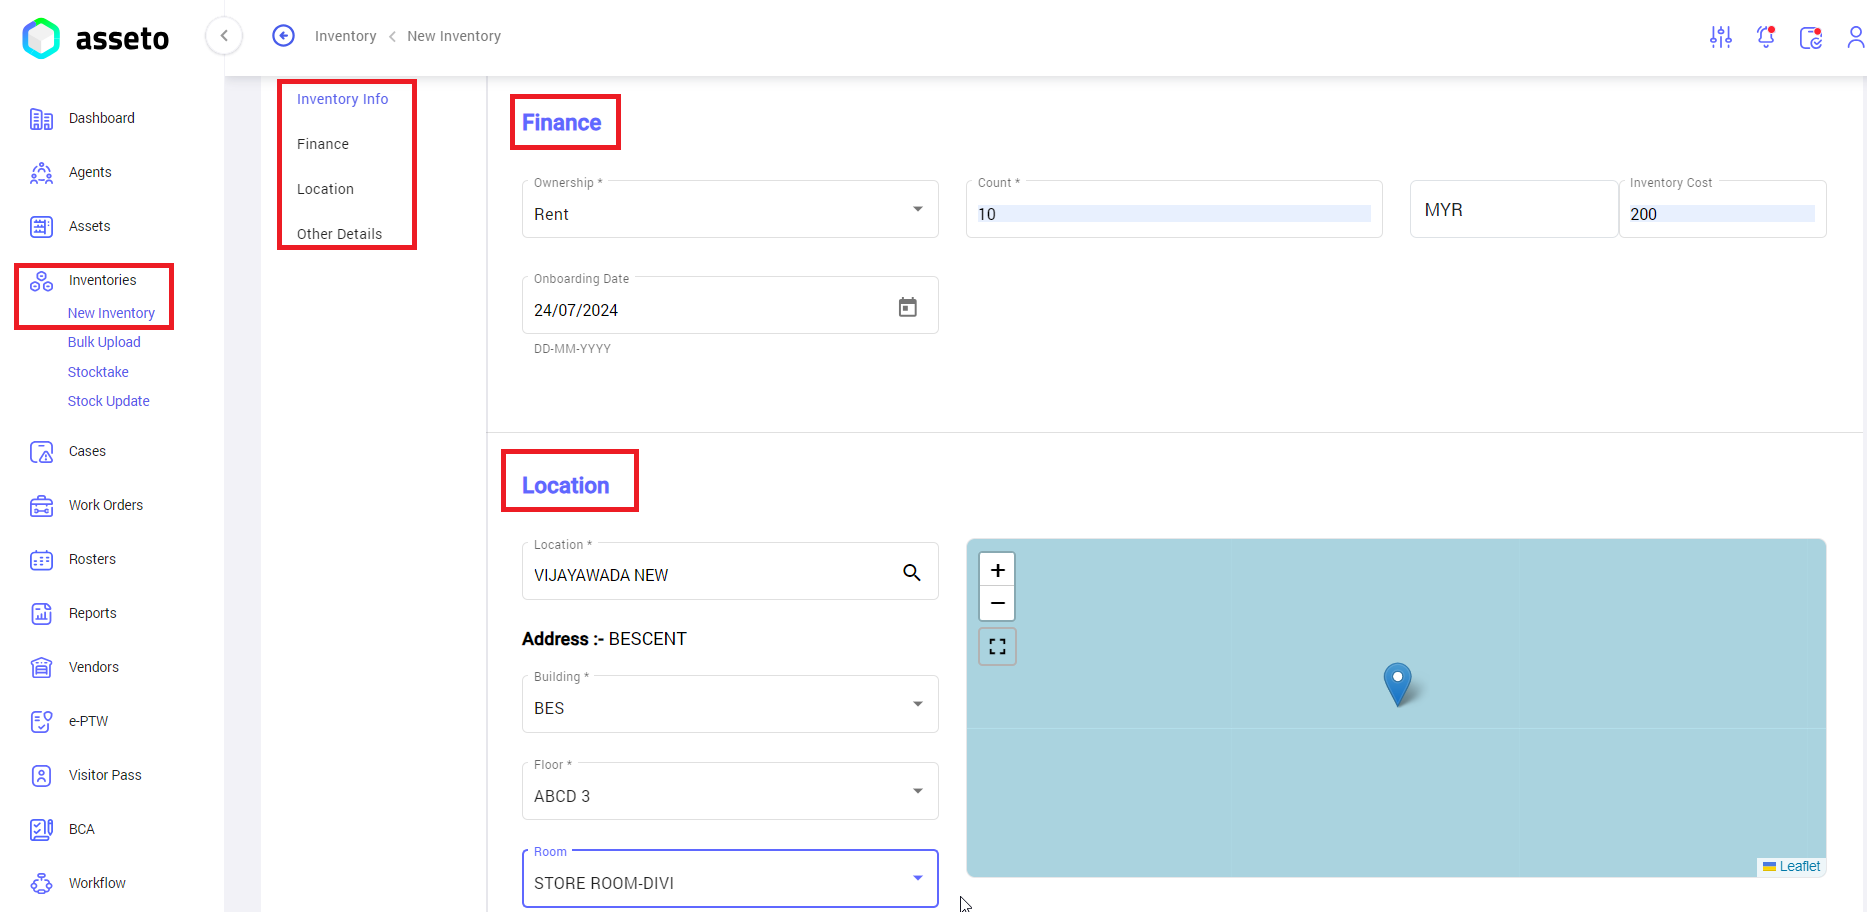
4.3. New Inventory
New inventory creation process: Using this feature, the user can onboard or register new inventories into the system.
A list of sections under the new inventory page will be available, by clicking on the specific section will be navigating to the respective section.
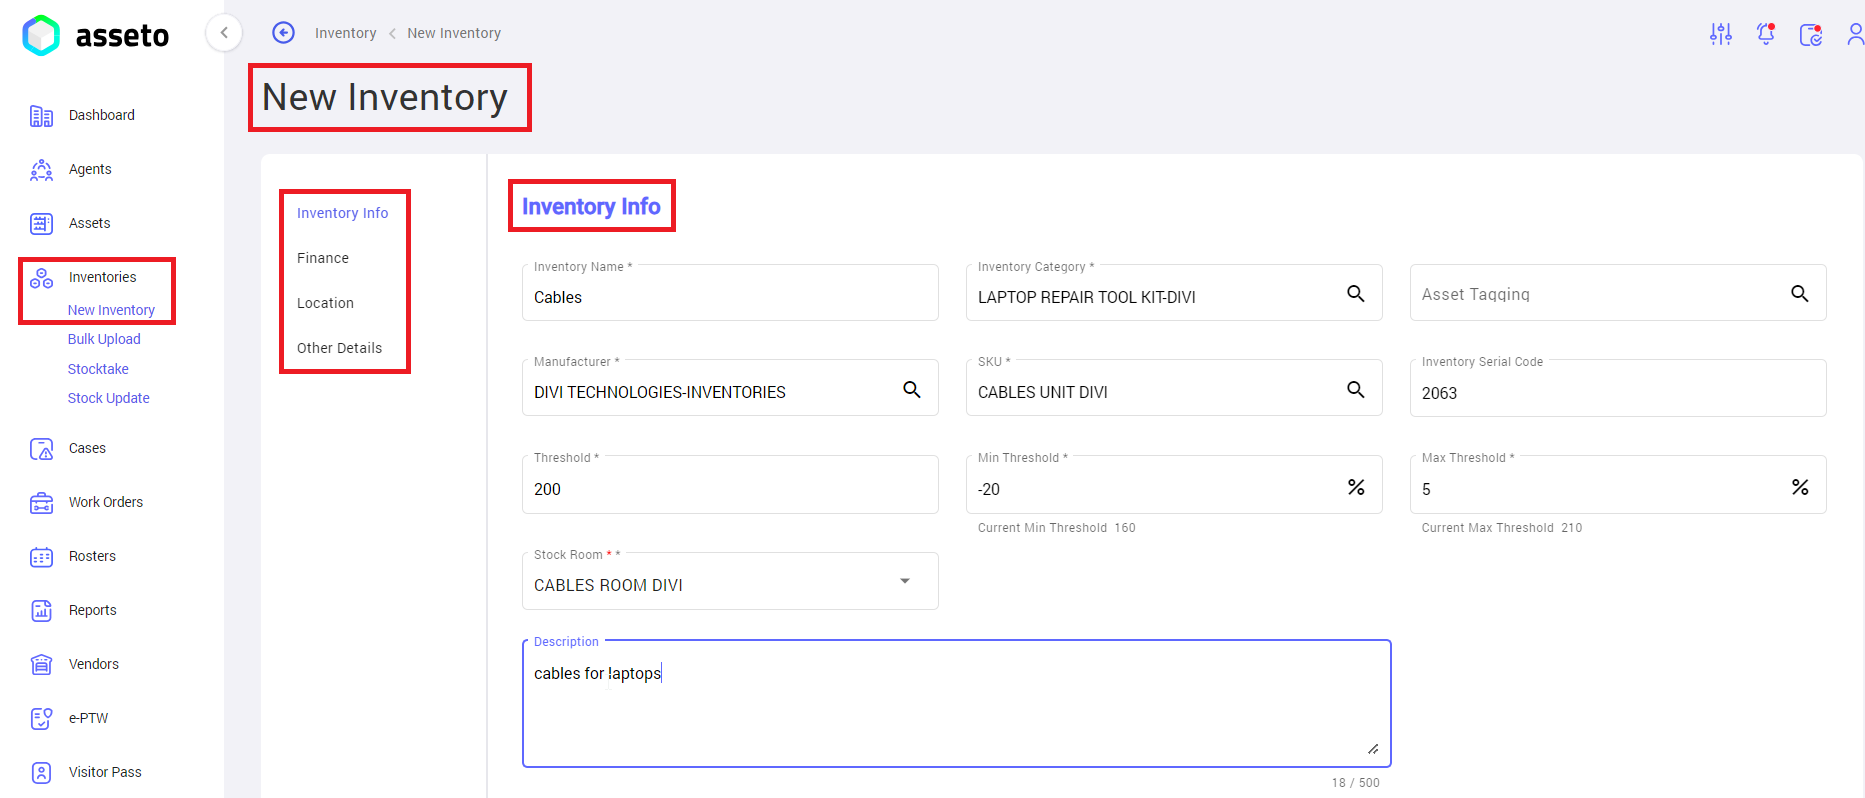
Fill the mandatory fields.
Note: Every inventory has individual SKU and Stock Room, for every inventory type we must create separate SKU and Stock Room in settings.
Fill all mandatory fields then only “save” button will be enabled.
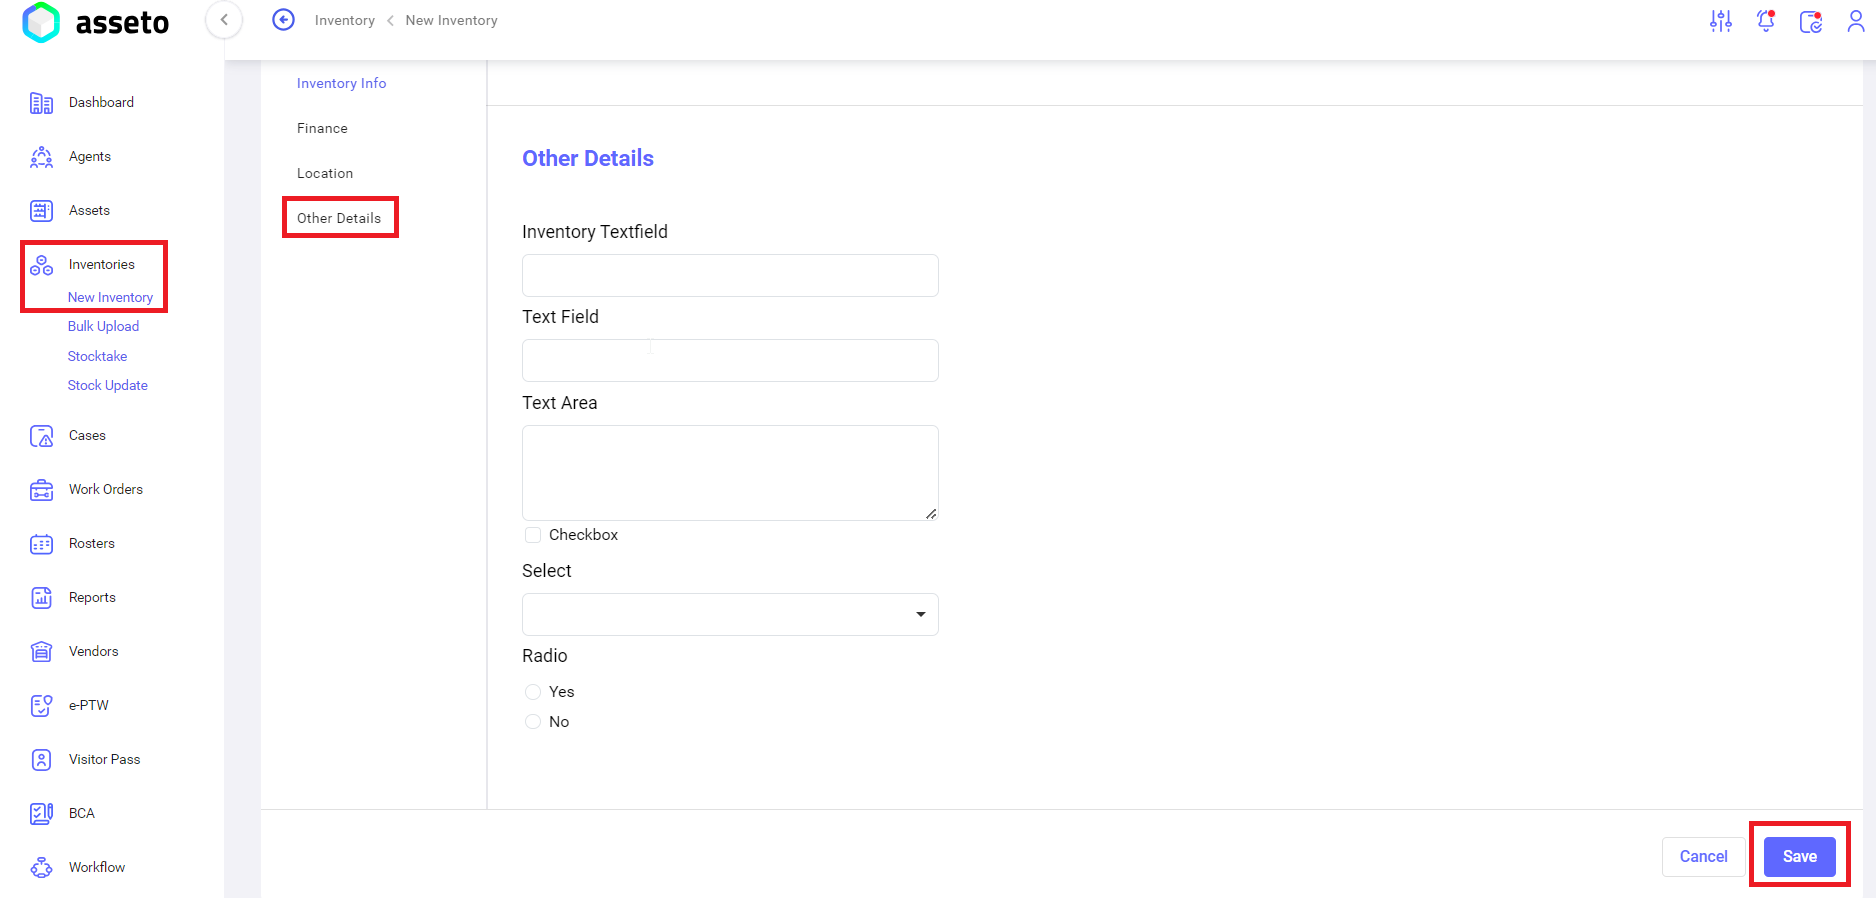
Click on the save button, “Inventory created successfully” confirmation message will be displayed.

Registered inventory will be displayed on the inventory list.
4.4. Bulk Upload
Bulk upload has the following features.
- New Inventory Bulk Upload
- Stocktake Bulk Upload
- StockUpdate Bulk Upload
4.4.1. New Inventory Bulk Upload
By using this feature, the user can onboard multiple inventories in bulk.
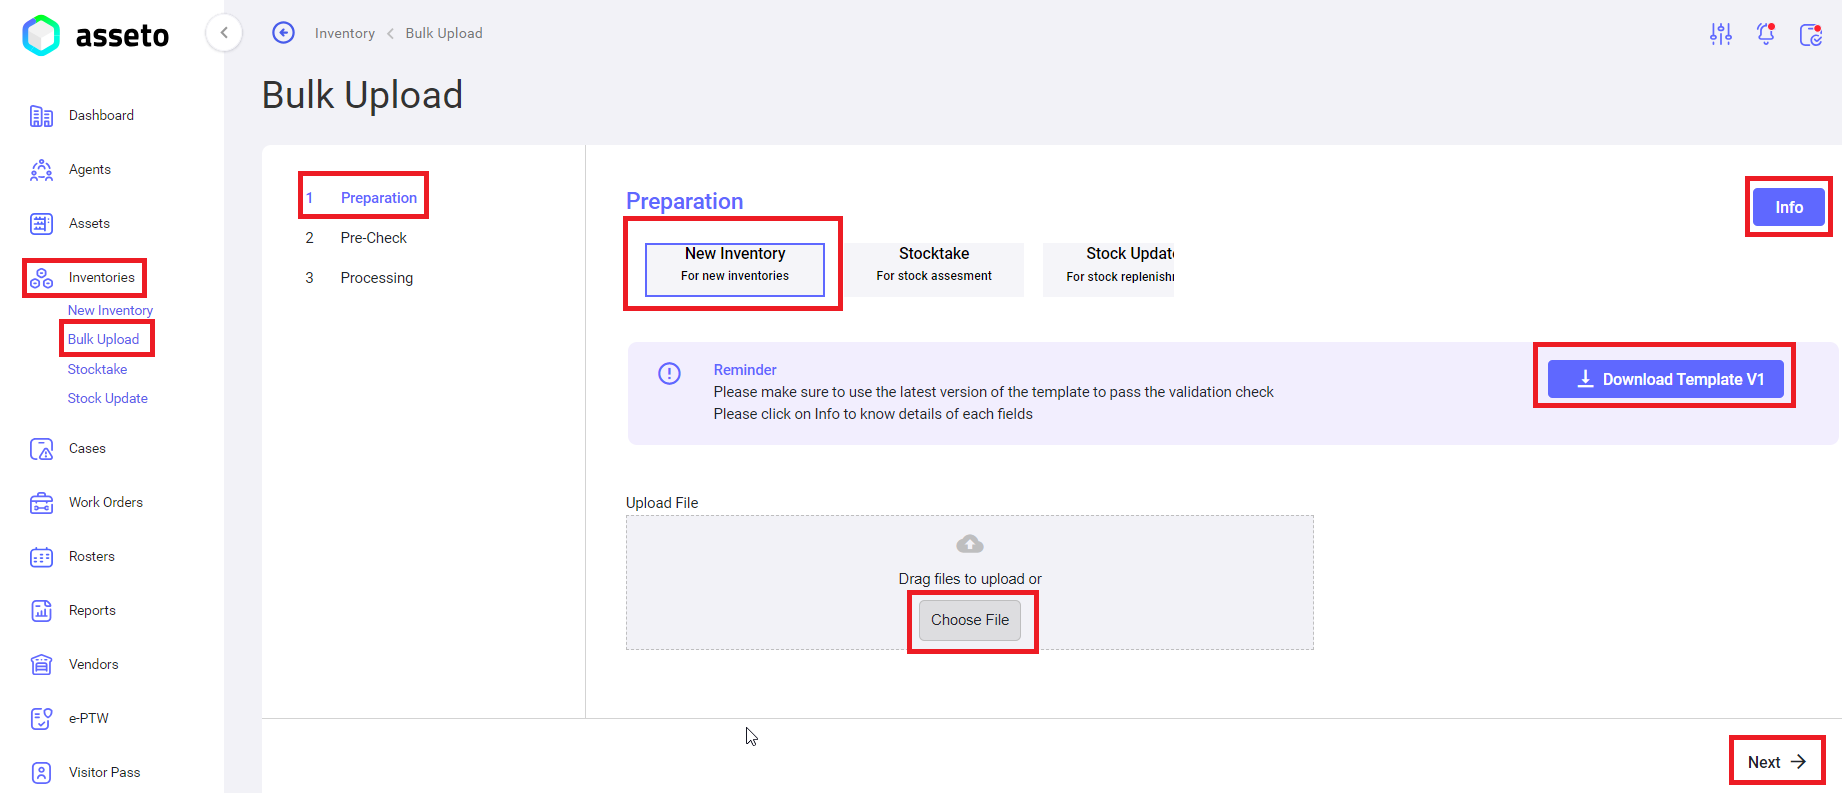
Inventory Bulk upload having 3 sections, those are
- Preparation: To download Bulk upload template.
- Pre check: To check for any errors in the uploaded sheet.
- Processing: To see the progress on the bulk upload process.
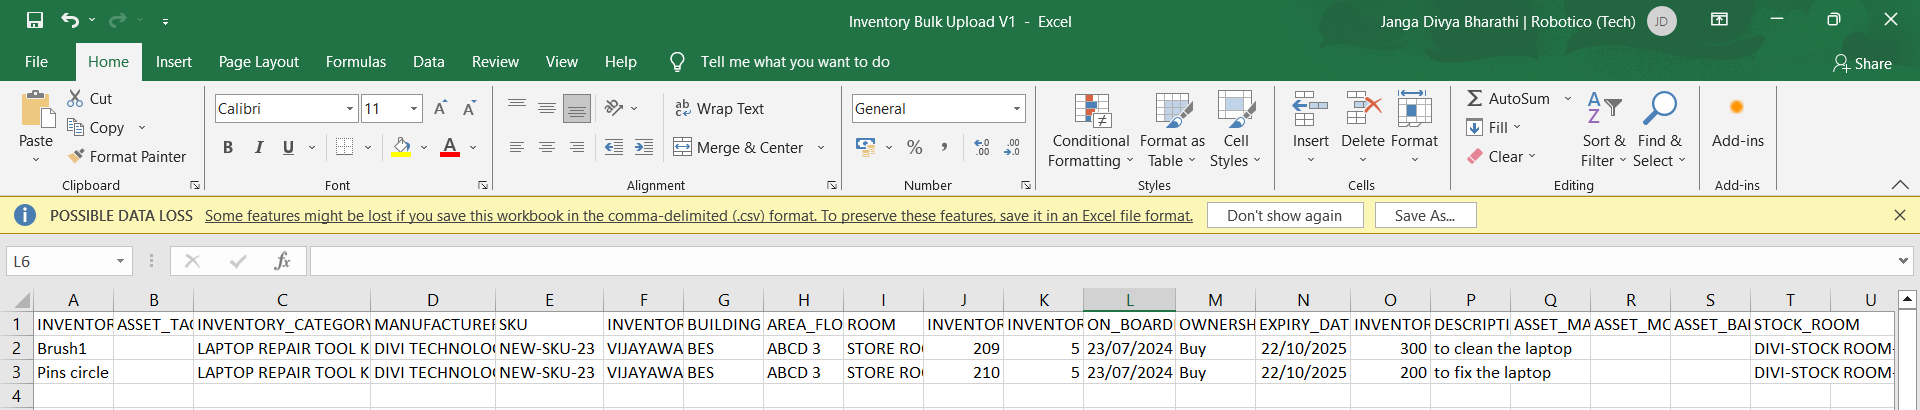
1. Preparation: click on download template button to download csv file will be available in your local pc downloads folder as shown by following screenshot.

Fill the data on the downloaded csv file for all inventories to be onboarding using bulk upload.
Upload the file by clicking on choose file button on the bulk upload page.
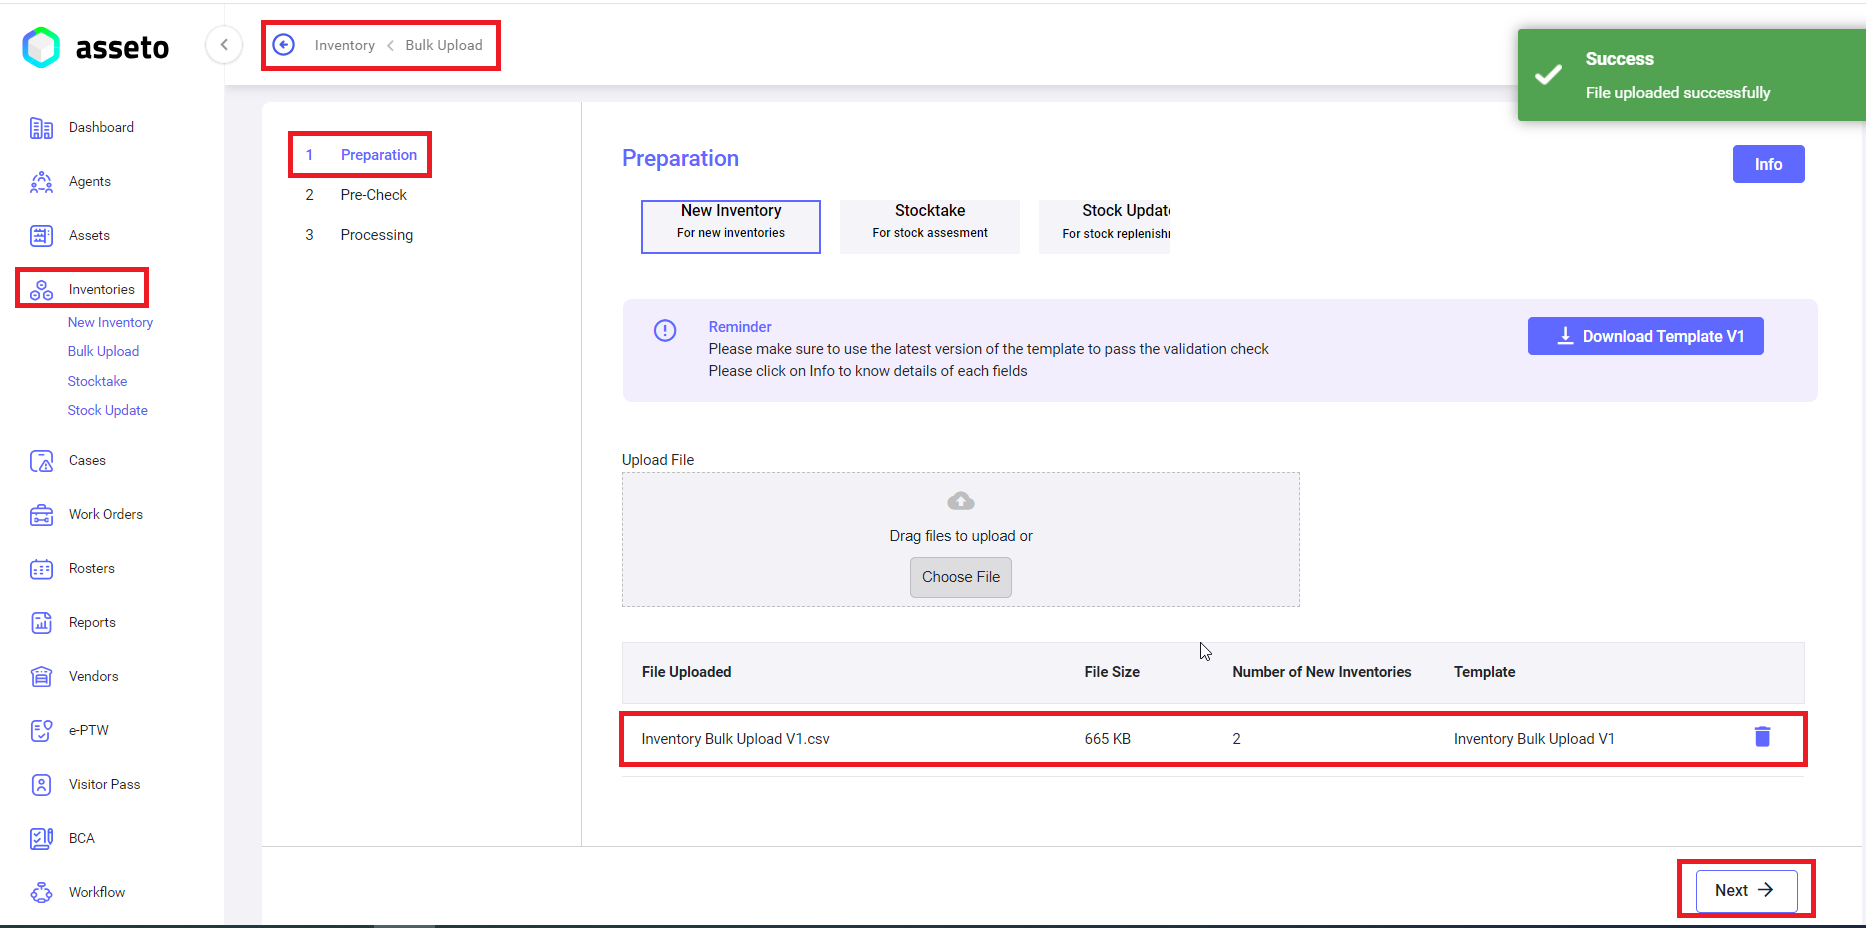
After uploading the csv file ‘Next’ button will be enabled, you can click on next button the system will navigate to you validation check page.
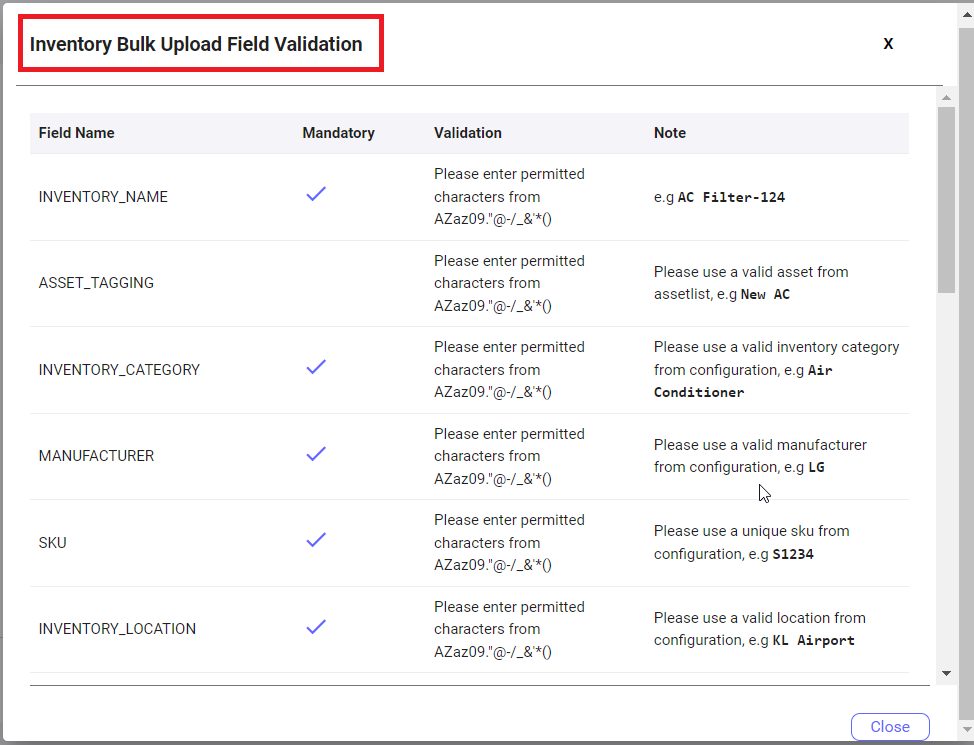
2. Precheck/validation check: If uploaded file having any errors will be display here, user will not be able to move to next stage unless those errors are corrected, submit button enabled (as shown by below screenshot) if no errors in your csv file.
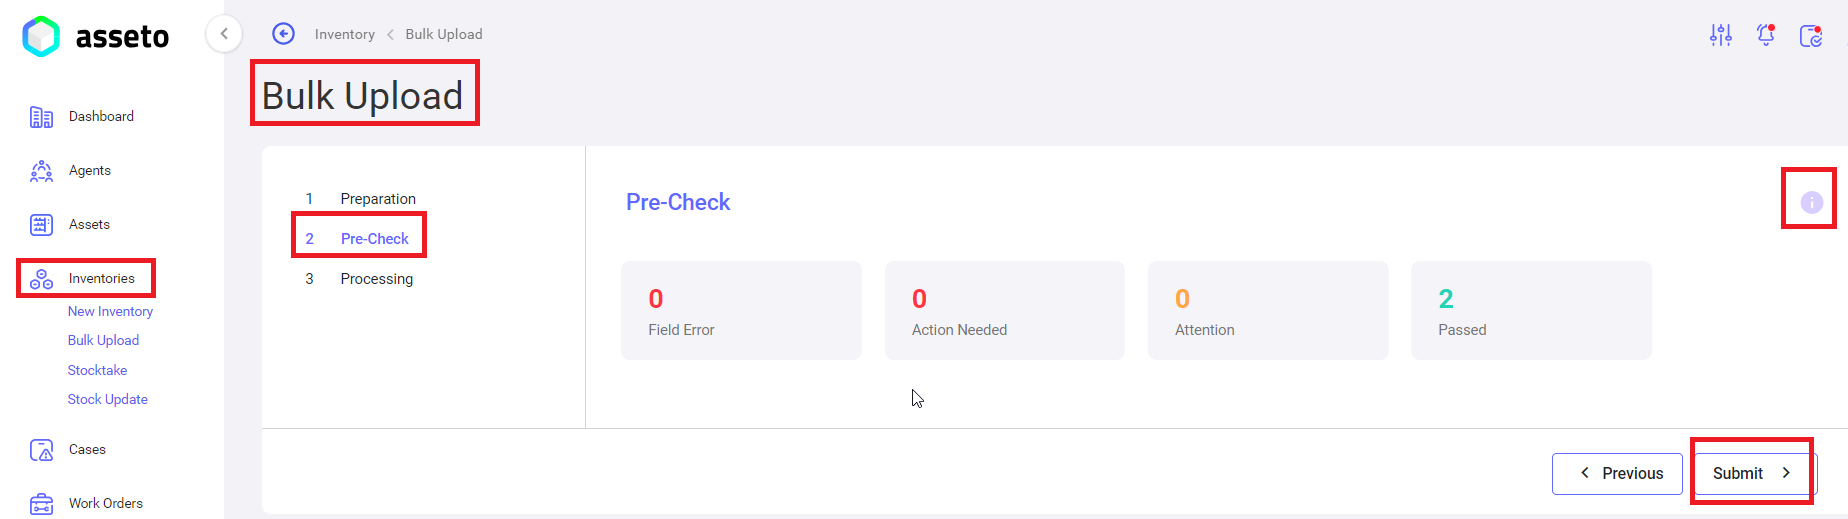
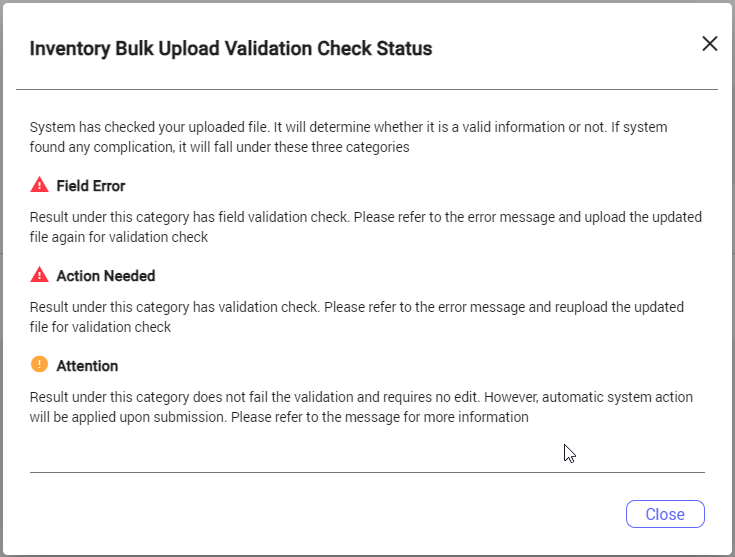
Note: Click on the tooltip to check the validation status on validation/pre-check page.
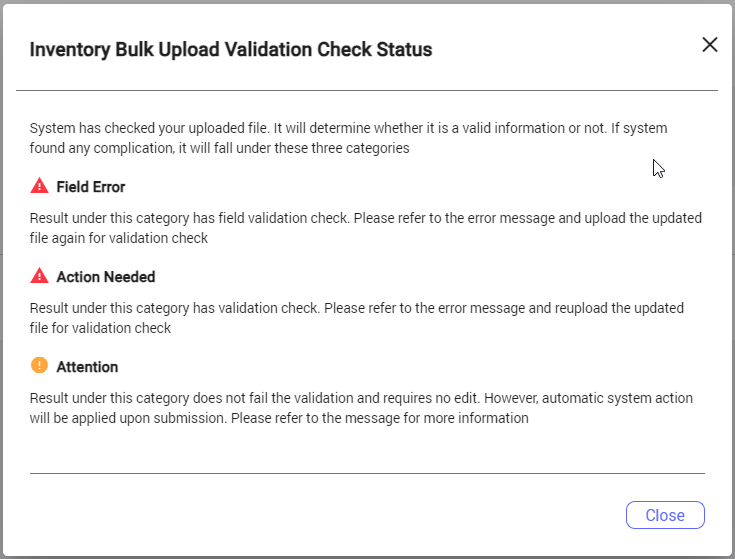
If there are no errors user can view passed count (i.e. number of inventories added) submit button enabled. Clicking on the submit button system will navigate to you next page.
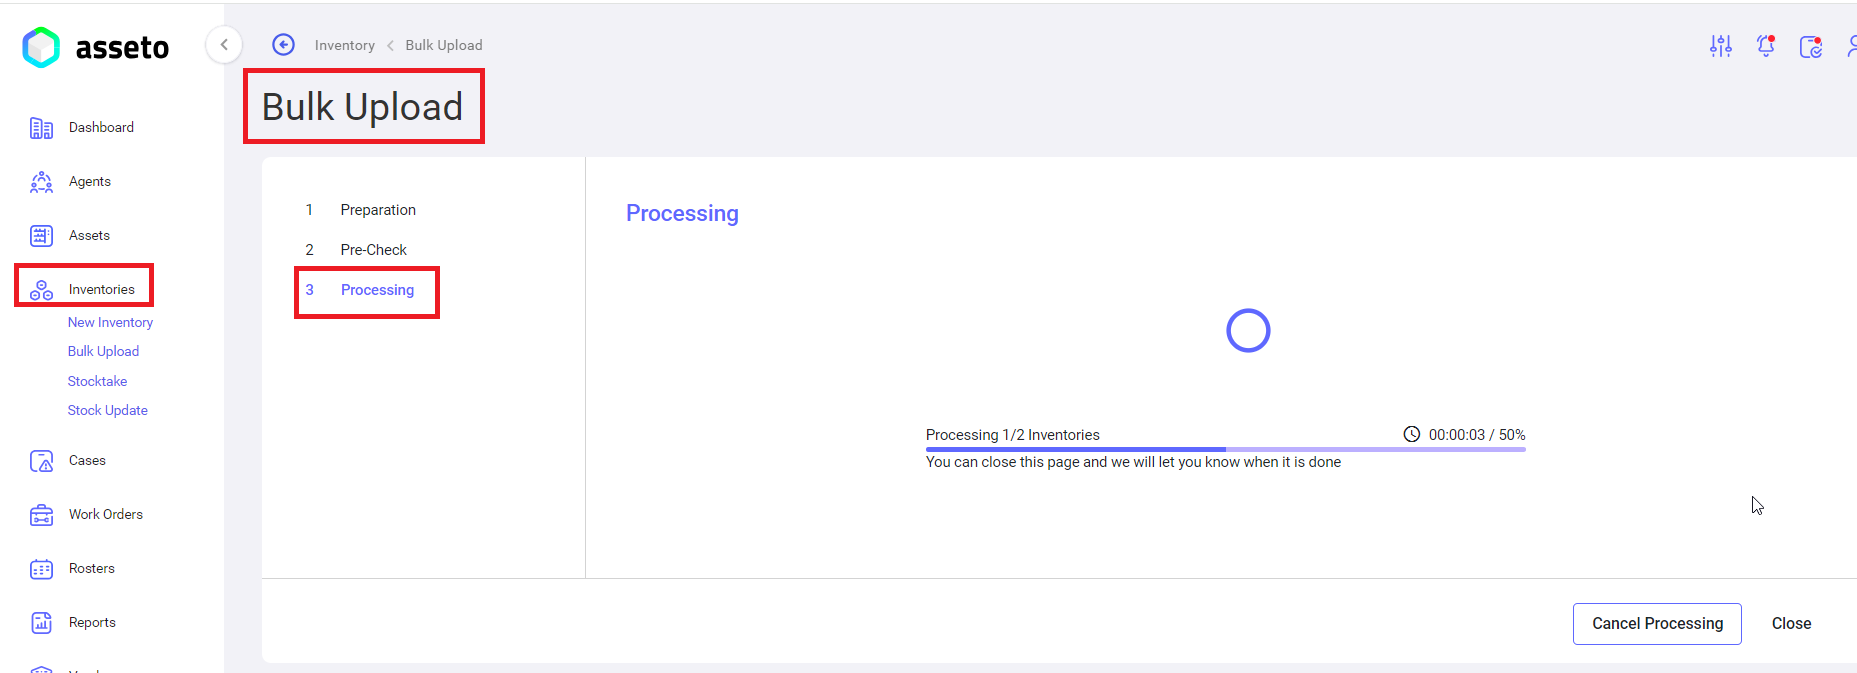
3. Processing: User can see the progress of bulk upload to the application. “Inventories added successfully” confirmation message will be displayed.
Click on close. added inventories through bulk upload will be displayed on the inventories list page.

4.4.2. Stocktake Bulk Upload
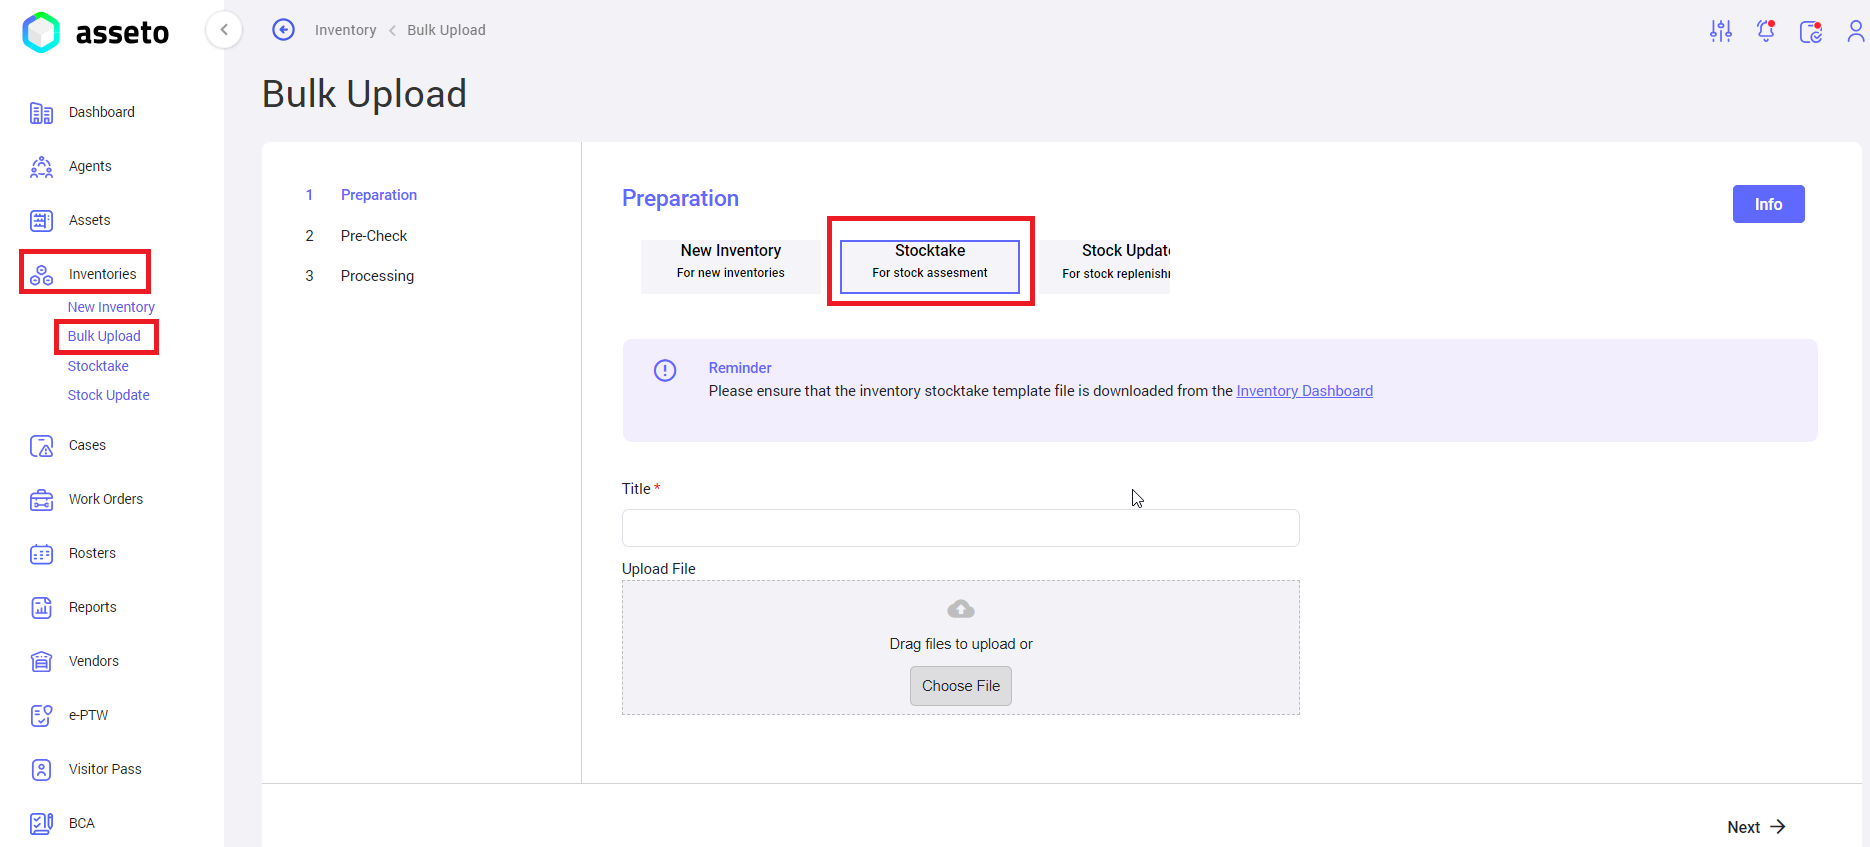
By using this feature user (role type custodian and should have “Stock Room” access) can upload stocktake inventories in bulk (for stock assessment).
Login into Asseto with custodian credentials ->Left Menu -> Inventory -> Bulk Upload -> Stocktake.
Stocktake Bulk upload having 3 sections, those are
- Preparation: bulk upload template download.
- Pre check: to check for any errors in the uploaded sheet.
- Processing: to see the progress of the bulk upload process.
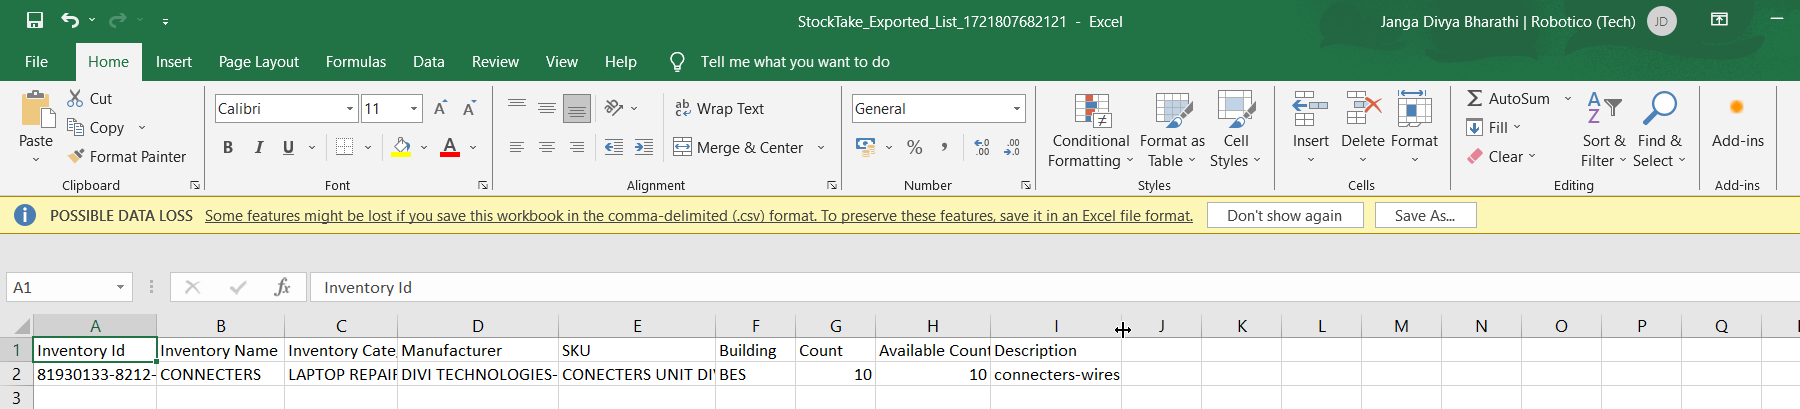
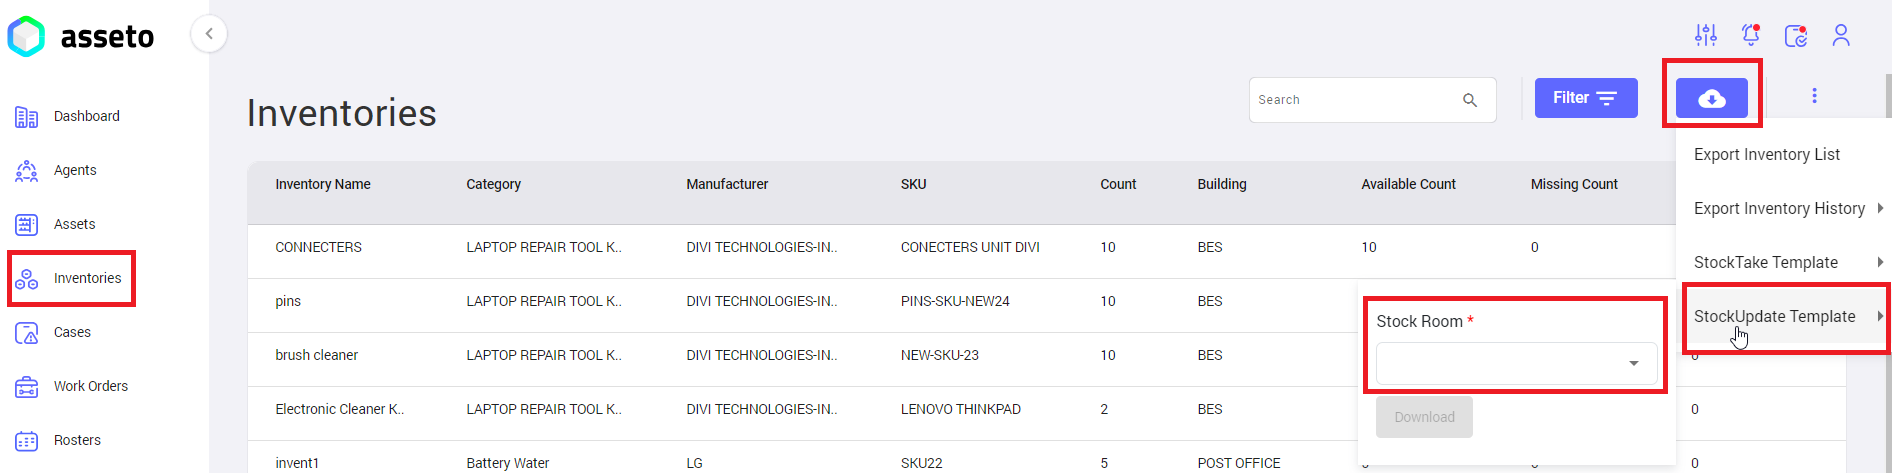
1. Preparation: Download inventory stocktake template from inventory dashboard.
Note: Agent having role type custodian and should have “Stock Room” access to download the csv file.
Click on the export button and click on “stocktake” option, here you can view available stock rooms under your custodian account.
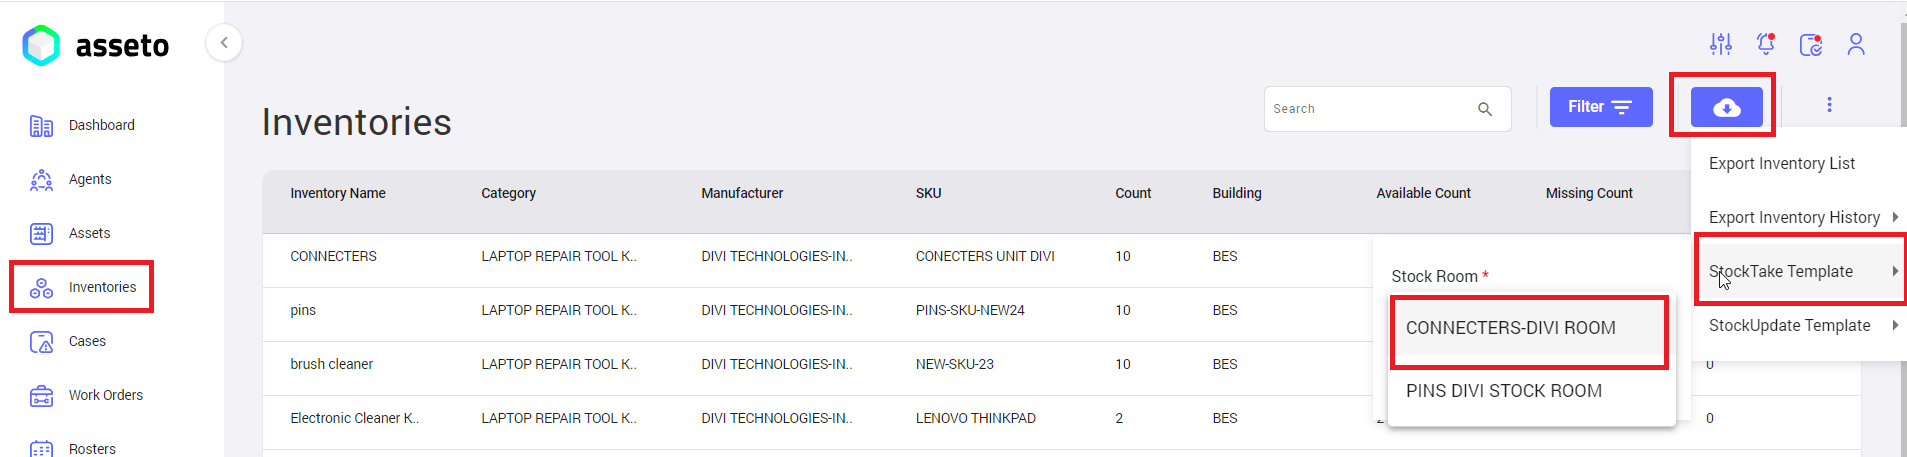
Select one room from the stock room list.
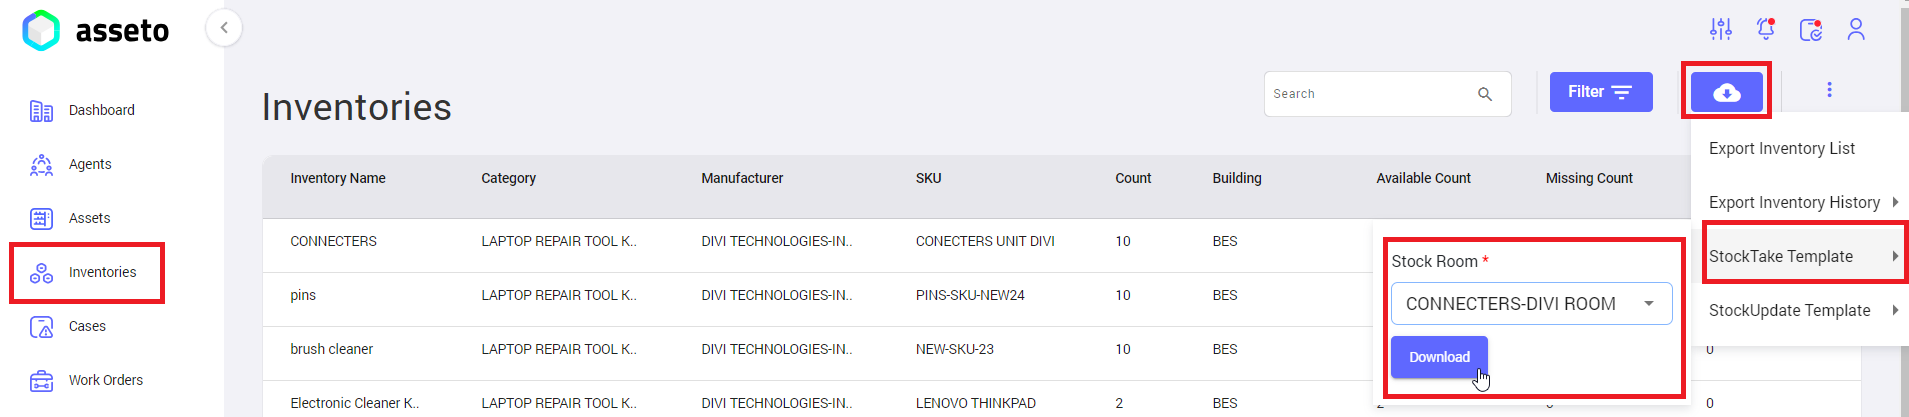
Click on the download button. Downloaded csv file will be available in your local pc downloads folder as shown by following screenshot.

Next: fill the fields in the sheet.
Next: Upload it.

After uploading the csv file ‘Next’ button will be enabled, you can click on next button the system will navigate to you validation check page.
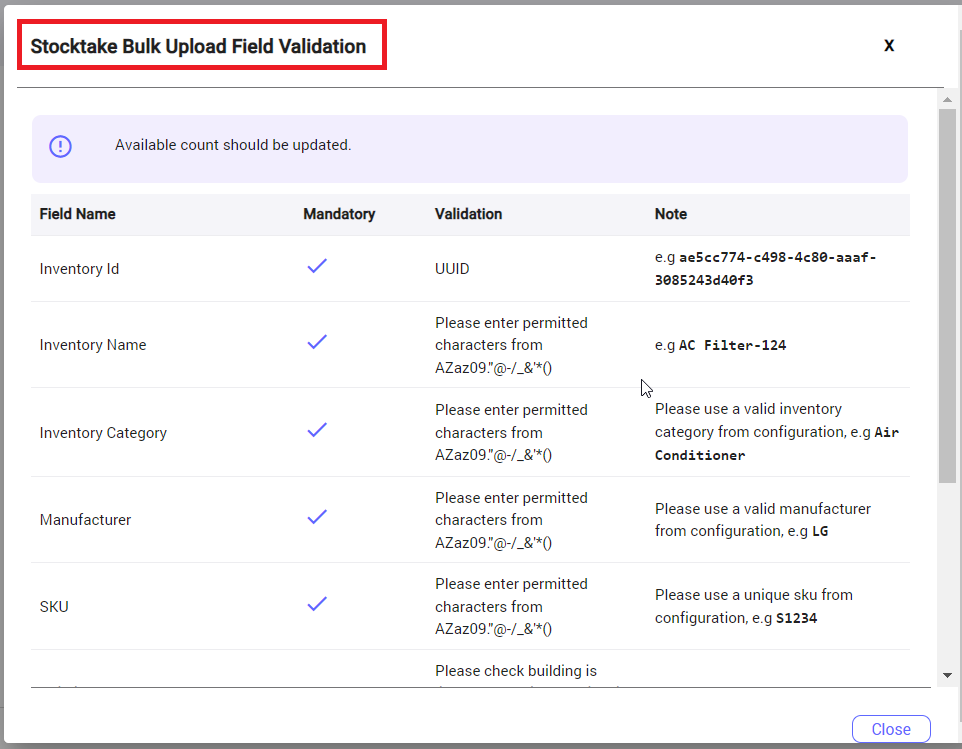
2. Precheck/validation check: If uploaded file having any errors will be display here, user will not be able to move to next stage unless those errors are corrected, submit button enabled (as shown by below screenshot) if no errors in your csv file.
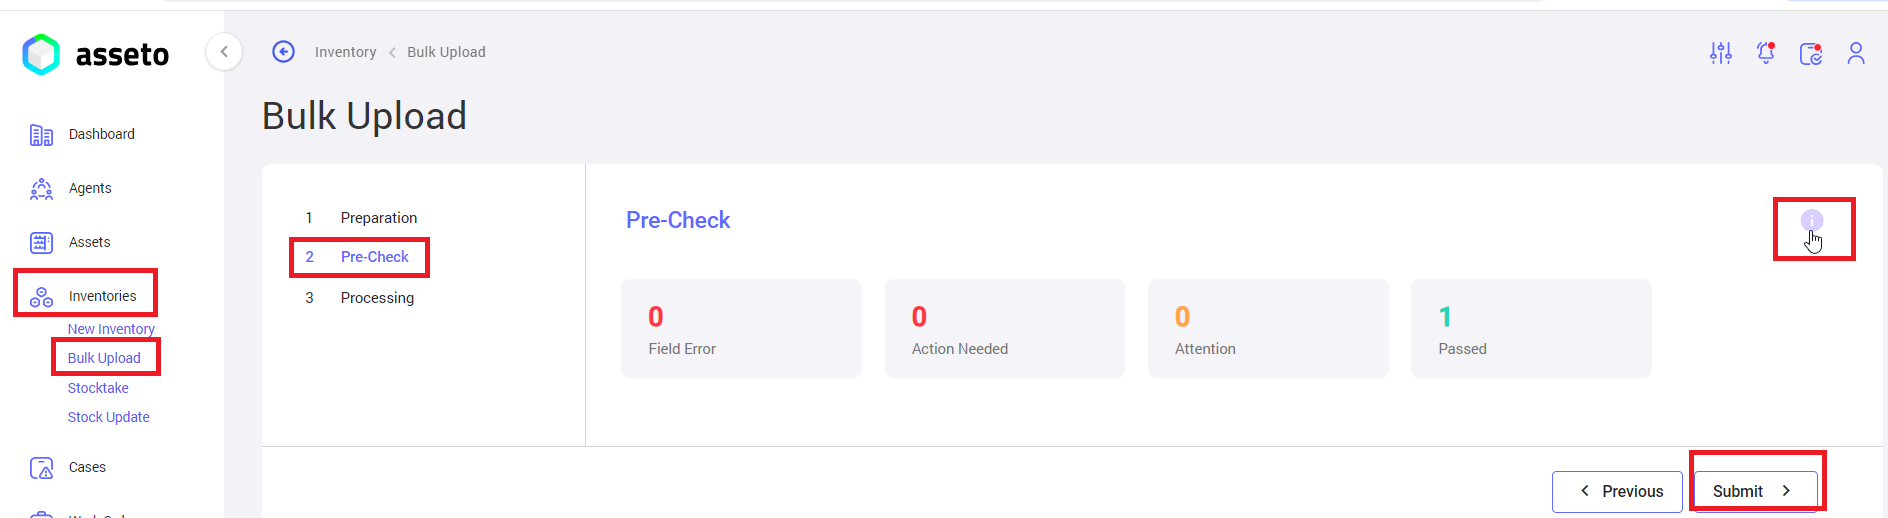
Note: Click on the tooltip to check the validation status on validation/pre-check page.
If there are no errors the user can view passed count (i.e. number of records in stocktake csv file) and submit button enabled. Clicking on the submit button system will navigate to you next page.
3. Processing: user can see the progress of bulk upload to the application. “stocktake request has been registered successfully and sent for approval” confirmation message will be displayed.
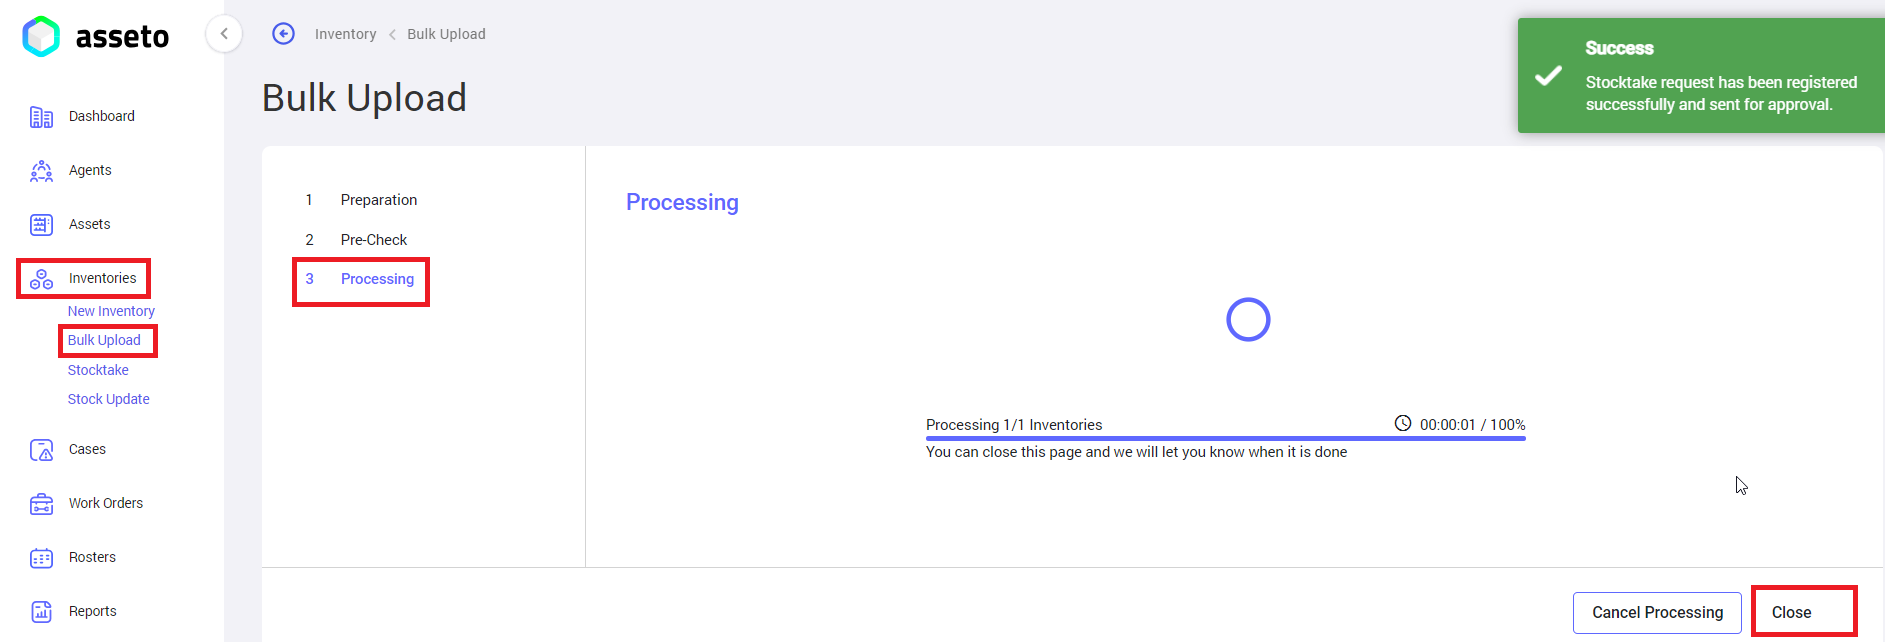
Next
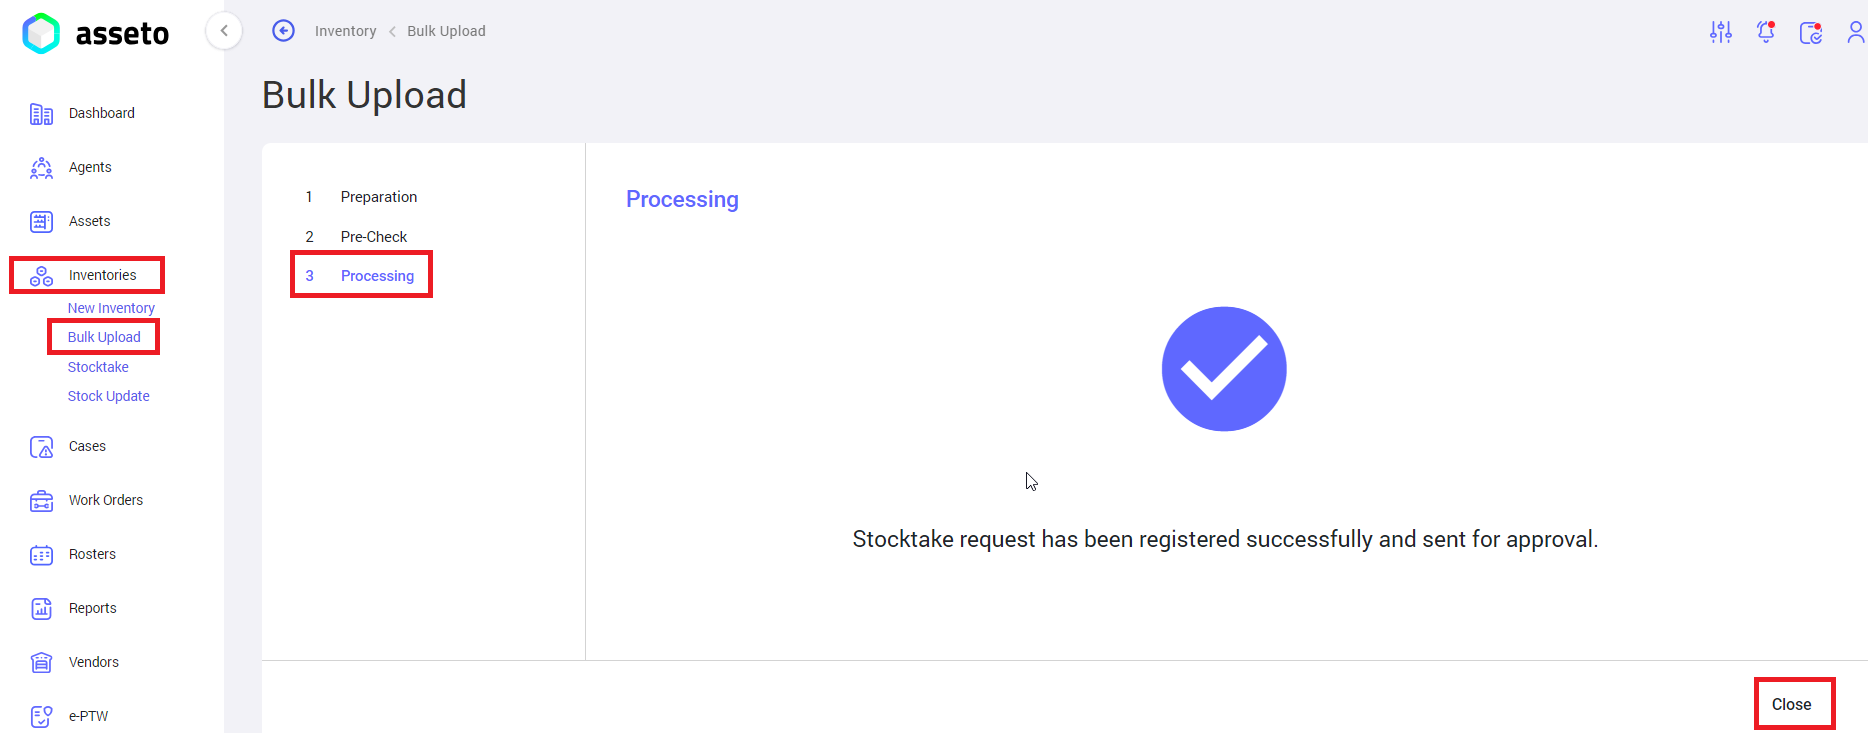
Click on close. added stocktake data file through bulk upload will be sent to coordinator for approval and system navigate to stocktake bulk upload page as shown by following screenshot.
Note: Agent having role type “Coordinator” can approve or reject the Stocktake file.
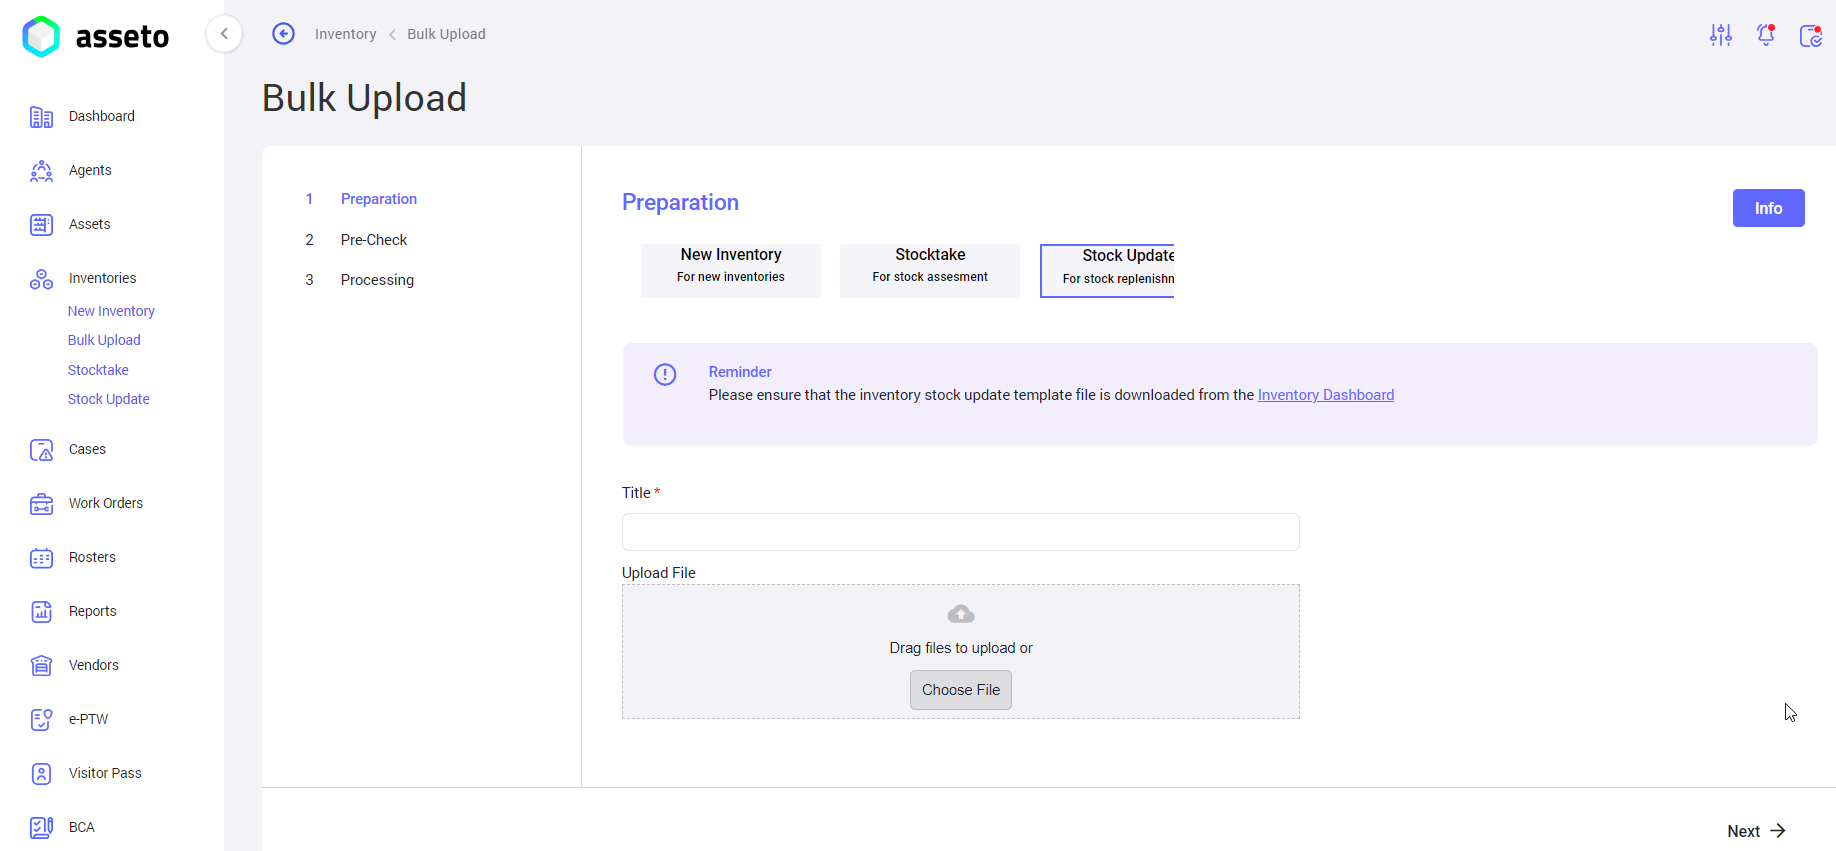
4.4.3. StockUpdate Bulk Upload
By using this feature user (role type custodian and should have “Stock Room” access) can upload stock update inventories in bulk (for stock replenishment).
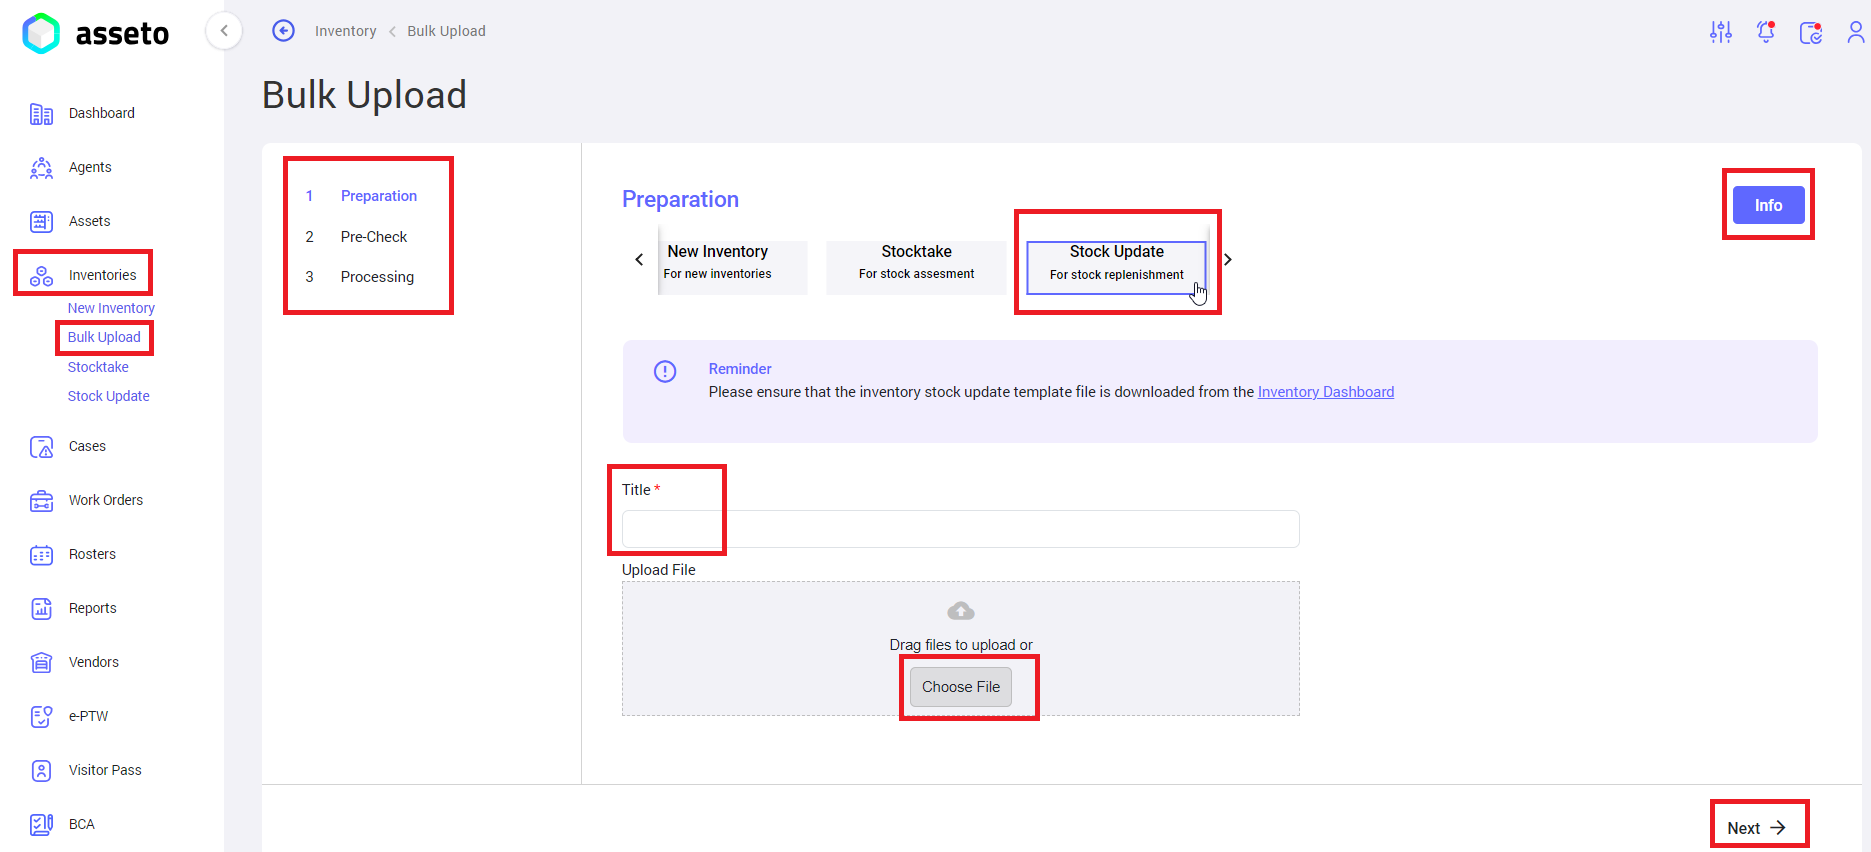
Login into Asseto with custodian credentials -> Left Menu -> Inventory -> Bulk Upload -> Stock Update.
stock update Bulk upload having 3 sections, those are
- Preparation: bulk upload template download.
- Pre check: to check for any errors in the uploaded sheet.
- Processing: to see the progress of the bulk upload process.
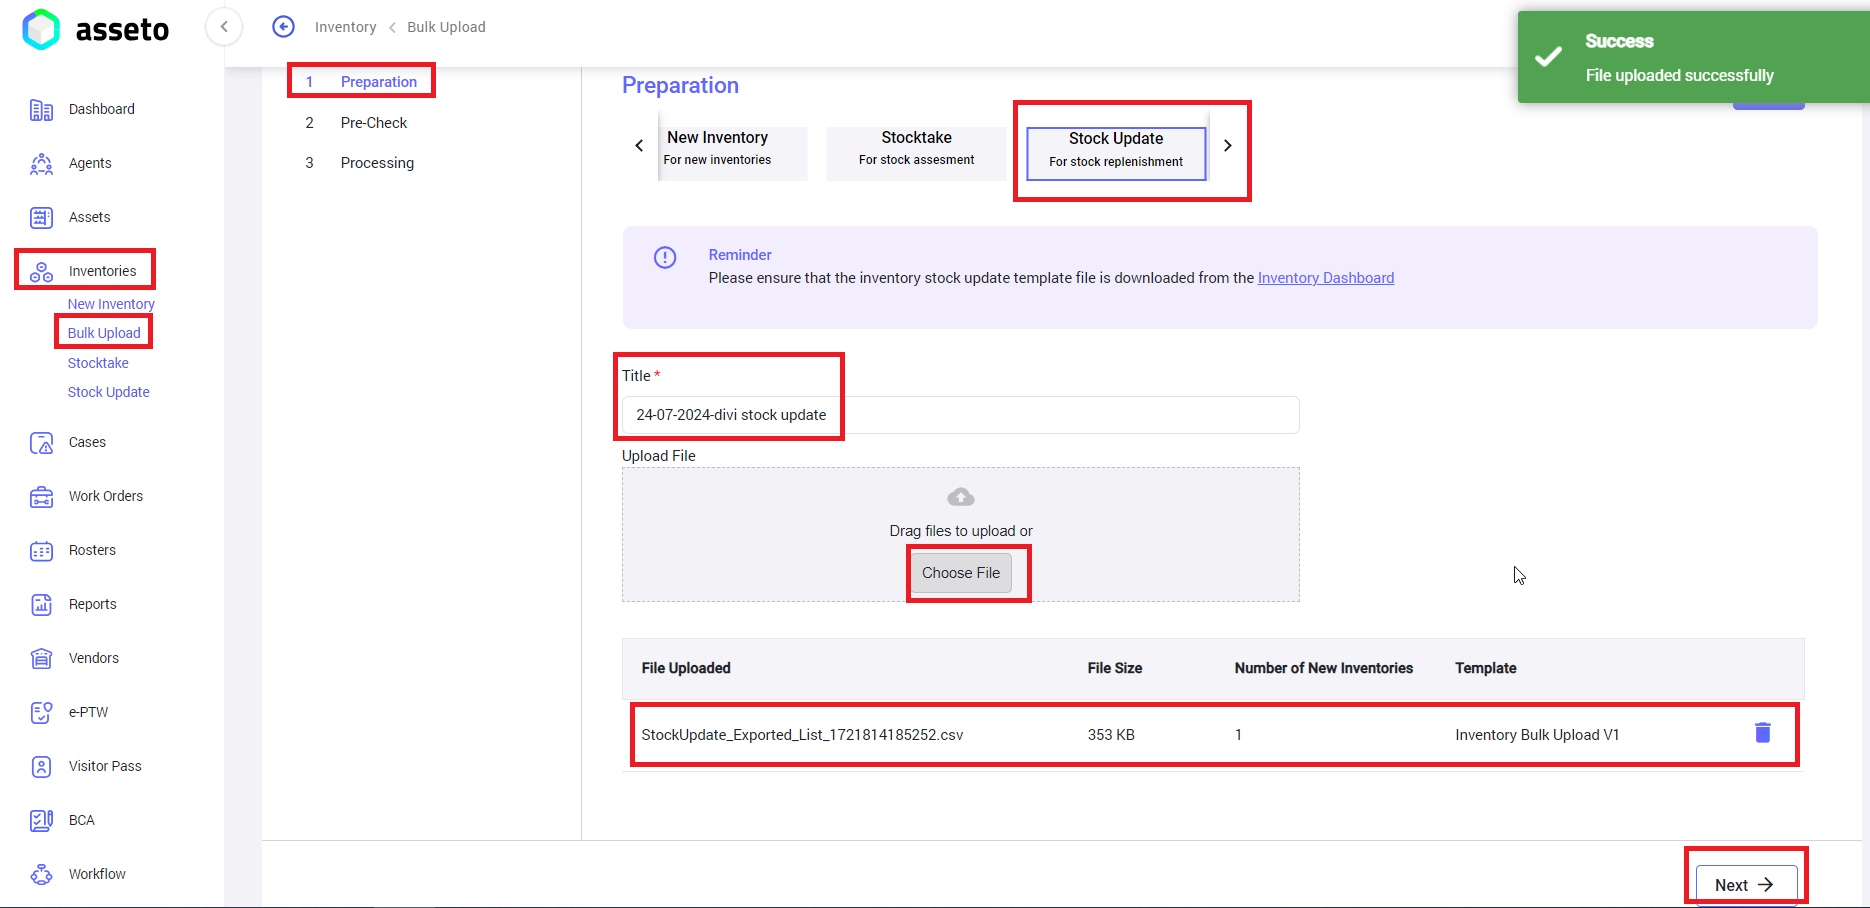
1. Preparation: Download inventory stock update template from inventory dashboard.
Note: Agent having role type custodian to download the csv file.
Click on the export button and click on “stock update” option, here you can view available stock rooms under your custodian account.
Next: Select stockupdate template.
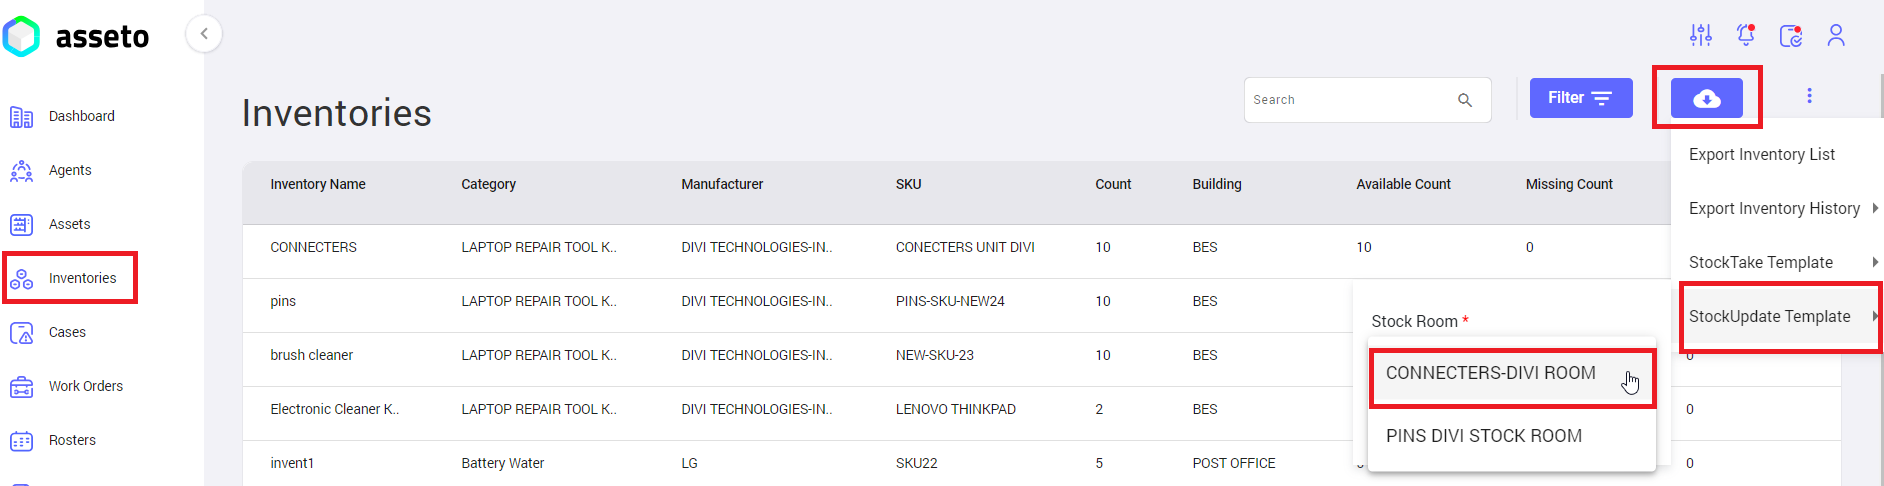
Next: Select one room from the stock room list.
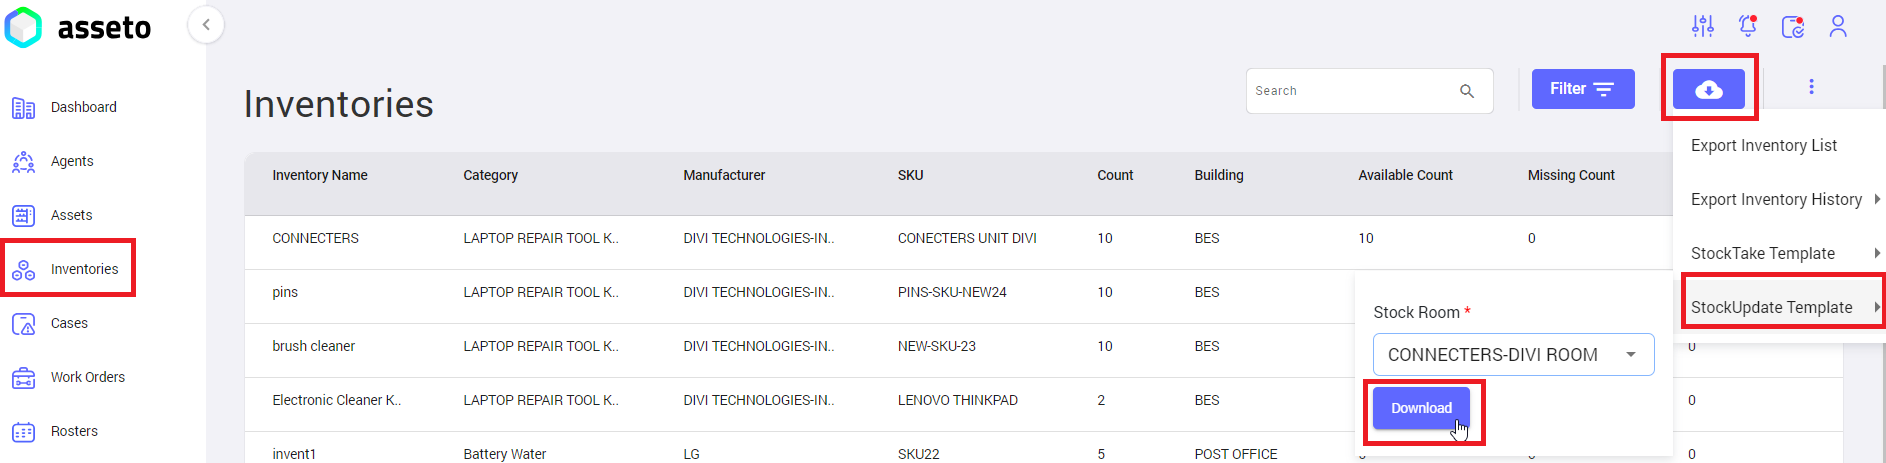
Click on the download button. Downloaded csv file will be available in your local pc downloads folder as shown by following screenshot.

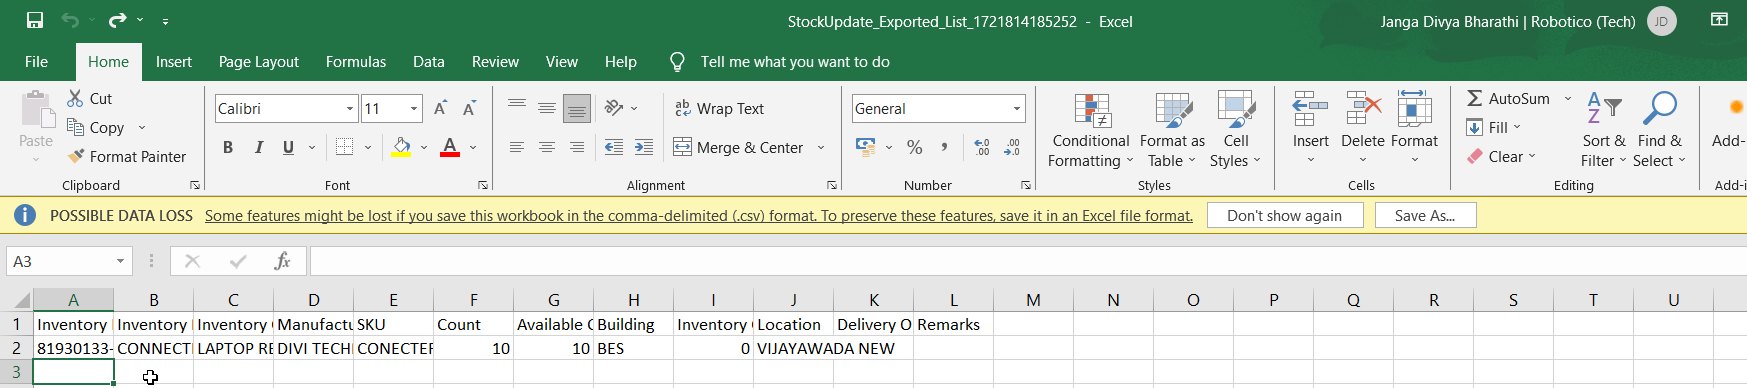
Fill the data on the downloaded csv file for stock count and upload the using “stock update” bulk upload.
Next: Upload this csv file by clicking on choose file button on inventory stock update bulk upload.
After uploading the csv file ‘Next’ button will be enabled, you can click on next button the system will navigate to you validation check page.
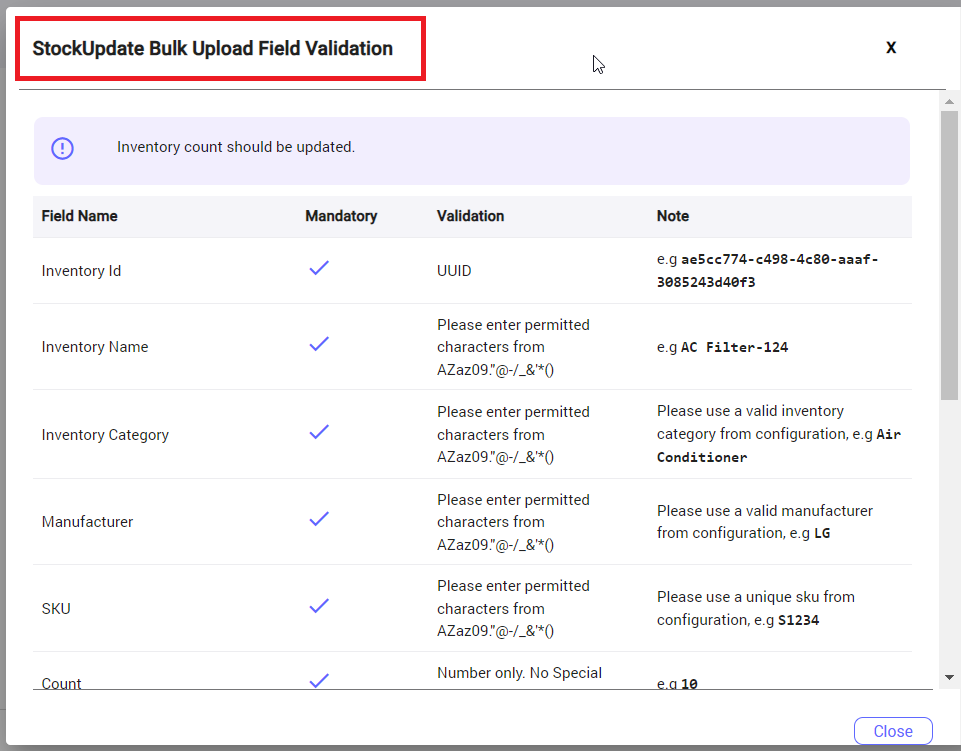
2. Precheck/validation check: If uploaded file having any errors will be display here, user will not be able to move to next stage unless those errors are corrected, submit button enabled (as shown by below screenshot) if no errors in your csv file.

Note: Click on the tooltip to check the validation status on validation/pre-check page.

If there are no errors user can view passed count (i.e. number of records in stock update csv file) and submit button enabled. Clicking on the submit button system will navigate to you next page.
3. Processing: User can see the progress of bulk upload to the application. “Stock update request has been registered successfully and sent for approval” confirmation message will be displayed.
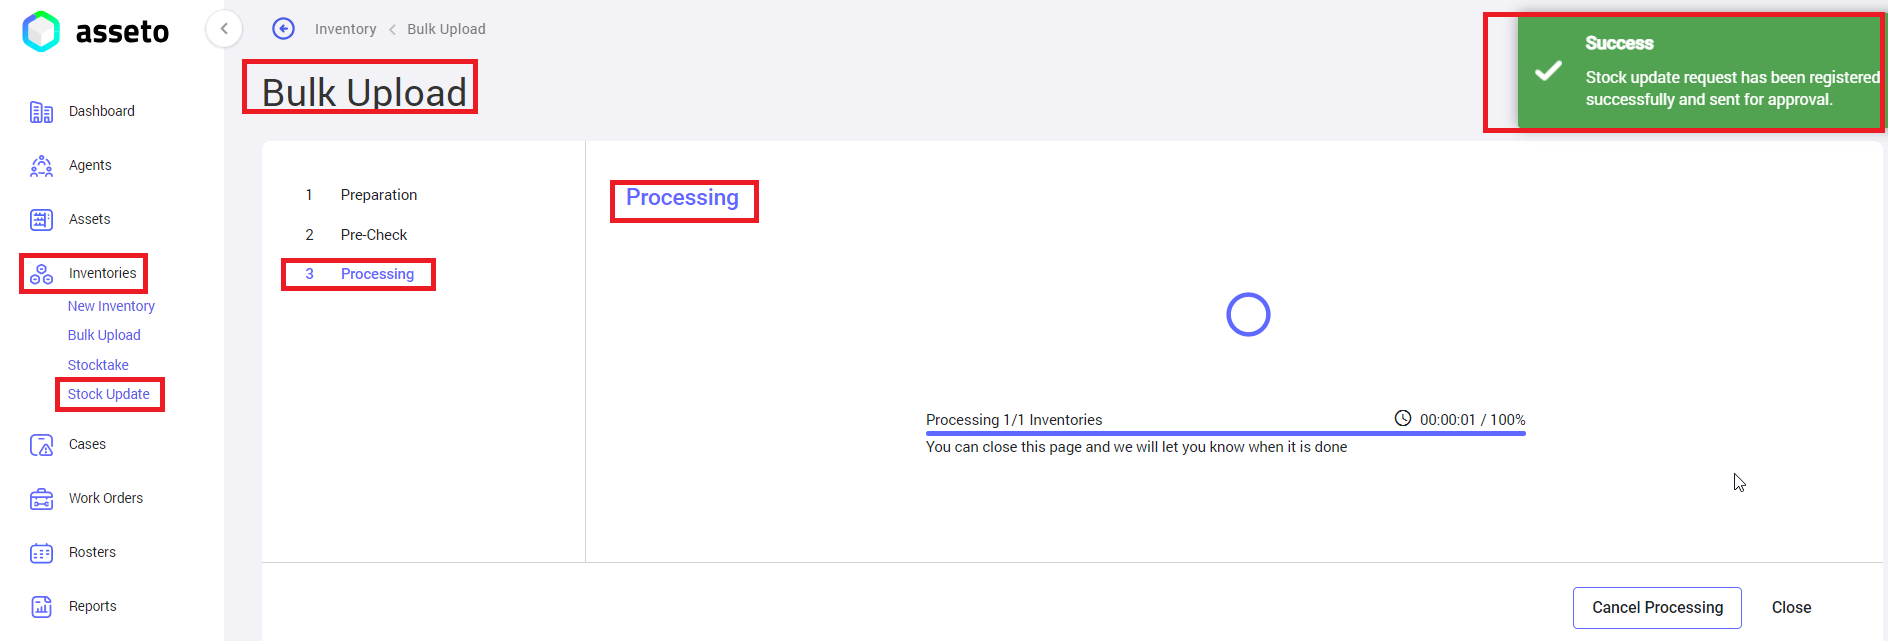
Next
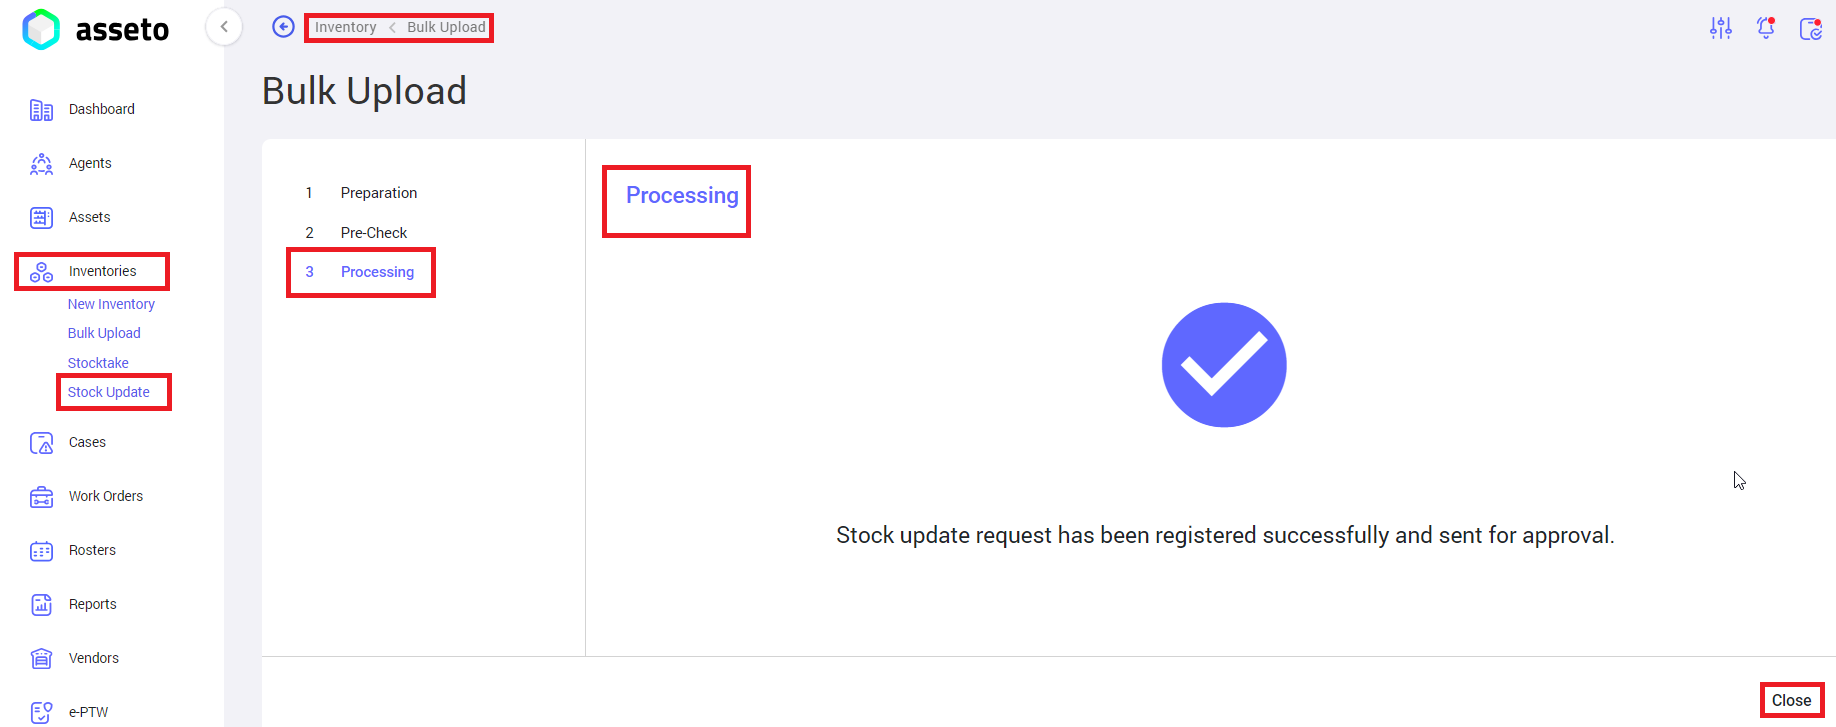
Click on close. added stock update data file through bulk upload will be sent to coordinator for approval and system navigate to stock update bulk upload page as shown by following screenshot.
Note: Agent having role type coordinator can approve or reject the stock update file.
4.5. Inventory Detail View
To view the details of inventory, click on the specific inventory from inventory list system will redirect you to inventory detail view page.
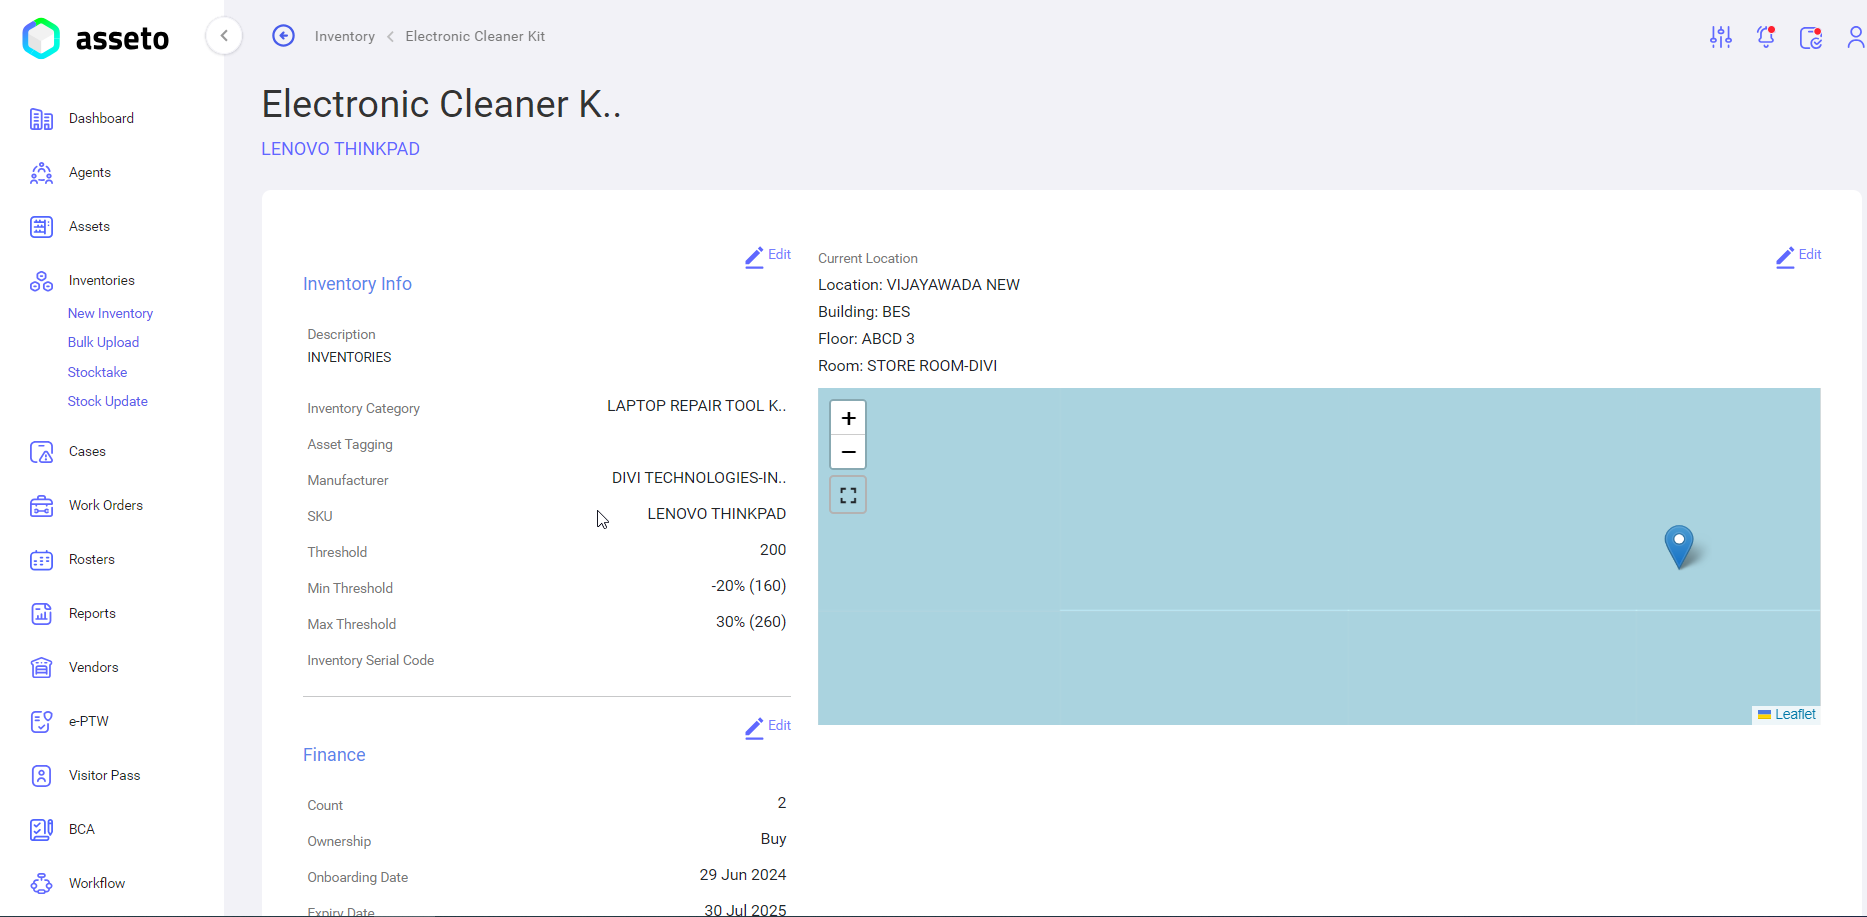
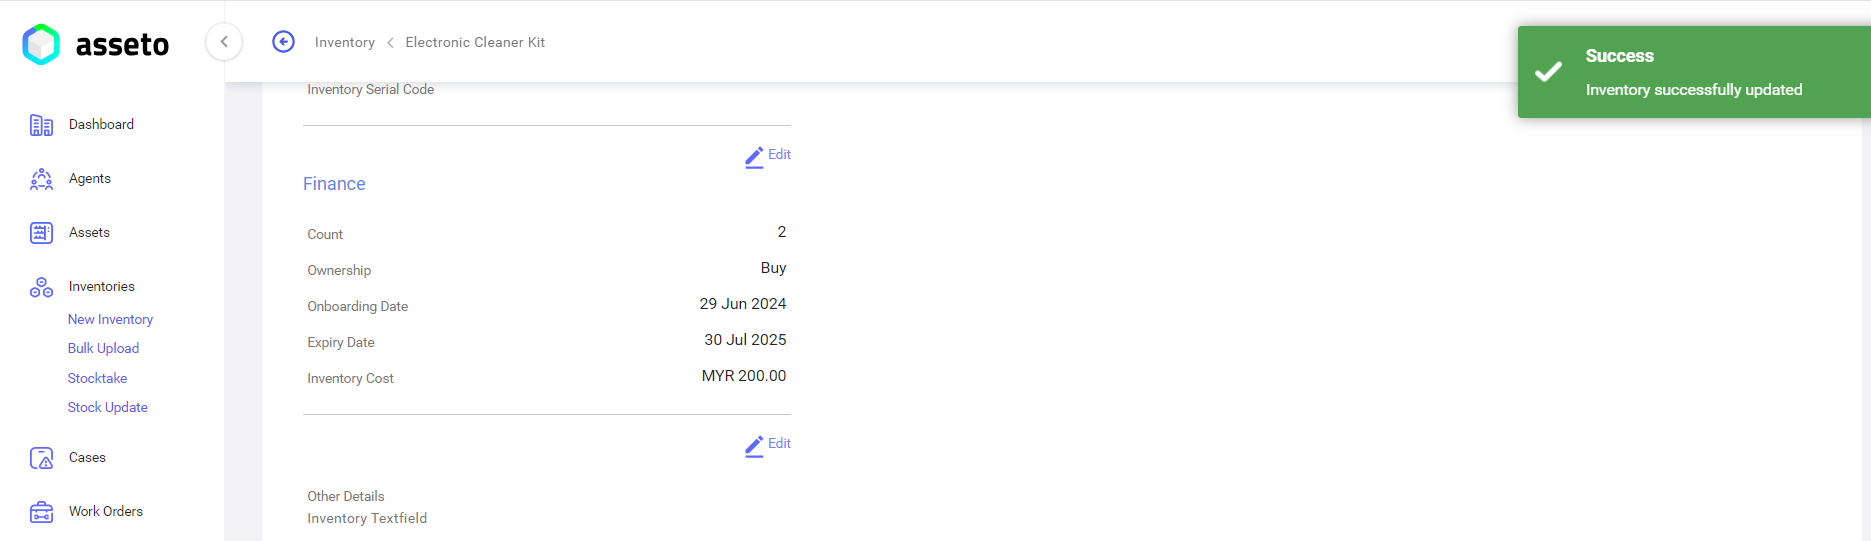
4.6. Inventory Edit
Click on edit icon to edit/update the inventory details.
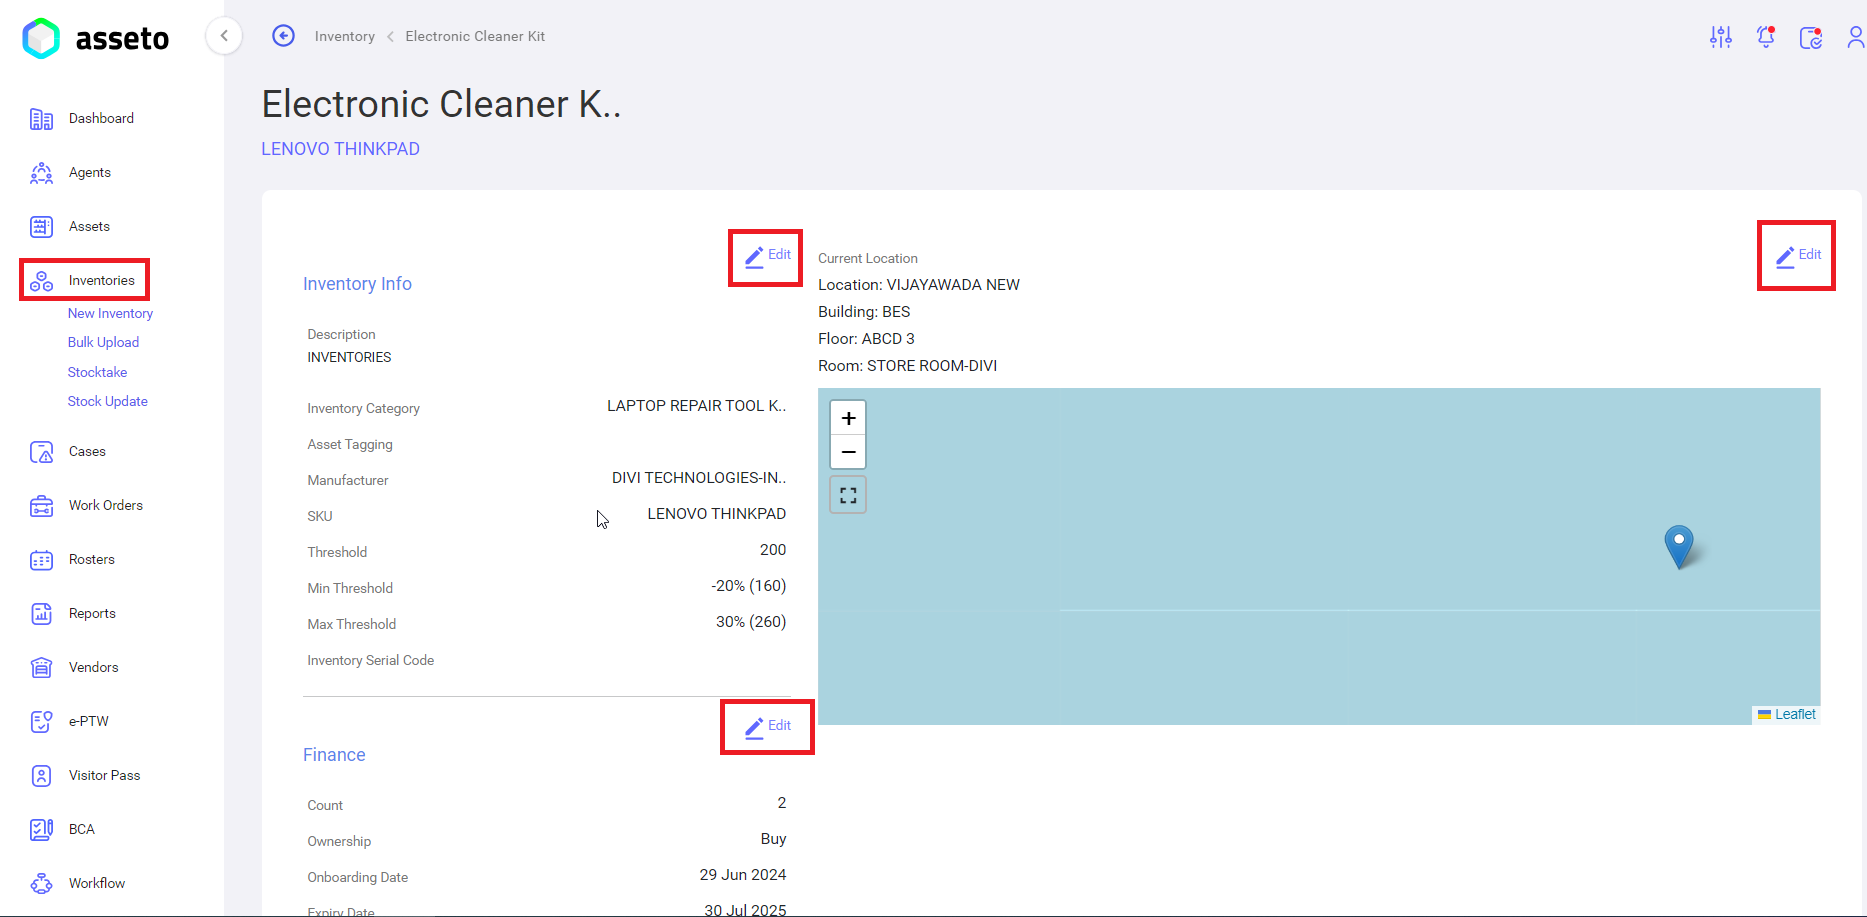
Click on edit icon nearby inventory info, page should be redirected to update inventory page. Users can update the inventory info and click on the save button.

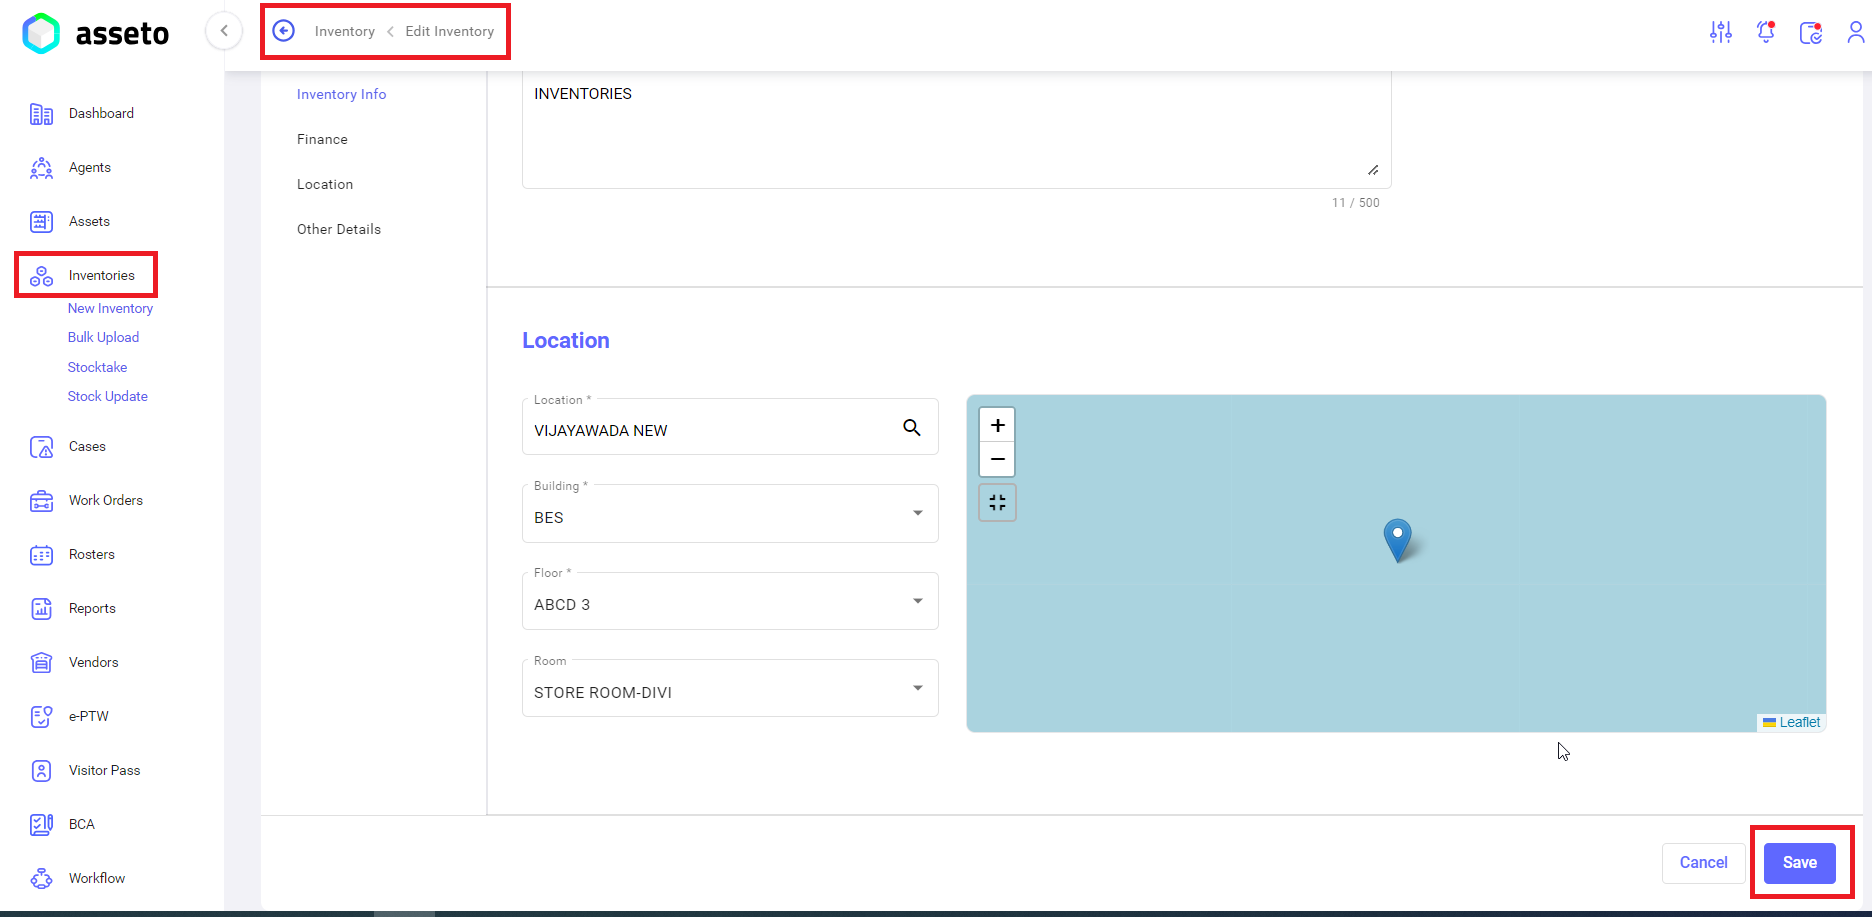
“Inventory details successfully updated” confirmation message will be displayed, updated data will be display on detail view page.
4.7. Stocktake
Stocktake dashboard has the following features.
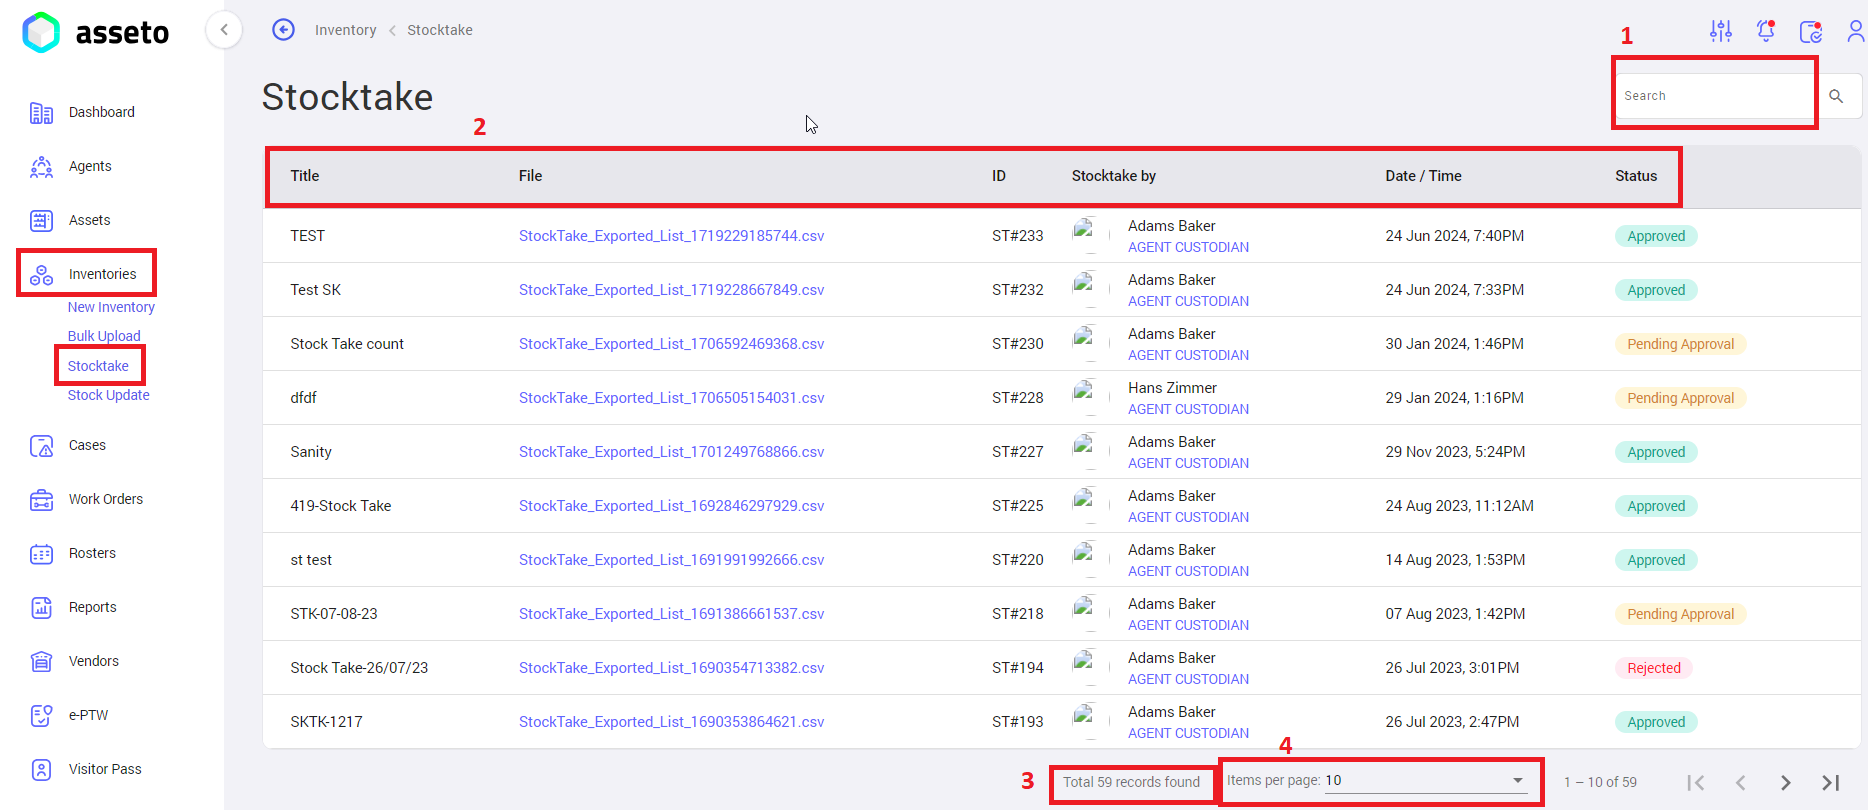
- Search: User can search for any specific file with their title.
- Stocktake table: User can view your uploaded csv files with a link to download to your local pc.
- Total records: Total number of csv files present in the system displayed at the bottom of the inventories stocktake table.
- Pagination: Pagination view is displayed beside the total number of records, you can select the pagination numbers (5,10,25,50,100) to get the desired list.
4.8. StockUpdate
Stock Update dashboard has the following features.
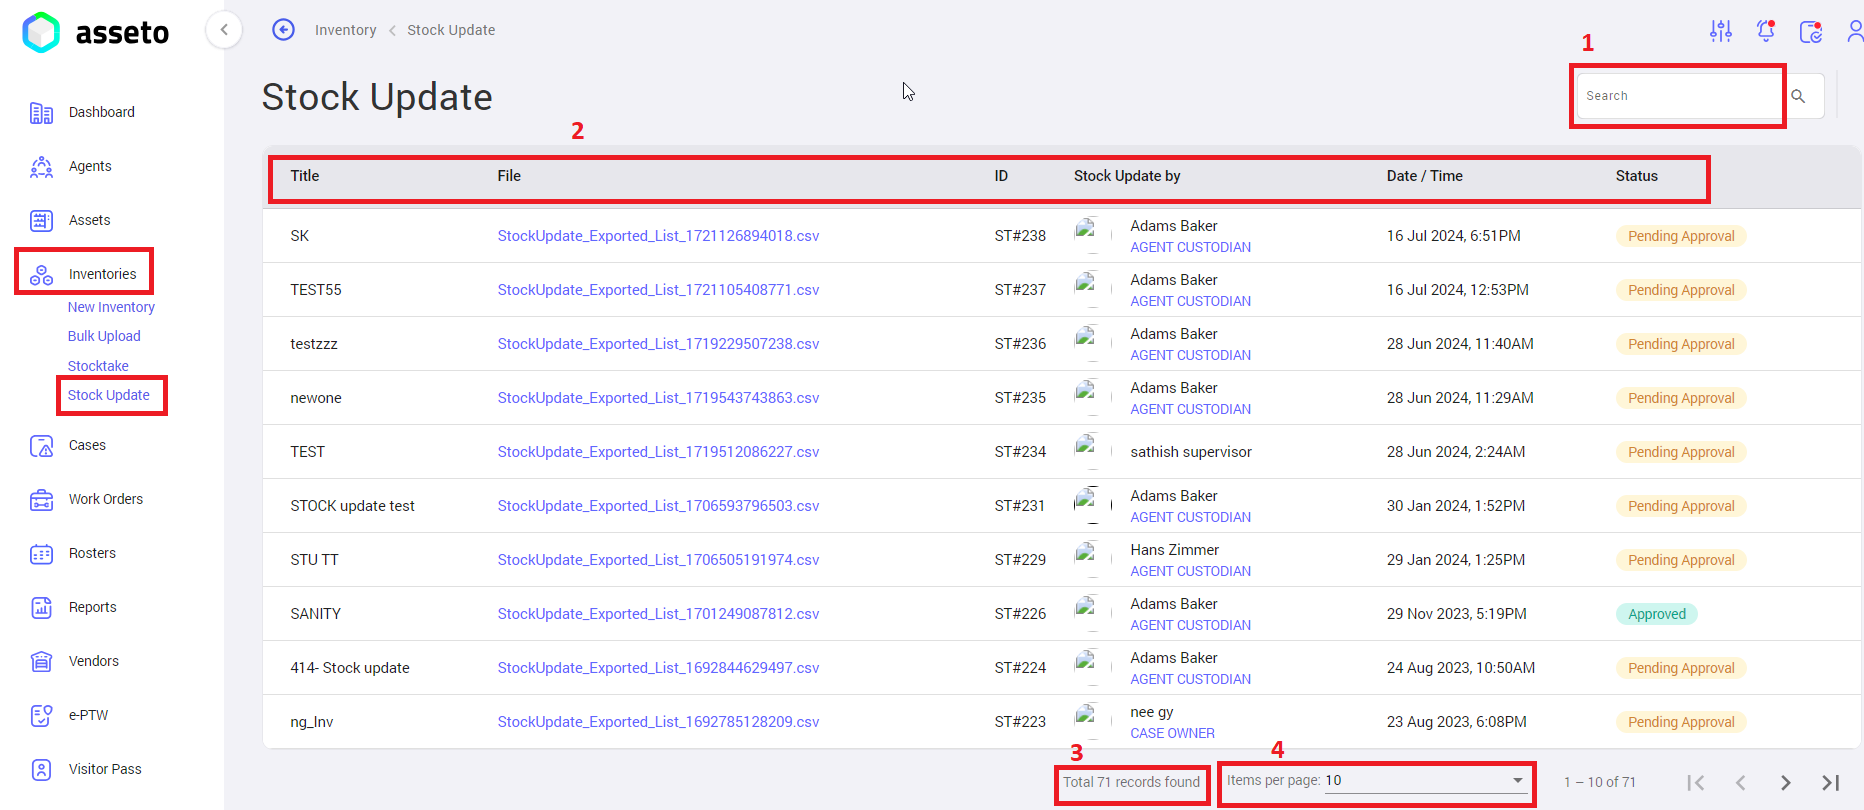
1. Search: User can search for any specific file with their title.
2. Stock Update table: User can view your uploaded csv files with a link to download to your local pc.
3. Total records: Total number of csv files present in the system displayed in bottom of the inventories stock update table.
4. Pagination: Pagination view is displayed beside of total number of records, you can select the pagination numbers (5,10,25,50,100) to get the desired list.