3. Assets
By using this feature user can onboard new asset, relocate, edit asset details (based on permissions assigned to the user) for already created asset from asset detail view page and asset decommission.
This module has the following features.
- New Asset
- Bulk Upload
- 3.1. Assets Dashboard
- 3.2. Pre-Requisites For Asset Creation
- 3.3. New Asset
- 3.4. Bulk Upload
- 3.5. Asset Detail View
- 3.6. Asset Edit/Update
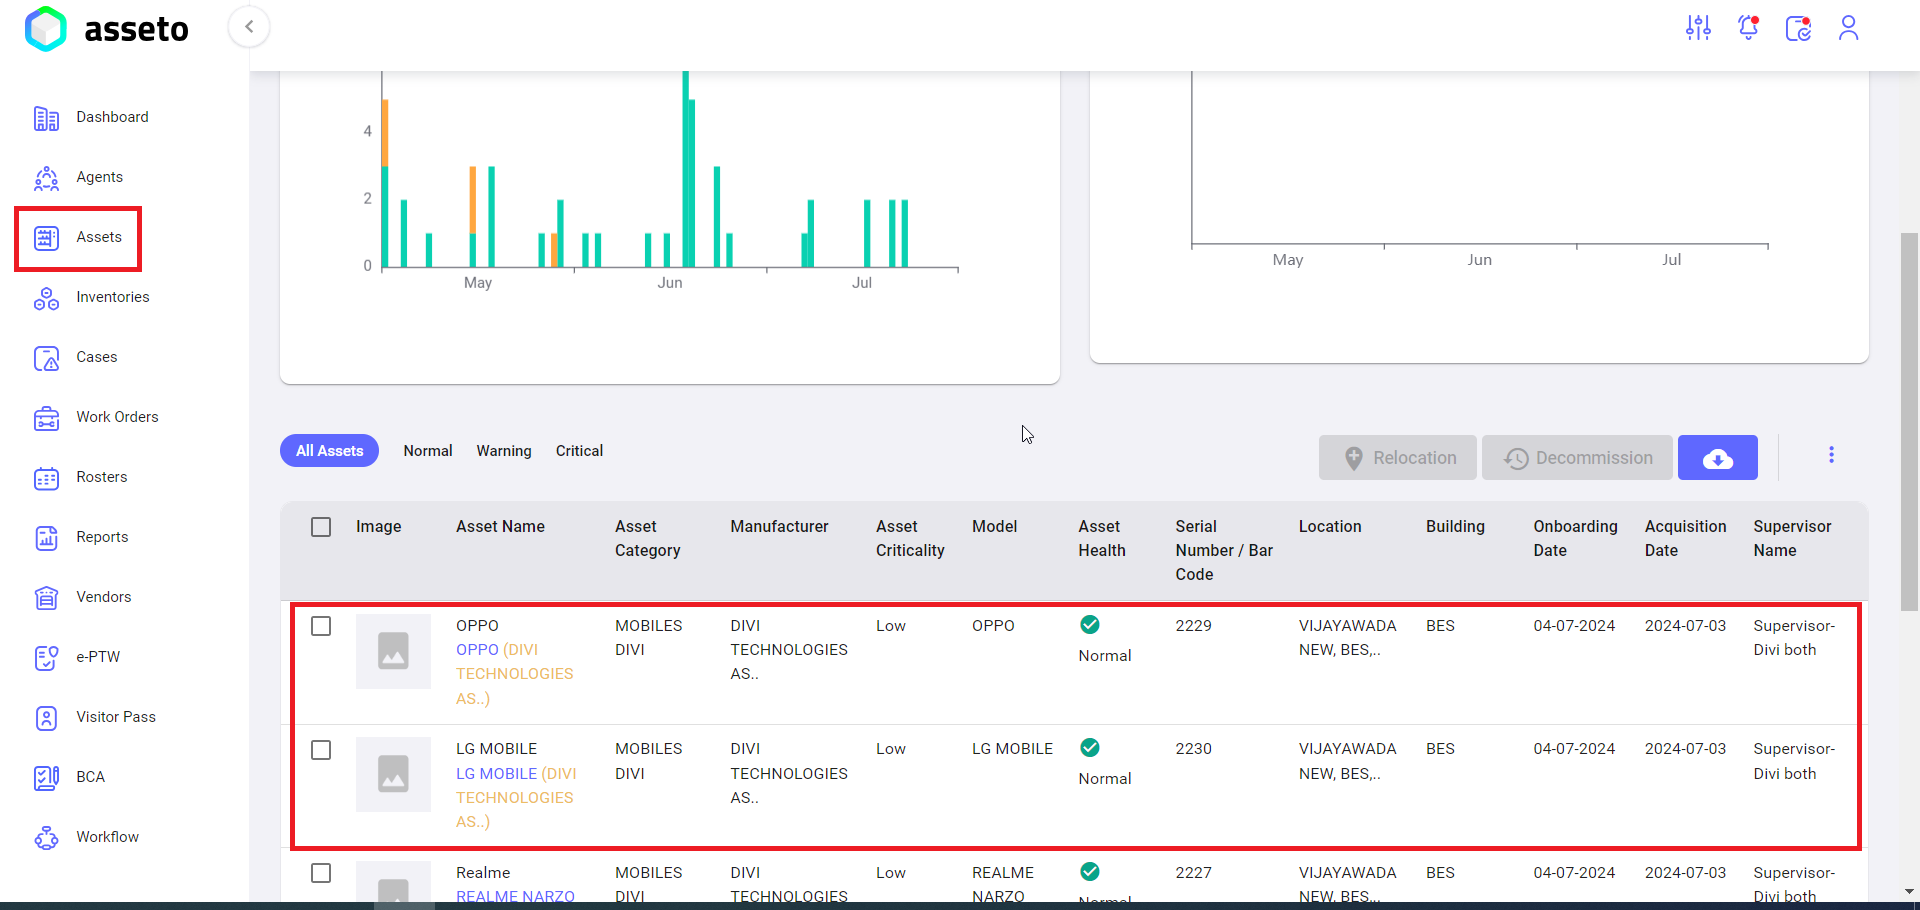
3.1. Assets Dashboard
Assets Dashboard:
The Assets dashboard page is shown in the following screenshot.
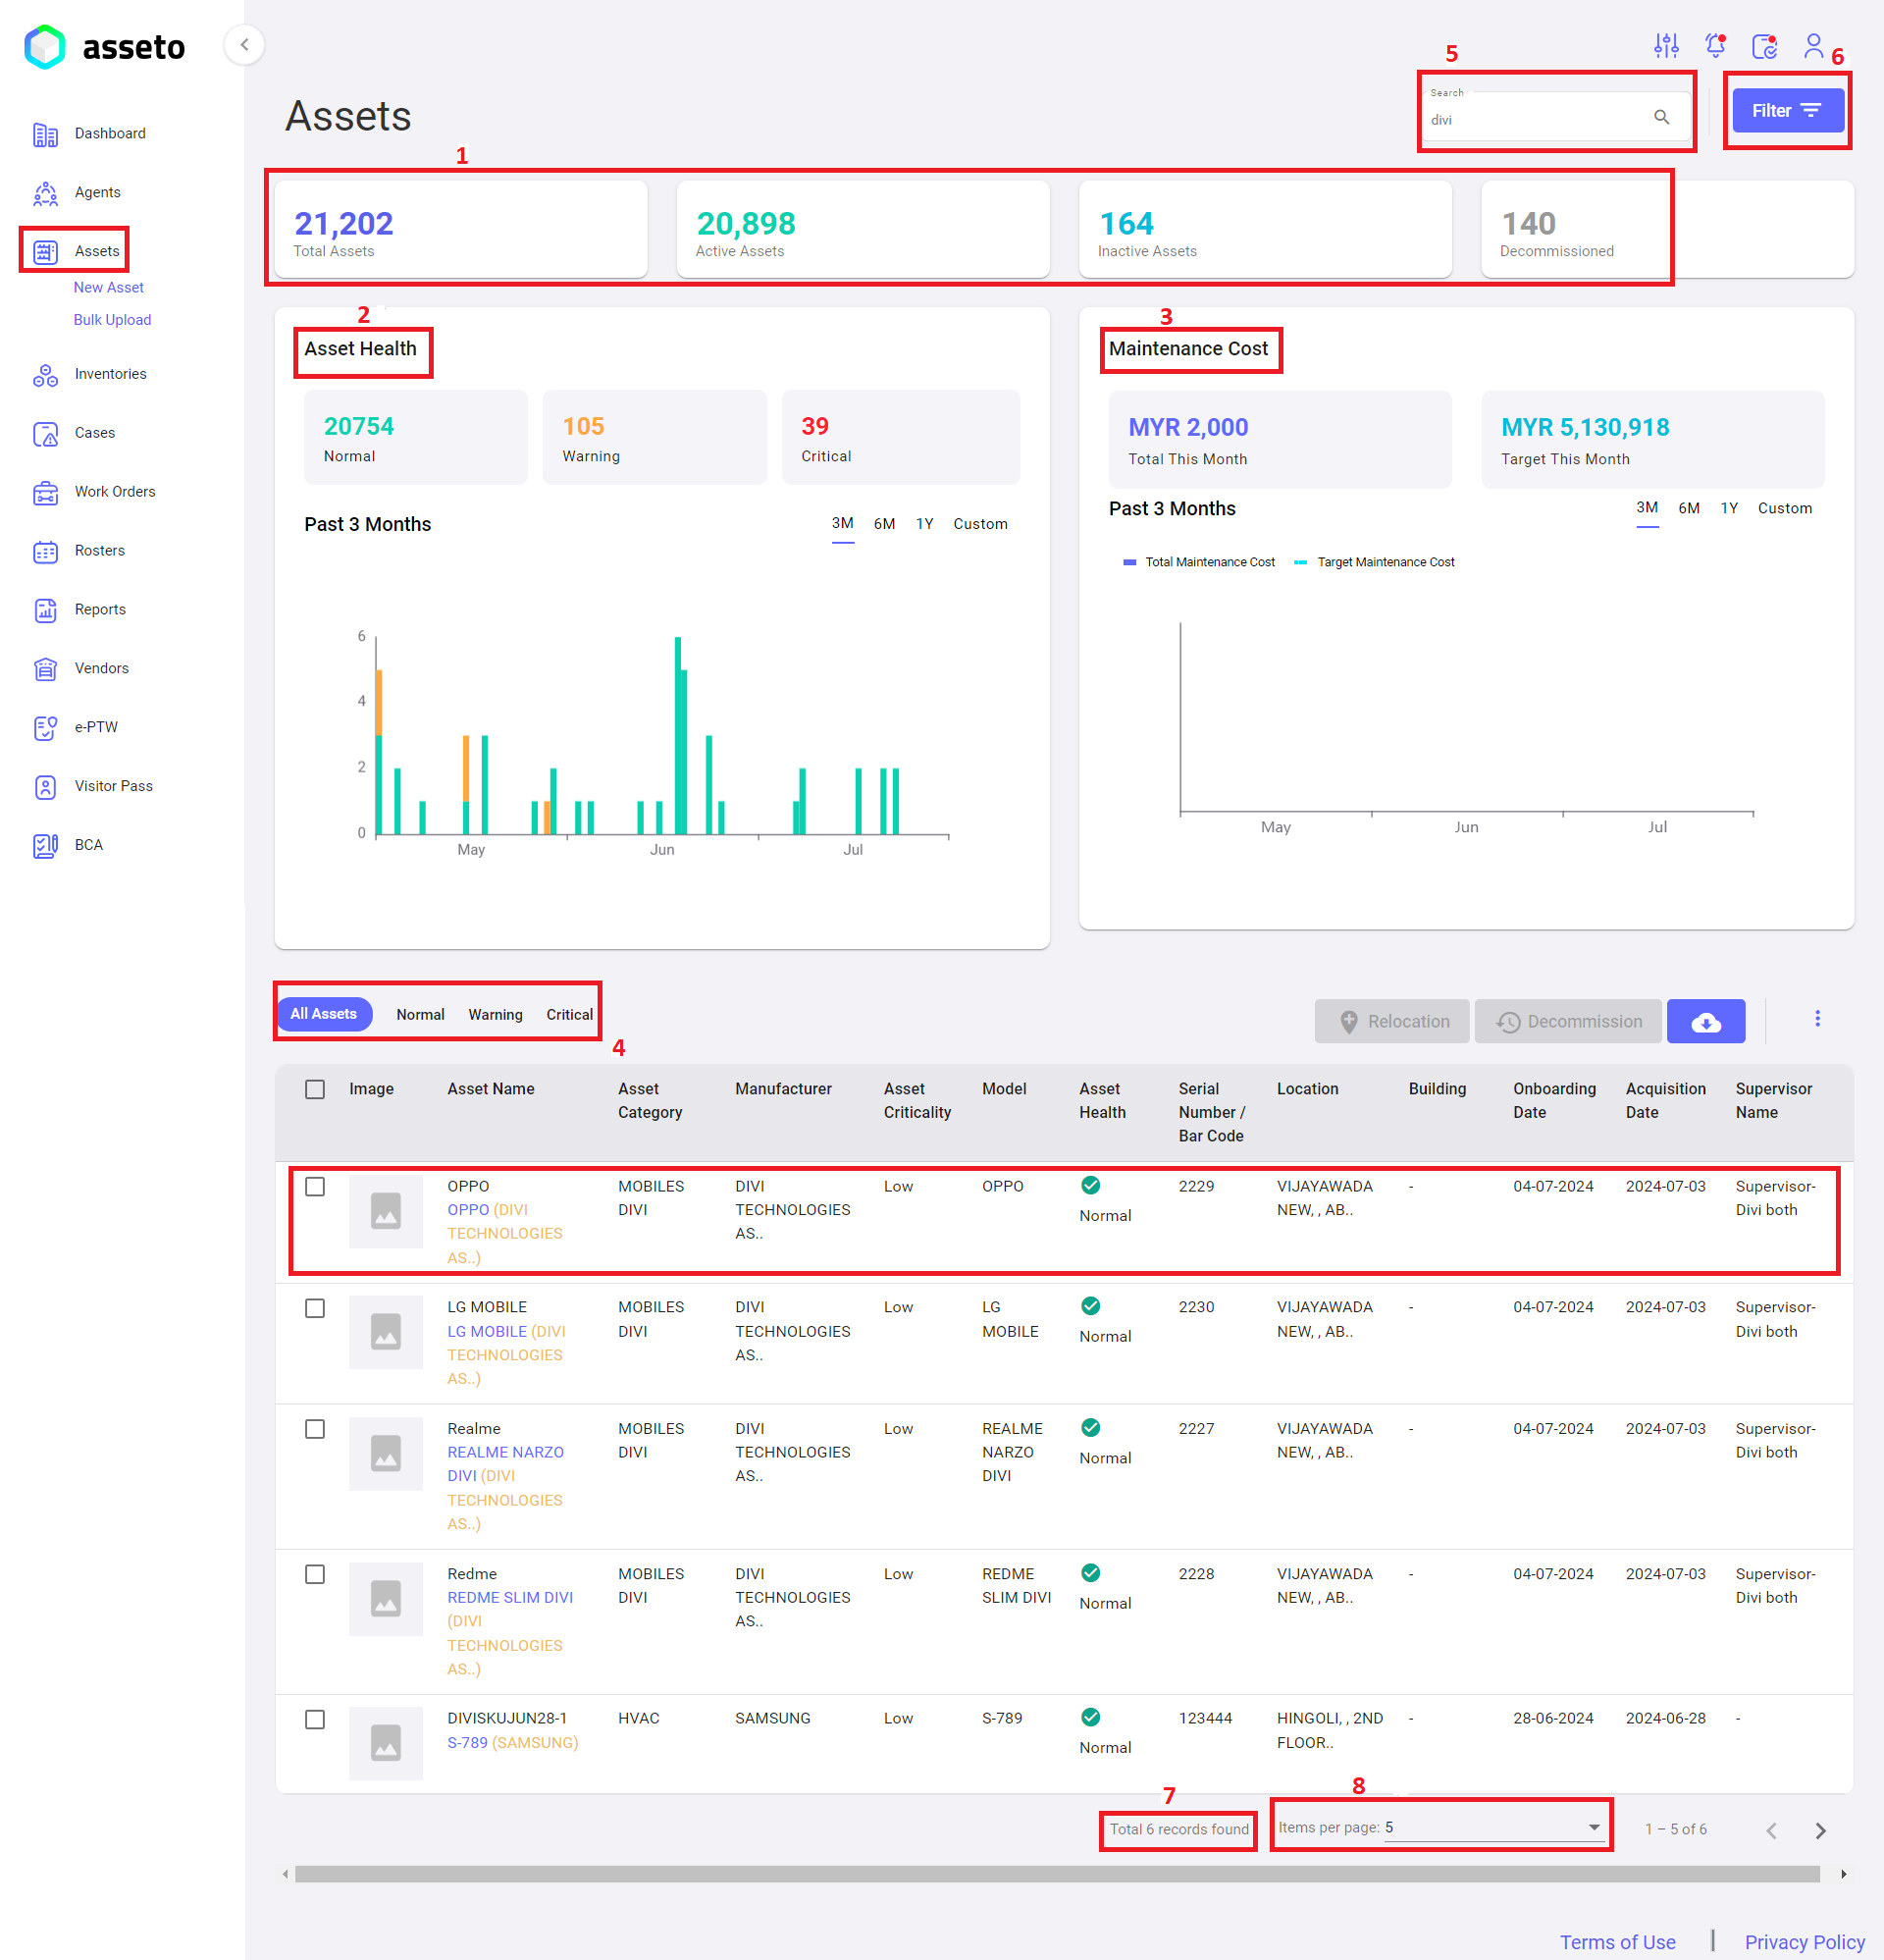
The Assets Dashboard page displays the following information and charts:
- Asset Summary: Shows the total number of assets in the system, including the count of active, inactive, and decommissioned assets to date.
- Asset Health: Displays the number of active assets categorized by health status (Normal, Warning, Critical) and shown in a bar chart for different time periods (e.g., 3 months, 6 months, 1 year).
- Maintenance Cost: Shows maintenance cost data with "Total This Month" and "Target This Month" values. A chart visualizes the total and target maintenance costs.
- Assets List: Users can view the complete list of onboarded assets on the dashboard.
- Search Bar: Allows users to search for specific assets by asset name.
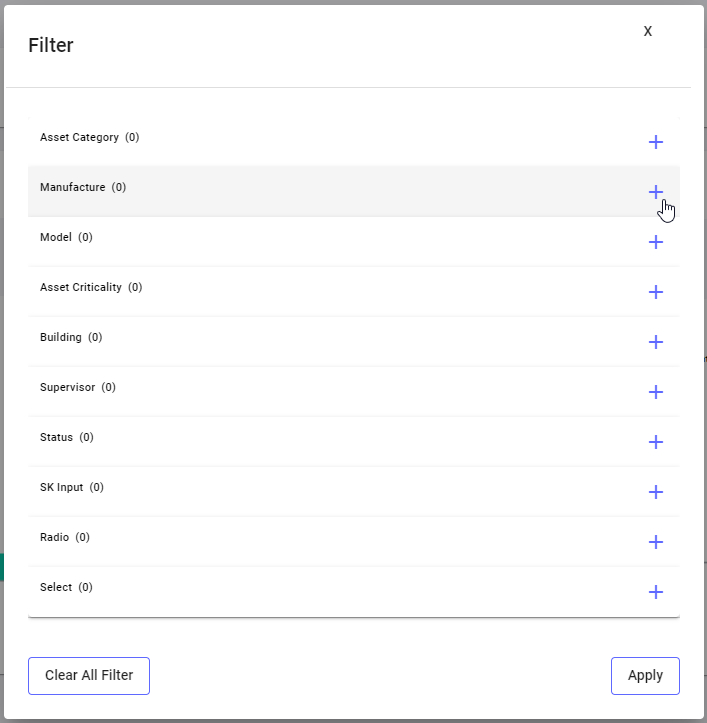
- Filter: Filters assets by various criteria such as asset category, manufacturer, model, etc. Clicking the filter icon will display a screen where the user can select filters, click the "Add" button, and then click "Apply." Filtered results will be displayed on the assets dashboard.

- Total Records: The total number of assets in the system is displayed at the bottom of the assets table.
- Pagination: The pagination view is located beside the total number of records, allowing the user to select the number of records to display per page (5, 10, 25, 50, 100) to view the desired list.
Assets List Page:
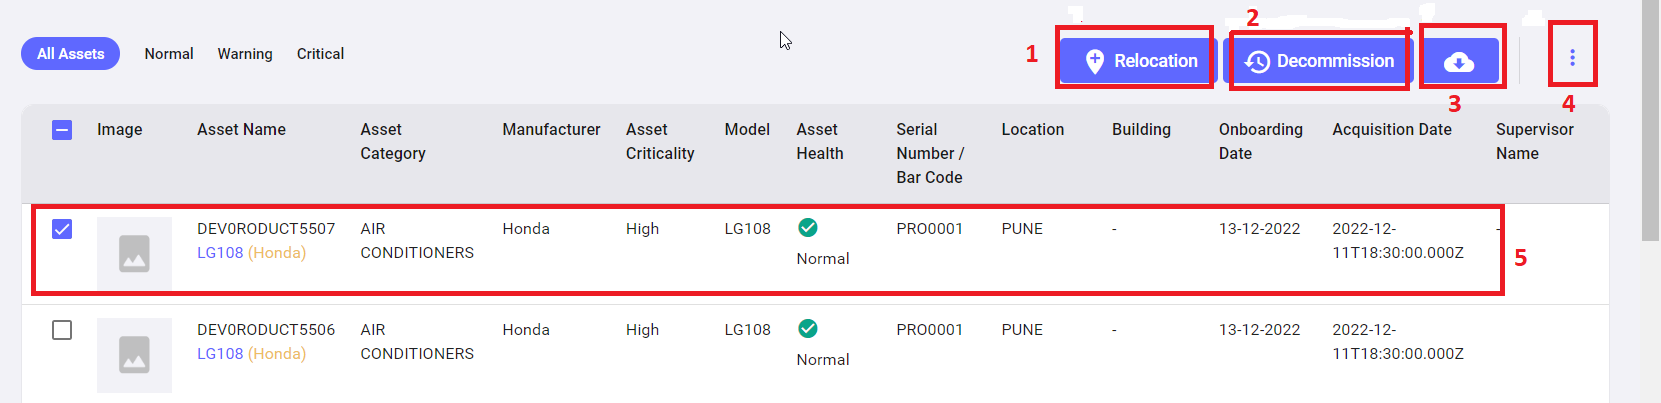
The asset list page has the following features.
1. Asset Relocation: Clicking the "Relocation" button will navigate the user to a new work order page with the subject set to "Relocation Request" and some auto-filled data for the selected asset. The user can fill in the remaining fields and click "Save" to apply for asset relocation.
2. Asset Decommission: Clicking the "Decommission" button will navigate the user to a new work order page with the subject set to "Decommission Request" and some auto-filled data for the selected asset. The user can fill in the remaining fields and click "Save" to apply for asset decommissioning.
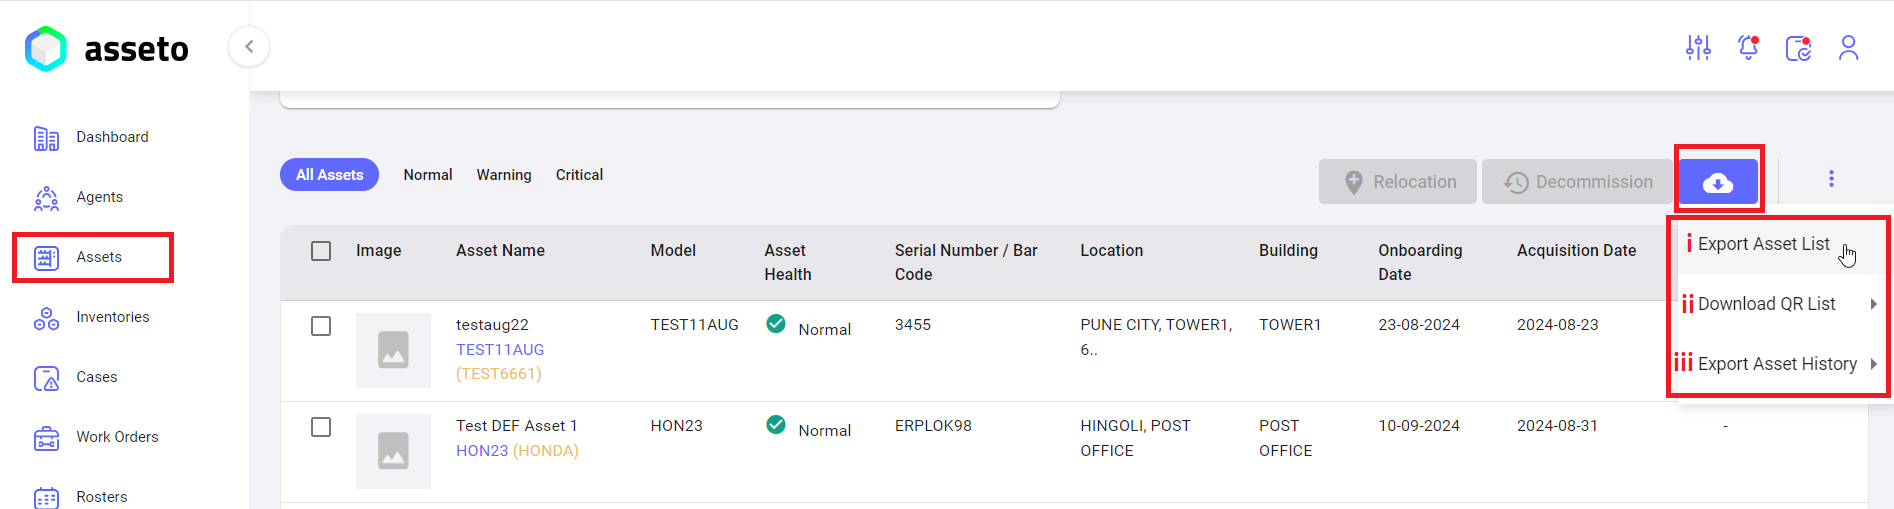
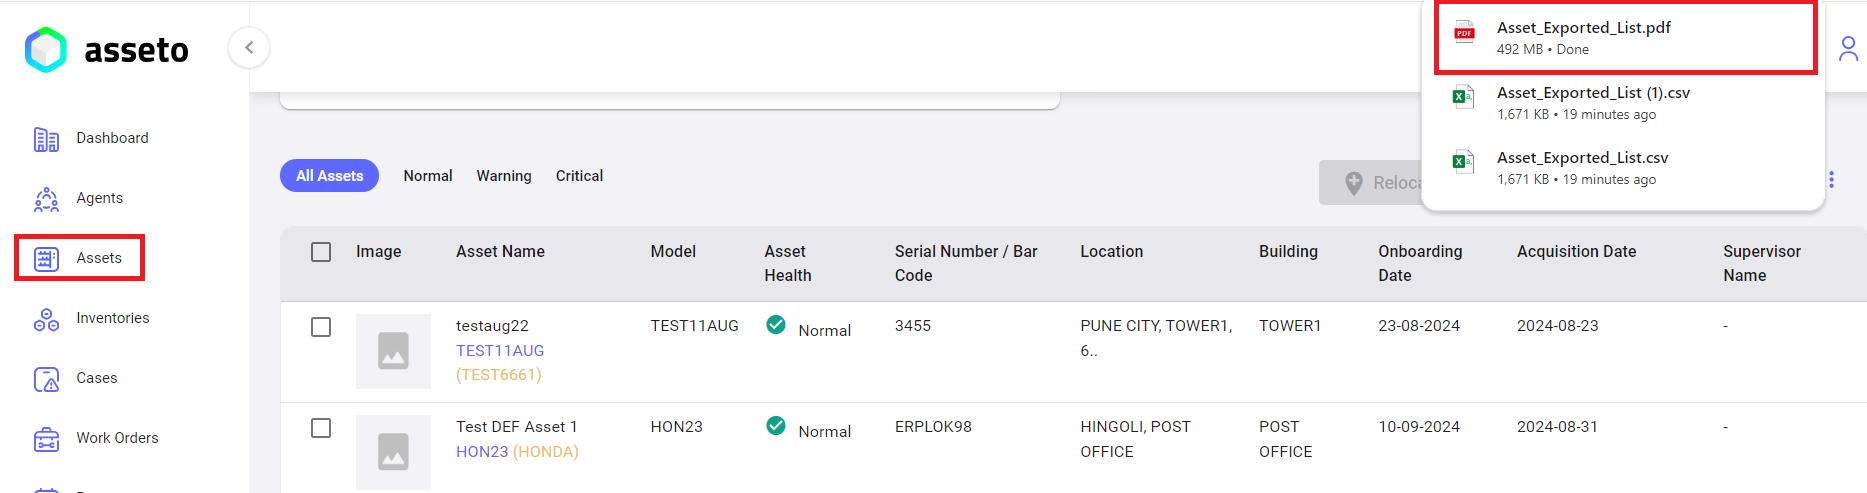
i. Export Asset List: To export the list of available assets from the system, please follow the appropriate procedures.
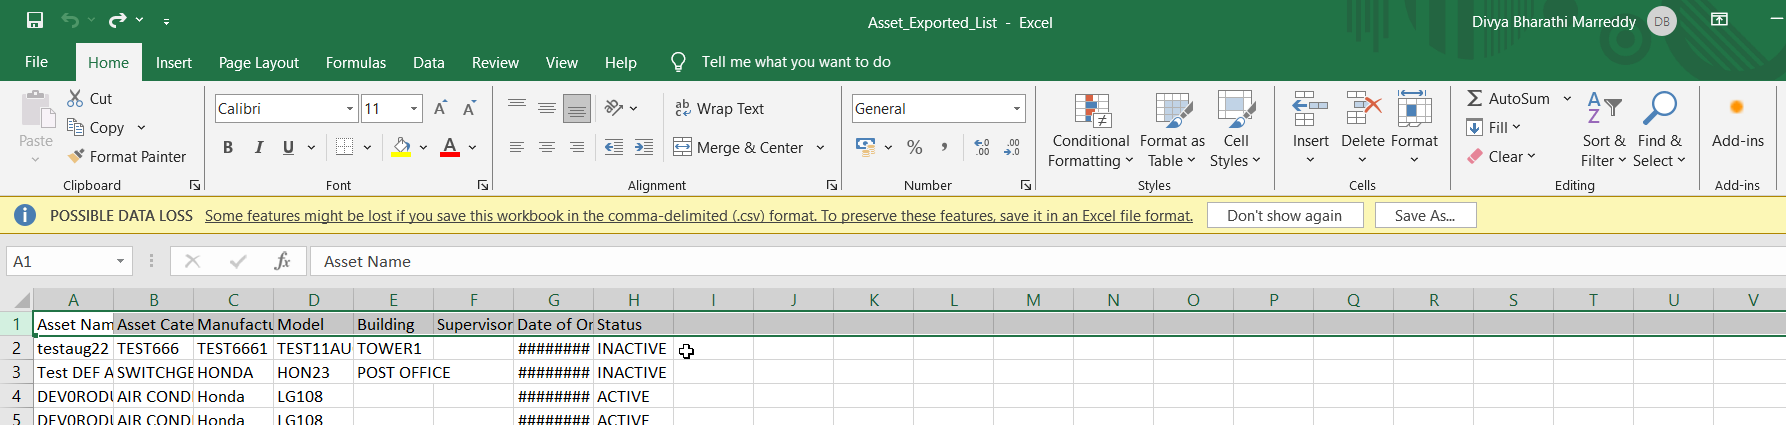
When you click on “Export Asset List” option, all assets list csv file downloaded into your local system.
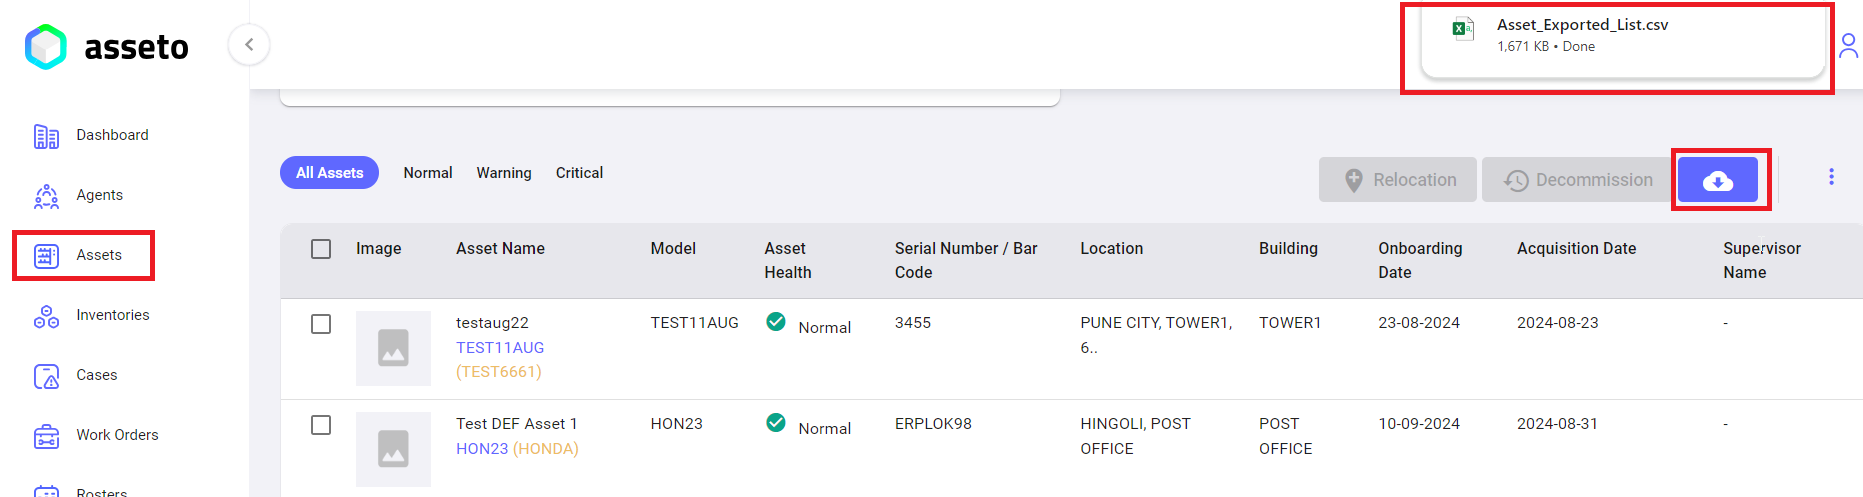
Asset exported file as shown by following screenshot.
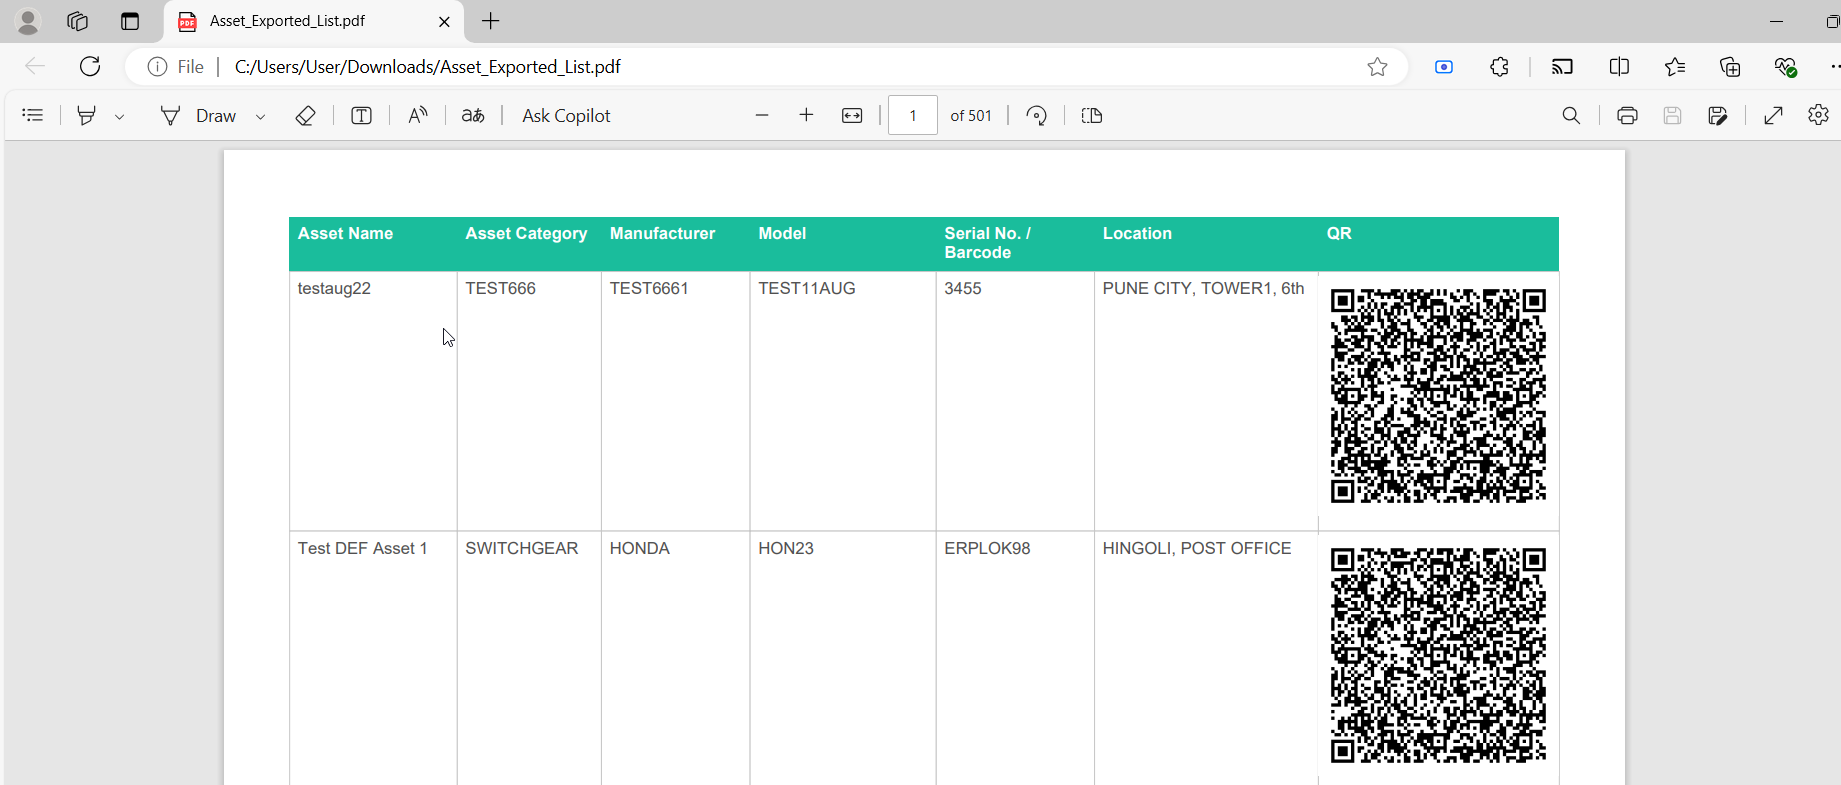
ii. Download QR List: To download the assets list with QR.
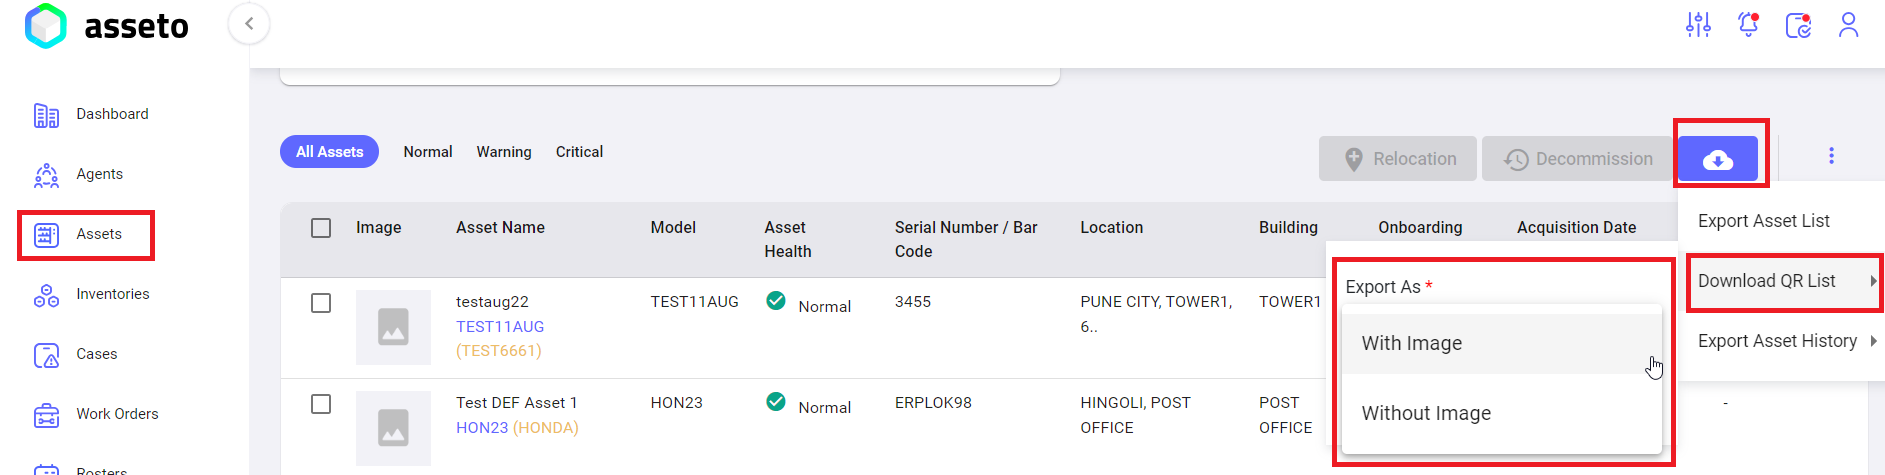
When the user selects the "Download QR List" option, the "Export As" feature will present two choices: ‘With Image’ and ‘Without Image’. The user should select one of these options to download the assets list with QR codes.
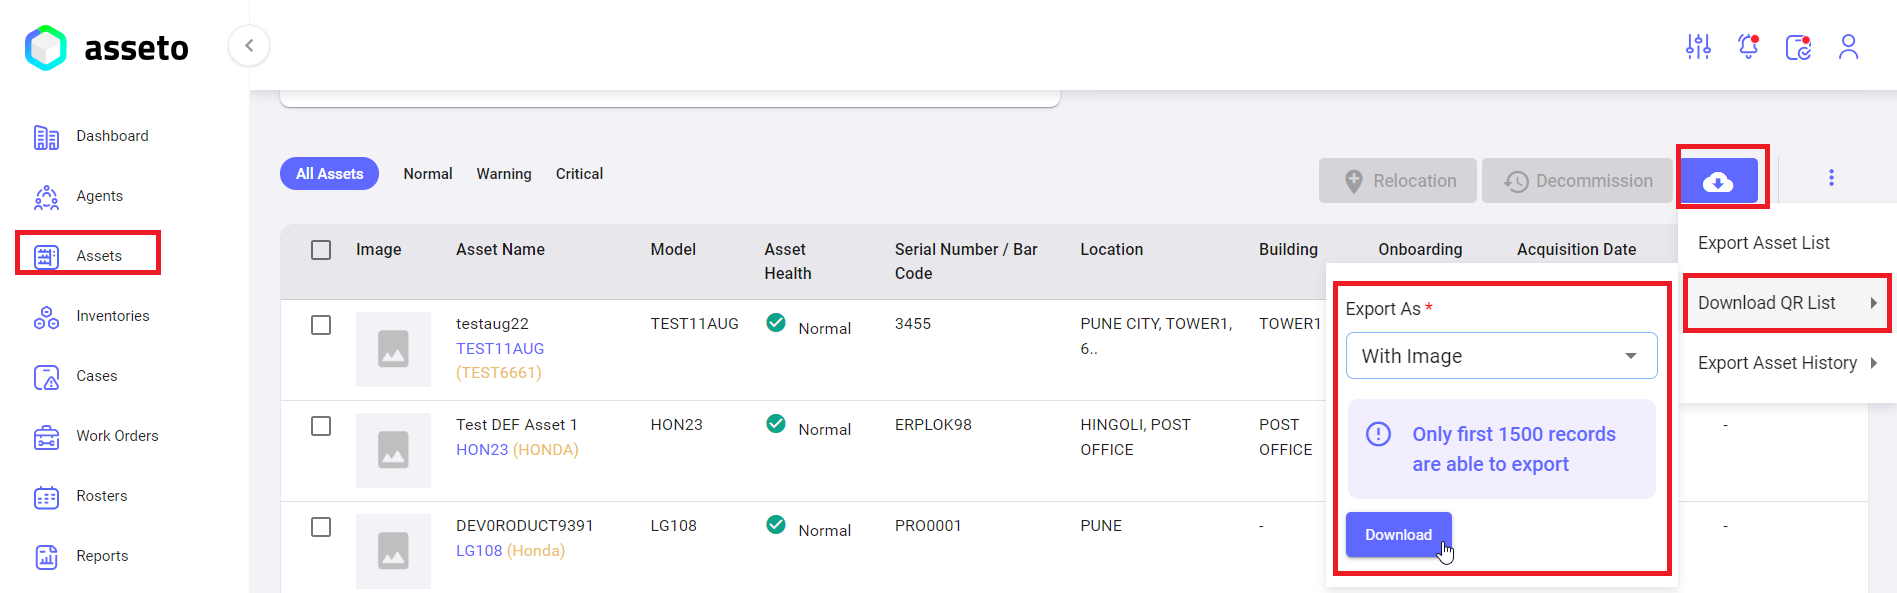
When the user clicks the "Download" button, a PDF file containing the assets list with QR codes will be downloaded to their local system.
The asset exported PDF file with QR codes is shown in the following screenshot.
iii. Export Asset History: This option allows the user to download the asset history for the selected date range.
When the user selects the "Export Asset History" option, the "Calendar" feature will appear, allowing the user to select a start date and end date. Please select the dates to download the asset history within the chosen range.
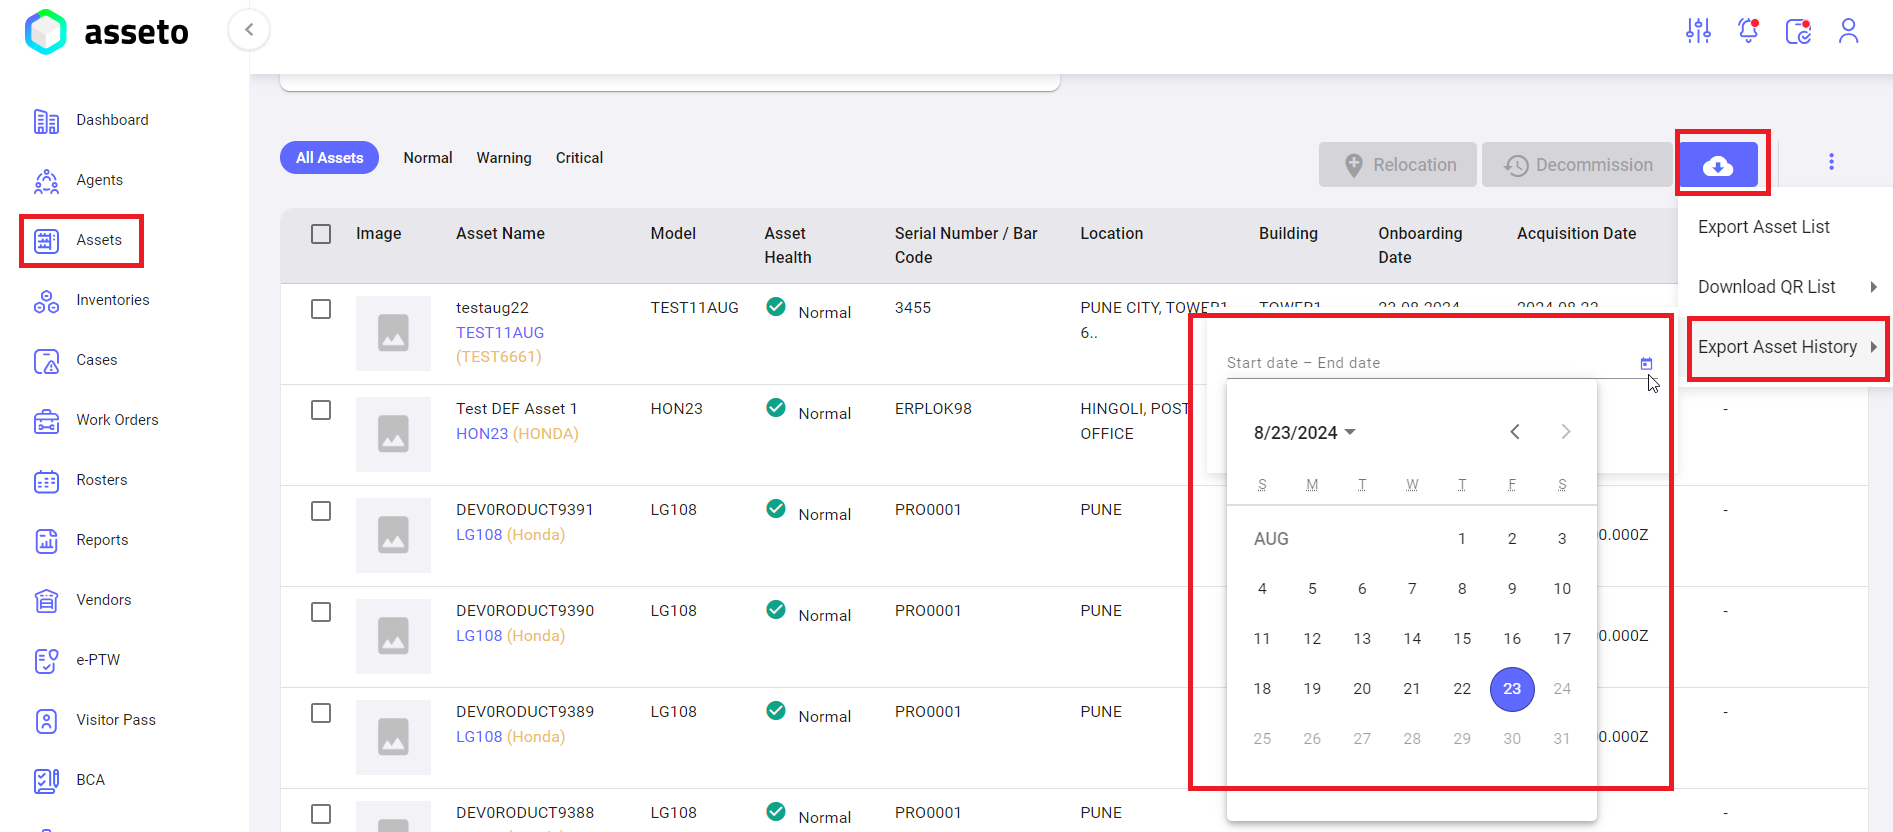
Click the "Download History" button to download the asset history for the selected date range.
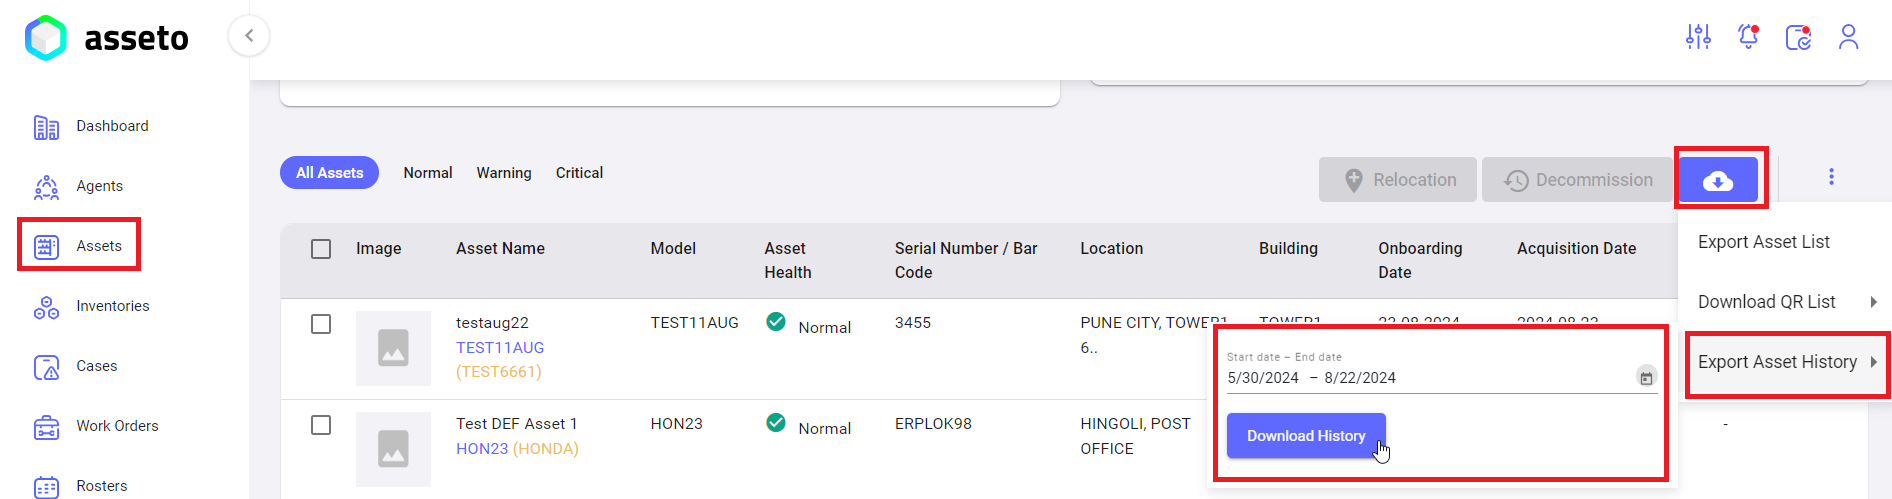
The assets list file will be downloaded to the user's local system.
4. List Icon: Customize Table View: The user can customize the table by selecting various columns and clicking the "Save" button. The selected columns will then populate in the assets table with the data.
5. Asset Detail View: The user can view the detailed information of an asset by selecting it from the assets list on the assets dashboard page.
3.2. Pre-Requisites For Asset Creation
To onboard assets, the following configurations must be completed in the settings module(Asset category, Manufacturer, Model, Location, Currency, Roles, Skillset.:
- Go to Settings and open Assets to configure Category, Manufacturer, and Model.
- Go to Settings and open Organization to configure Currency Settings, Location, and Roles.
- Go to Settings and open Agents to configure Skillset.
- Go to the Agents module and create new agents with roles. These agents can then be selected as Supervisor and Assignee from the dropdown when creating a new asset.
- Go to the Vendor module and create a new vendor to select from the dropdown while creating a new asset.
i. Go to settings and open assets to configure Category, Manufacturer, Model
Settings -> Assets -> Category
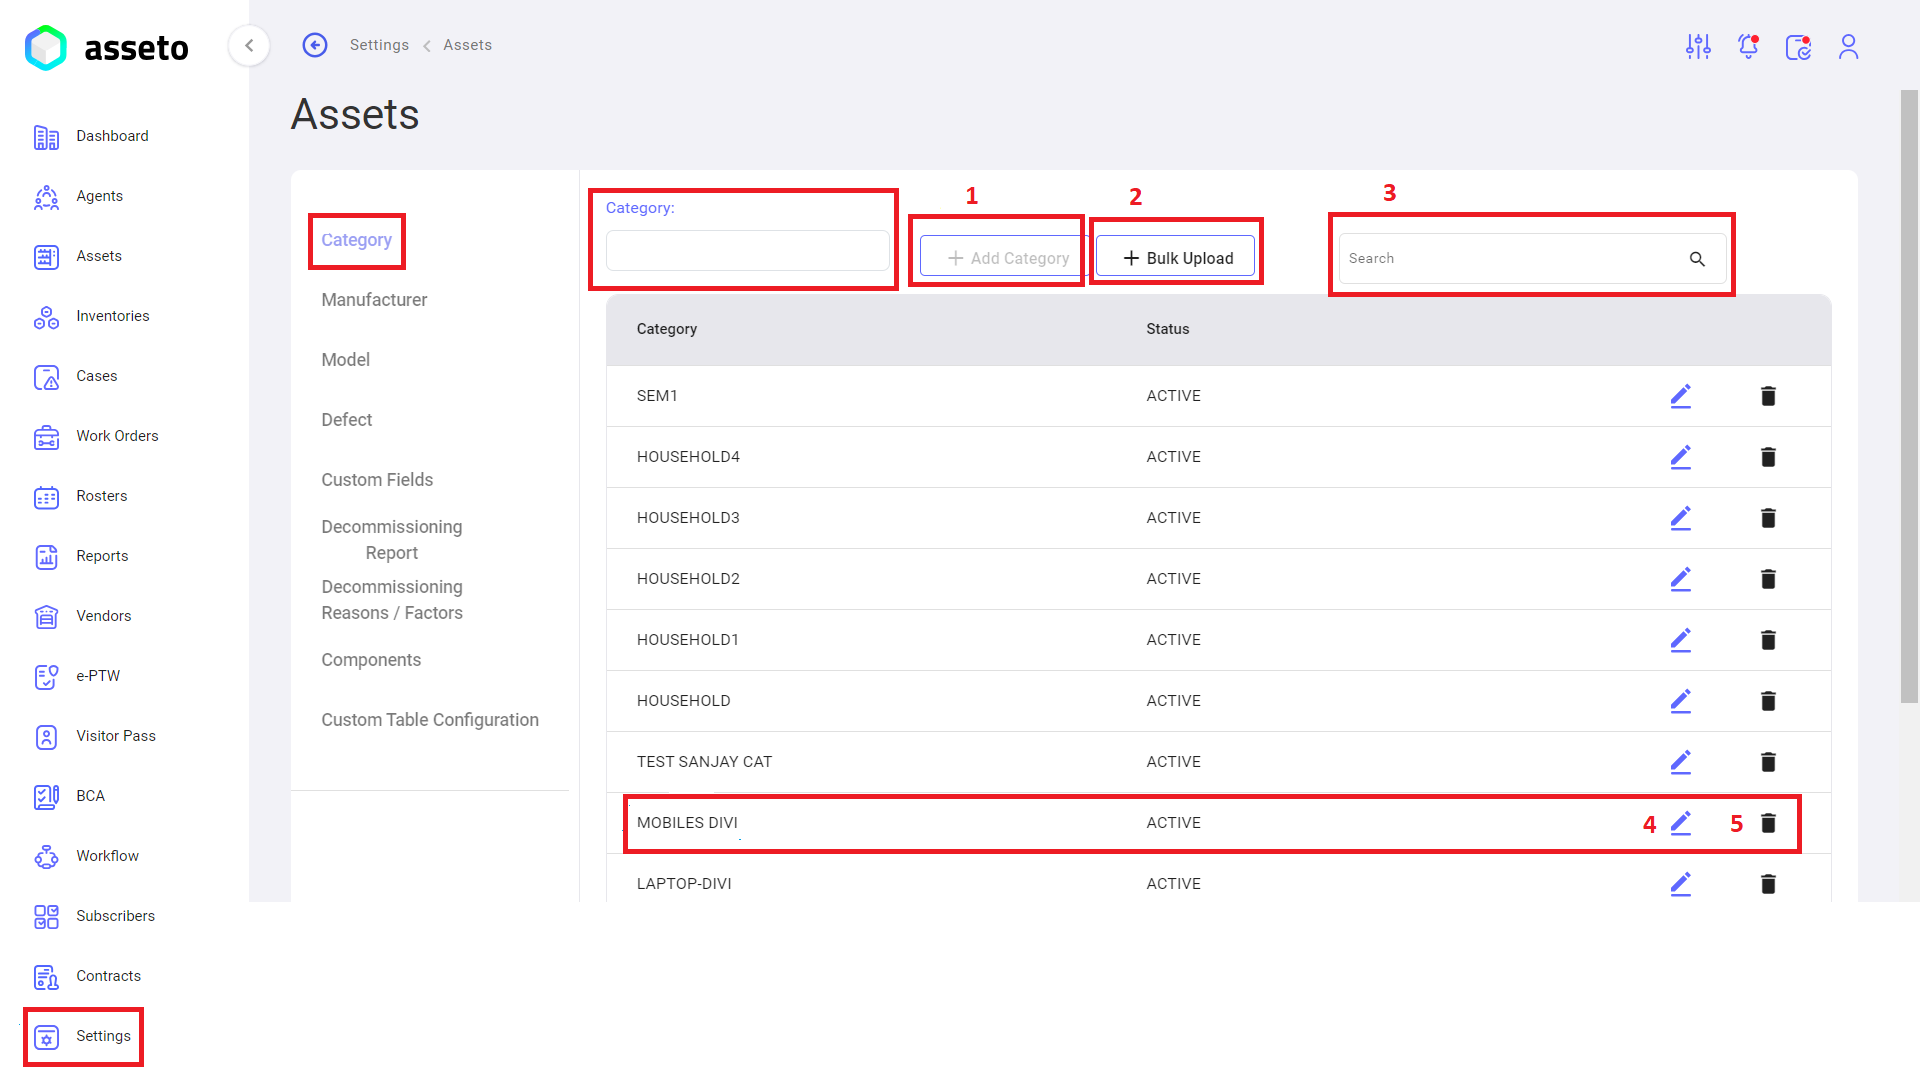
- Add Asset Category: Enter the category name in the text box and click the "Add Category" button to create an individual category.
- Asset Category Bulk Upload: Click the bulk upload button to create multiple categories at once. Download the CSV file, fill in the data, and then upload it.
- Search: Search for any category by its name.
- Edit Asset Category: Edit an existing category by clicking the edit icon next to the desired category in the list.
- Delete Asset Category: Delete an existing category by clicking the delete icon next to the desired category in the list.
Settings -> Assets -> Manufacturer:
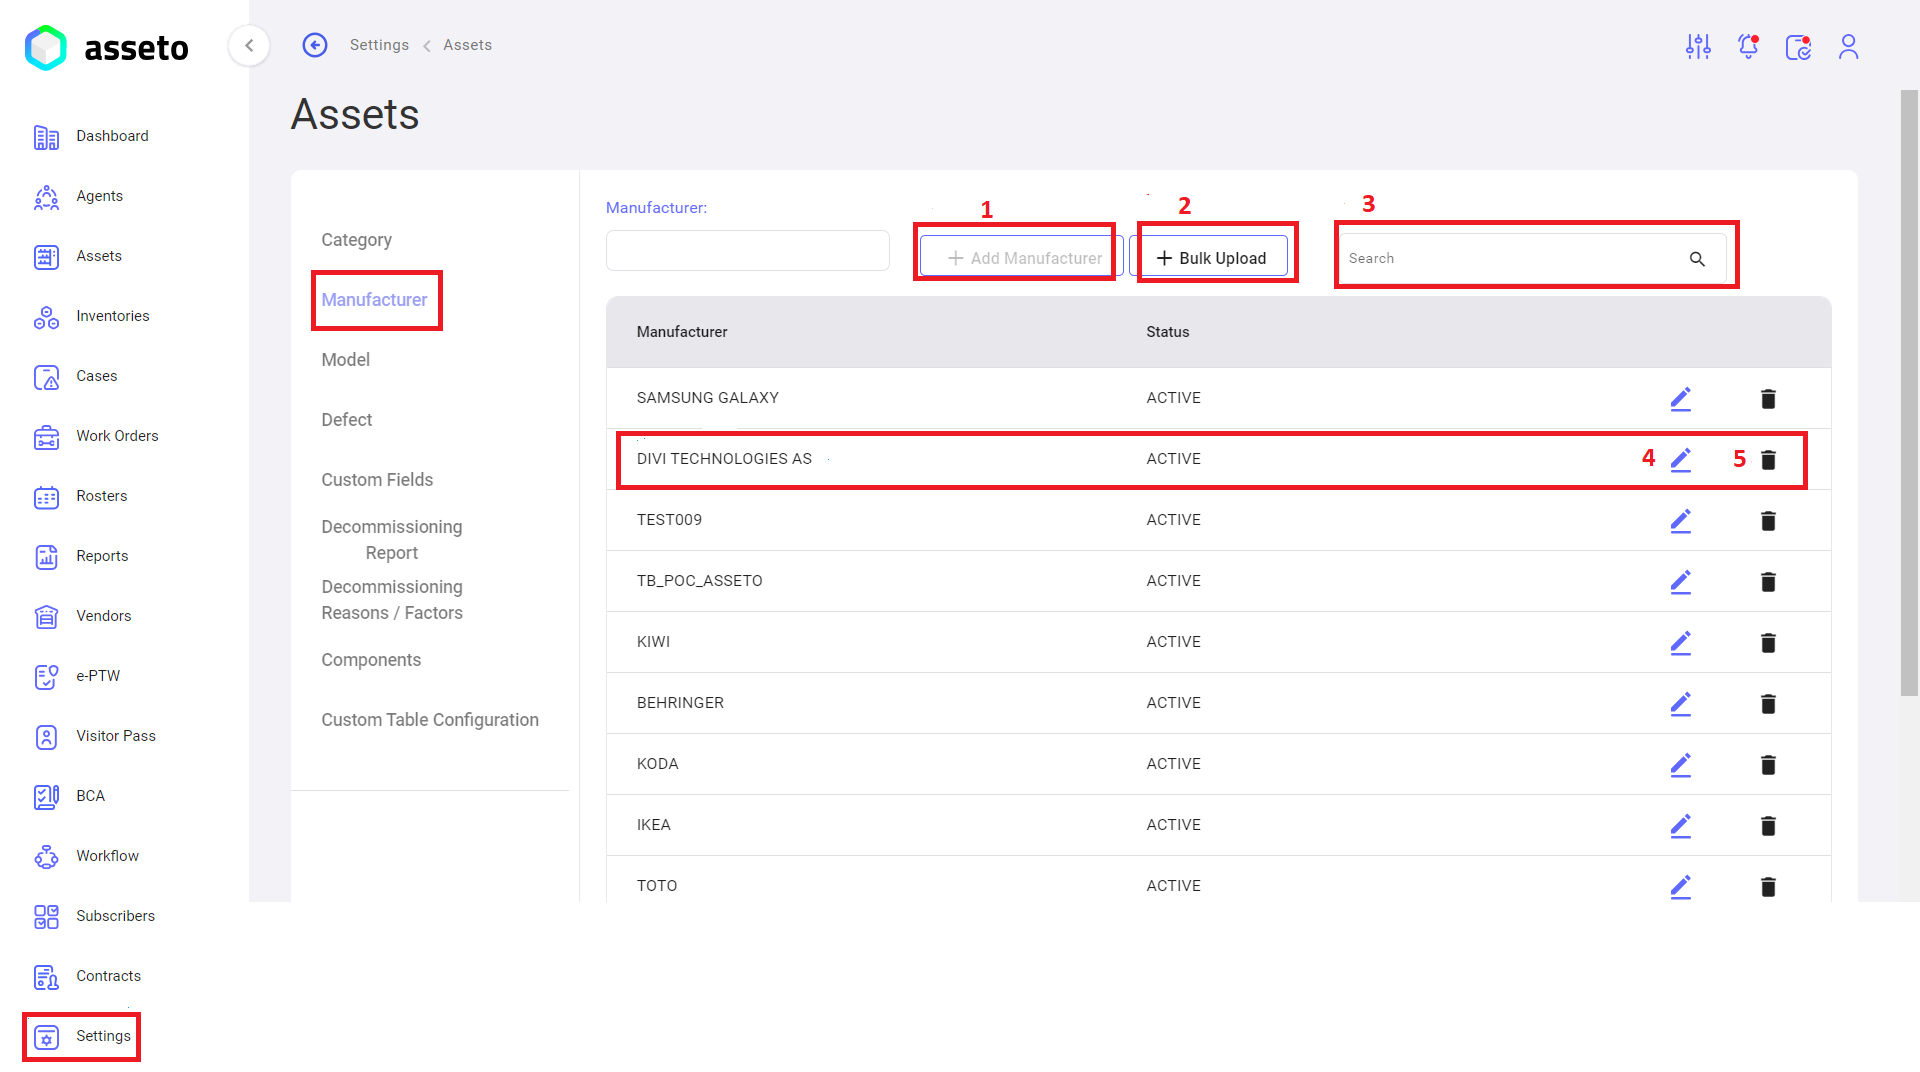
- Add Manufacturer: Enter the manufacturer name in the text box and click the "Add Manufacturer" button to onboard an individual manufacturer.
- Bulk Upload Manufacturer: Click the bulk upload button to onboard multiple manufacturers at once. Download the CSV file, fill in the data, and upload it.
- Search: Search for any manufacturer by name.
- Edit Manufacturer: Edit an existing manufacturer by clicking the edit icon next to the desired manufacturer in the list.
- Delete Manufacturer: Delete an existing manufacturer by clicking the delete icon next to the desired manufacturer in the list.
Settings -> Assets -> Model:
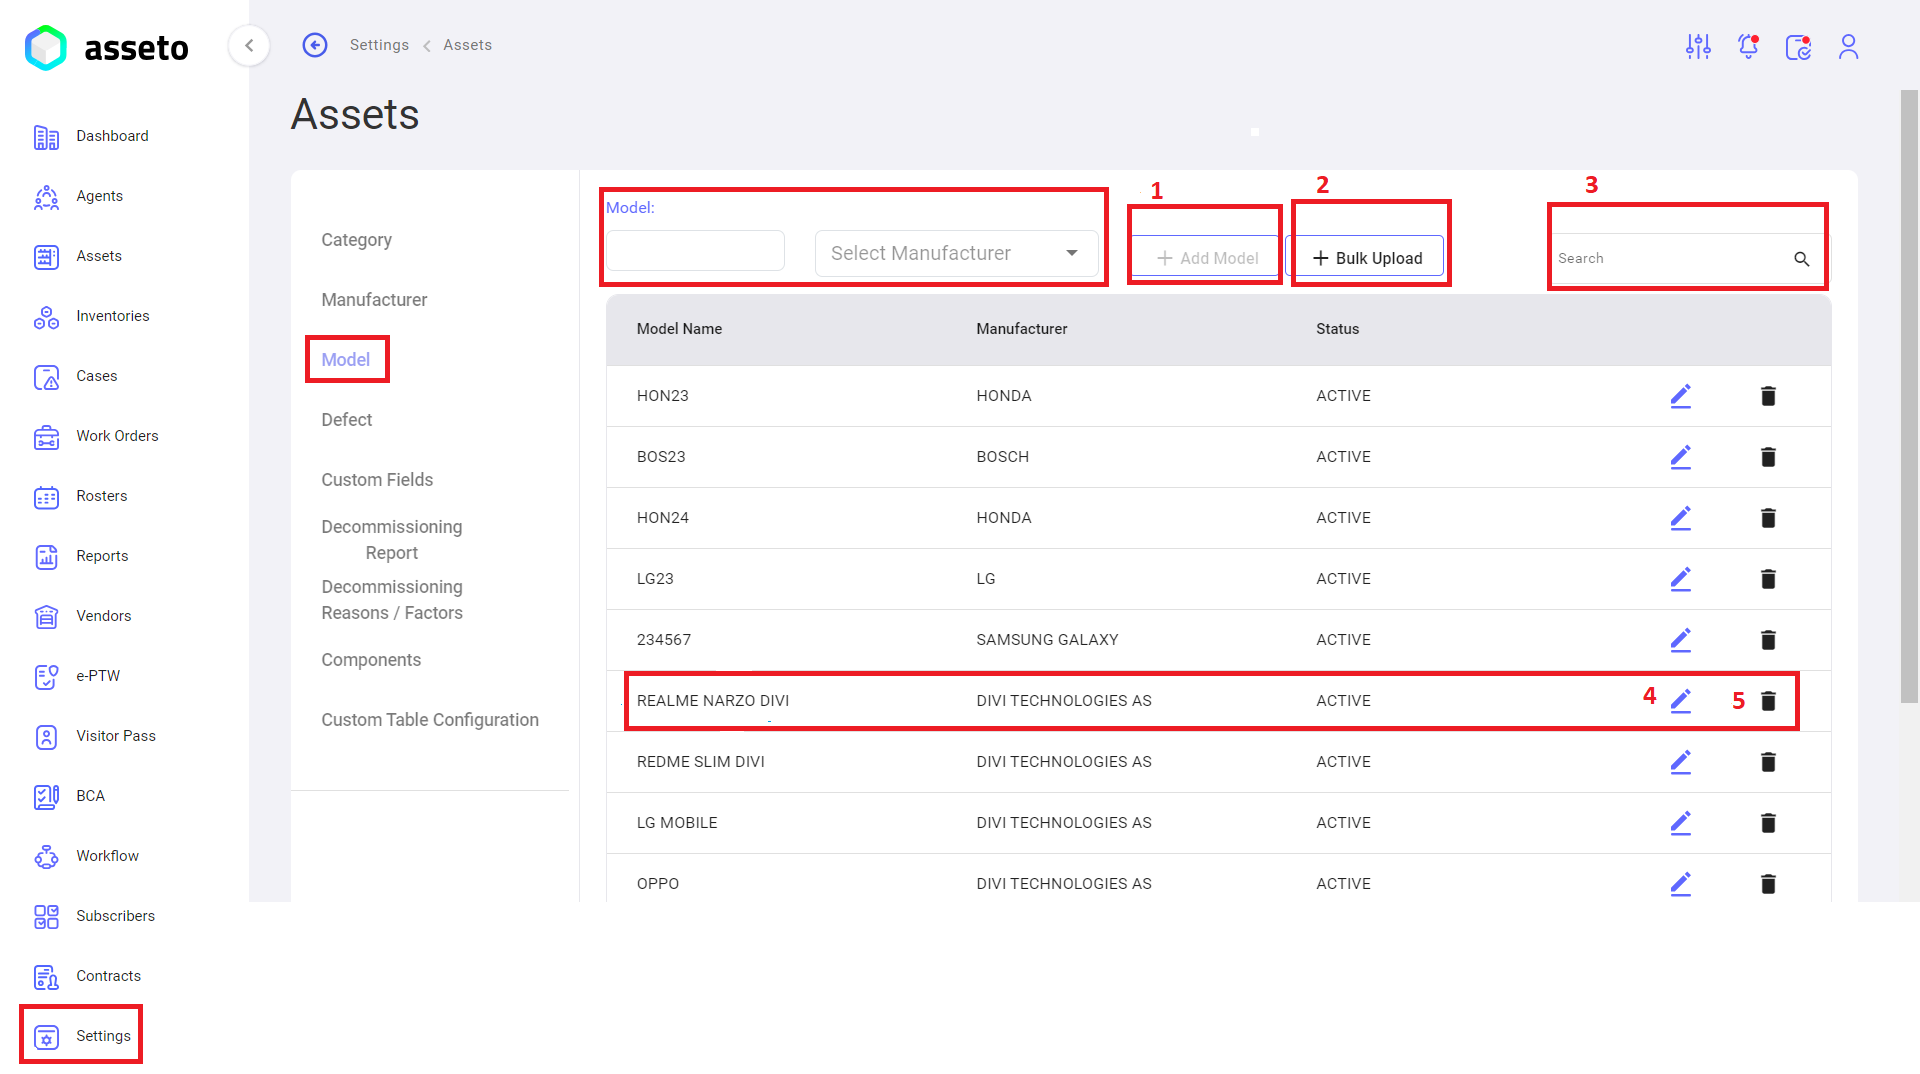
- Add Model: Enter the asset model name in the text box, select the manufacturer, and click the "Add Model" button to create a new model.
- Bulk Upload Model: Click the bulk upload button to create multiple models at once. Download the CSV file, fill in the data, and upload it.
- Search Box: Search for any model by its name, and the results will be displayed in the table below.
- Edit Model: Edit an existing model by clicking the edit icon in each row of the model list.
- Delete Model: Delete an existing model by clicking the delete icon in each row of the model list.
ii. Go to Settings -> My Organization to configure Currency Settings, Location, Roles, and Resource Groups.
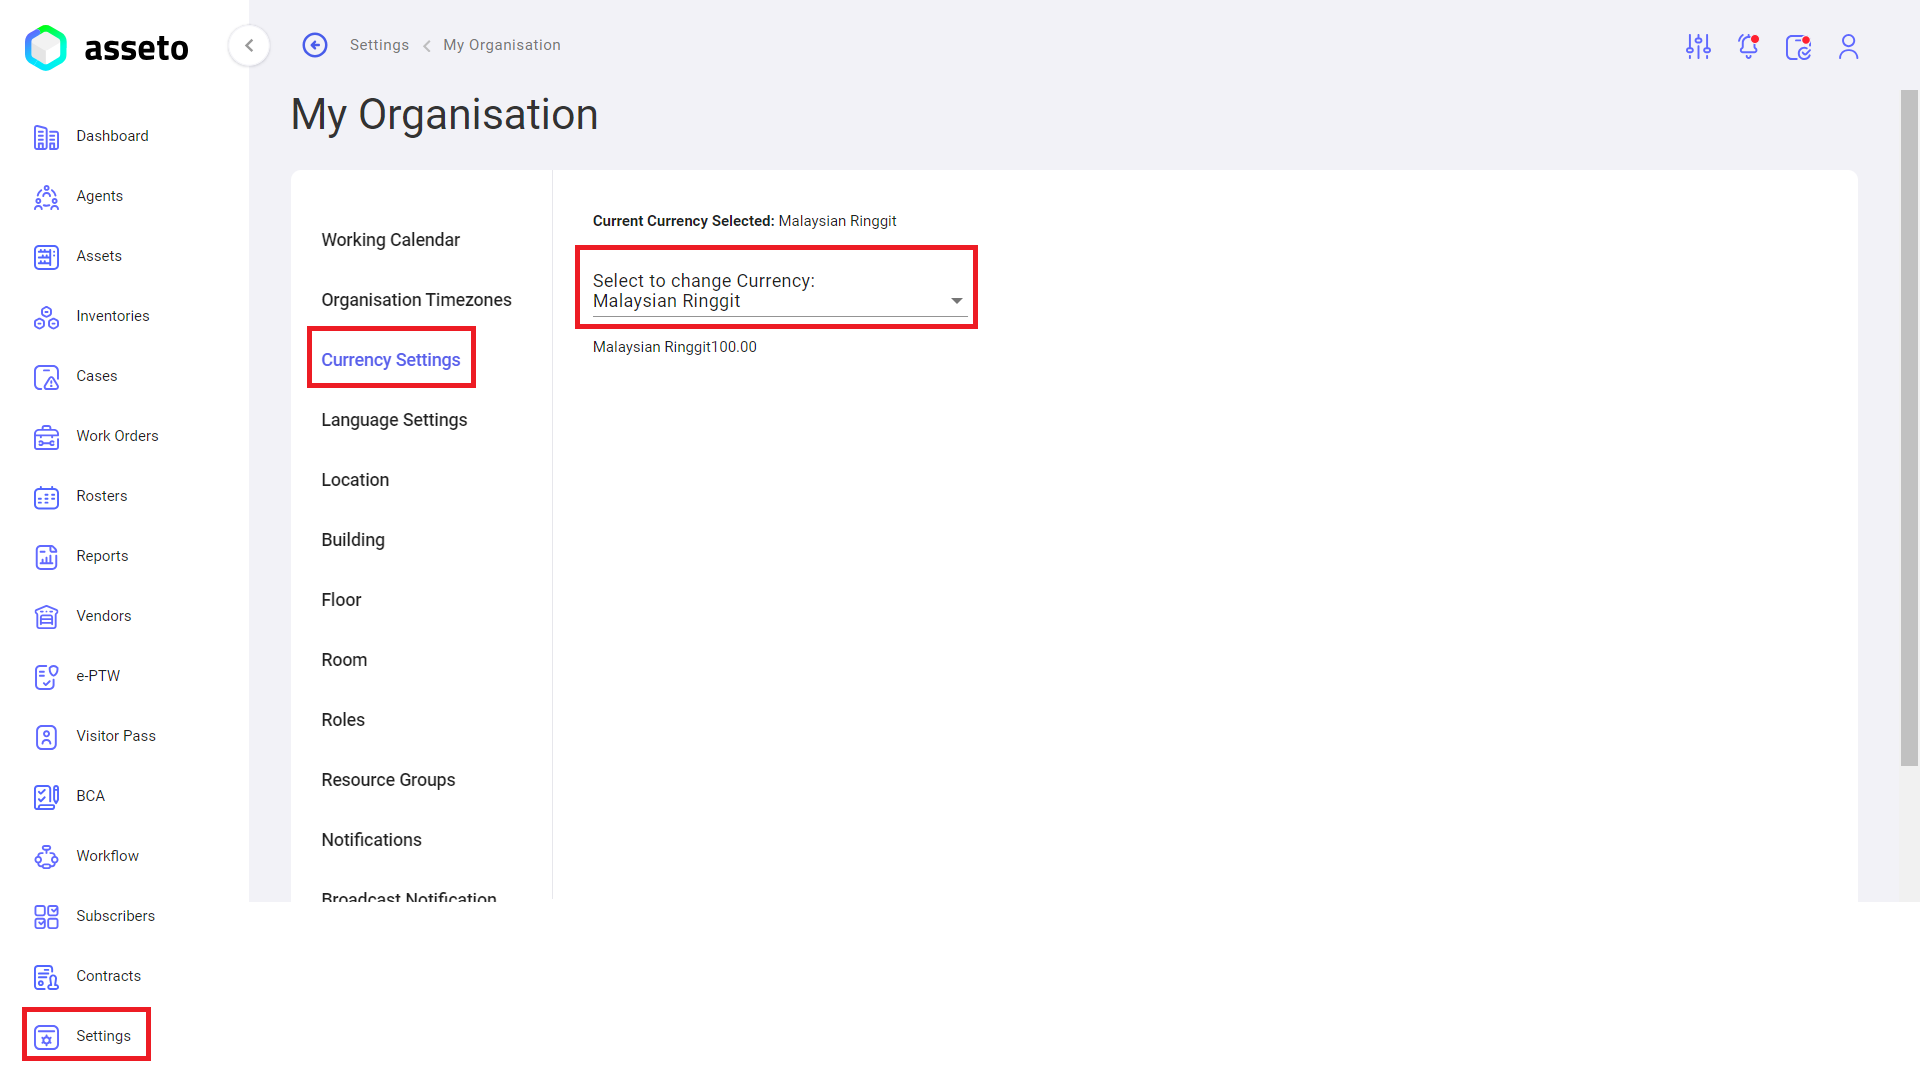
- Settings -> My Organization -> Currency Settings
- Select the currency type from the dropdown, as shown in the following screenshot.
Settings -> My Organization -> Location:
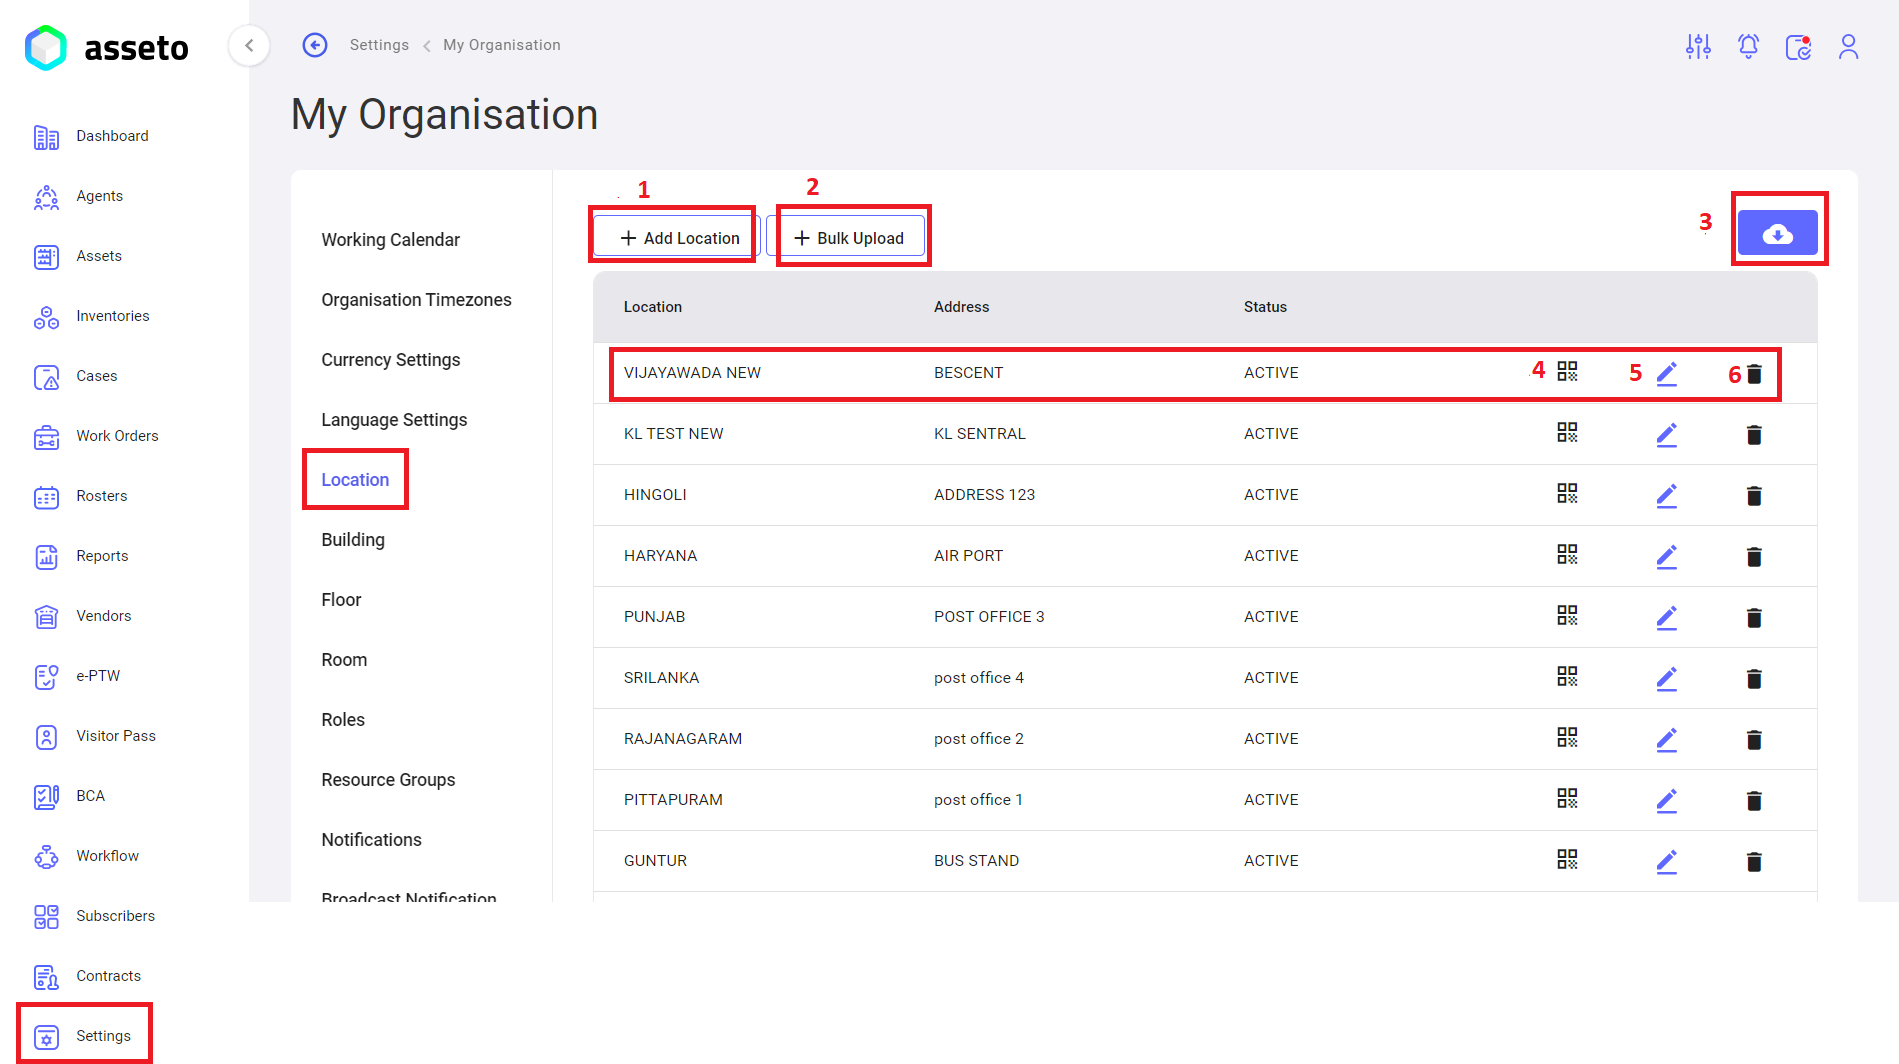
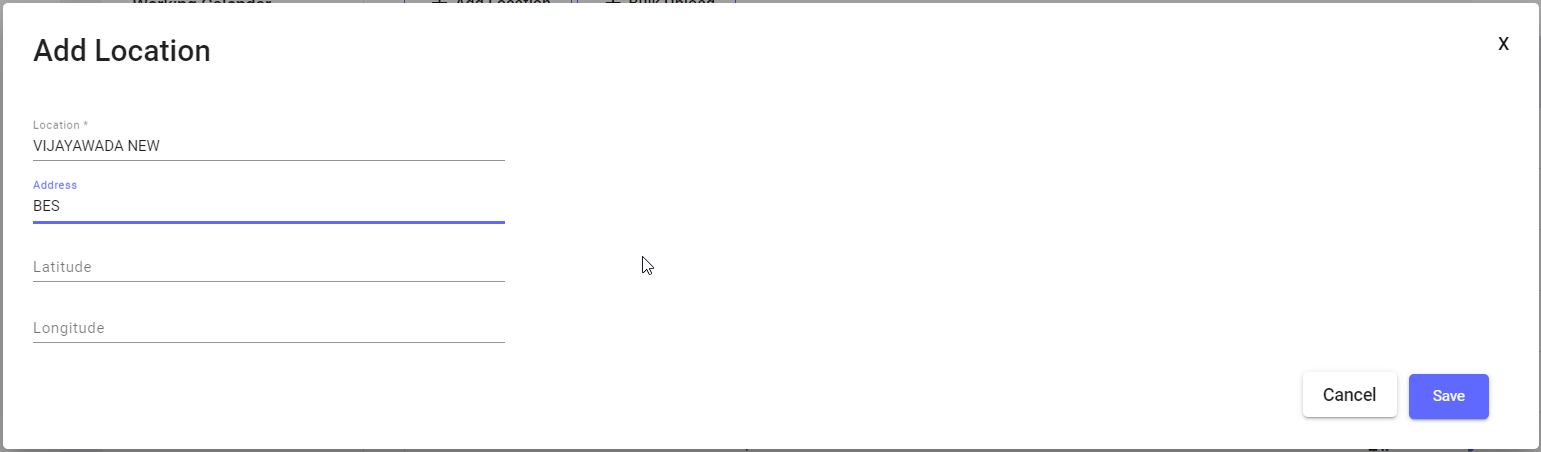
- Add Location: Click on the "Add Location" button to create an individual location. When the "Add Location" button is clicked, the following page will appear. Fill in all the mandatory fields, after which the save button will be enabled. Click the "Save" button to save the location details, which will then be displayed in the first row of the table.

- Bulk Upload Location: Click the bulk upload button to create multiple locations at once. Download the CSV file, fill in the data, and upload it.
- Export Button: Download the QR list of locations, with options to export either with image or without image.
- QR: Click the QR icon and scan the QR code to view the specific location.
- Edit Location: Edit existing locations by clicking the edit icon in each row of the location list.
- Delete Location: Delete existing locations by clicking the delete icon in each row of the location list.
Settings -> My Organization -> Building:
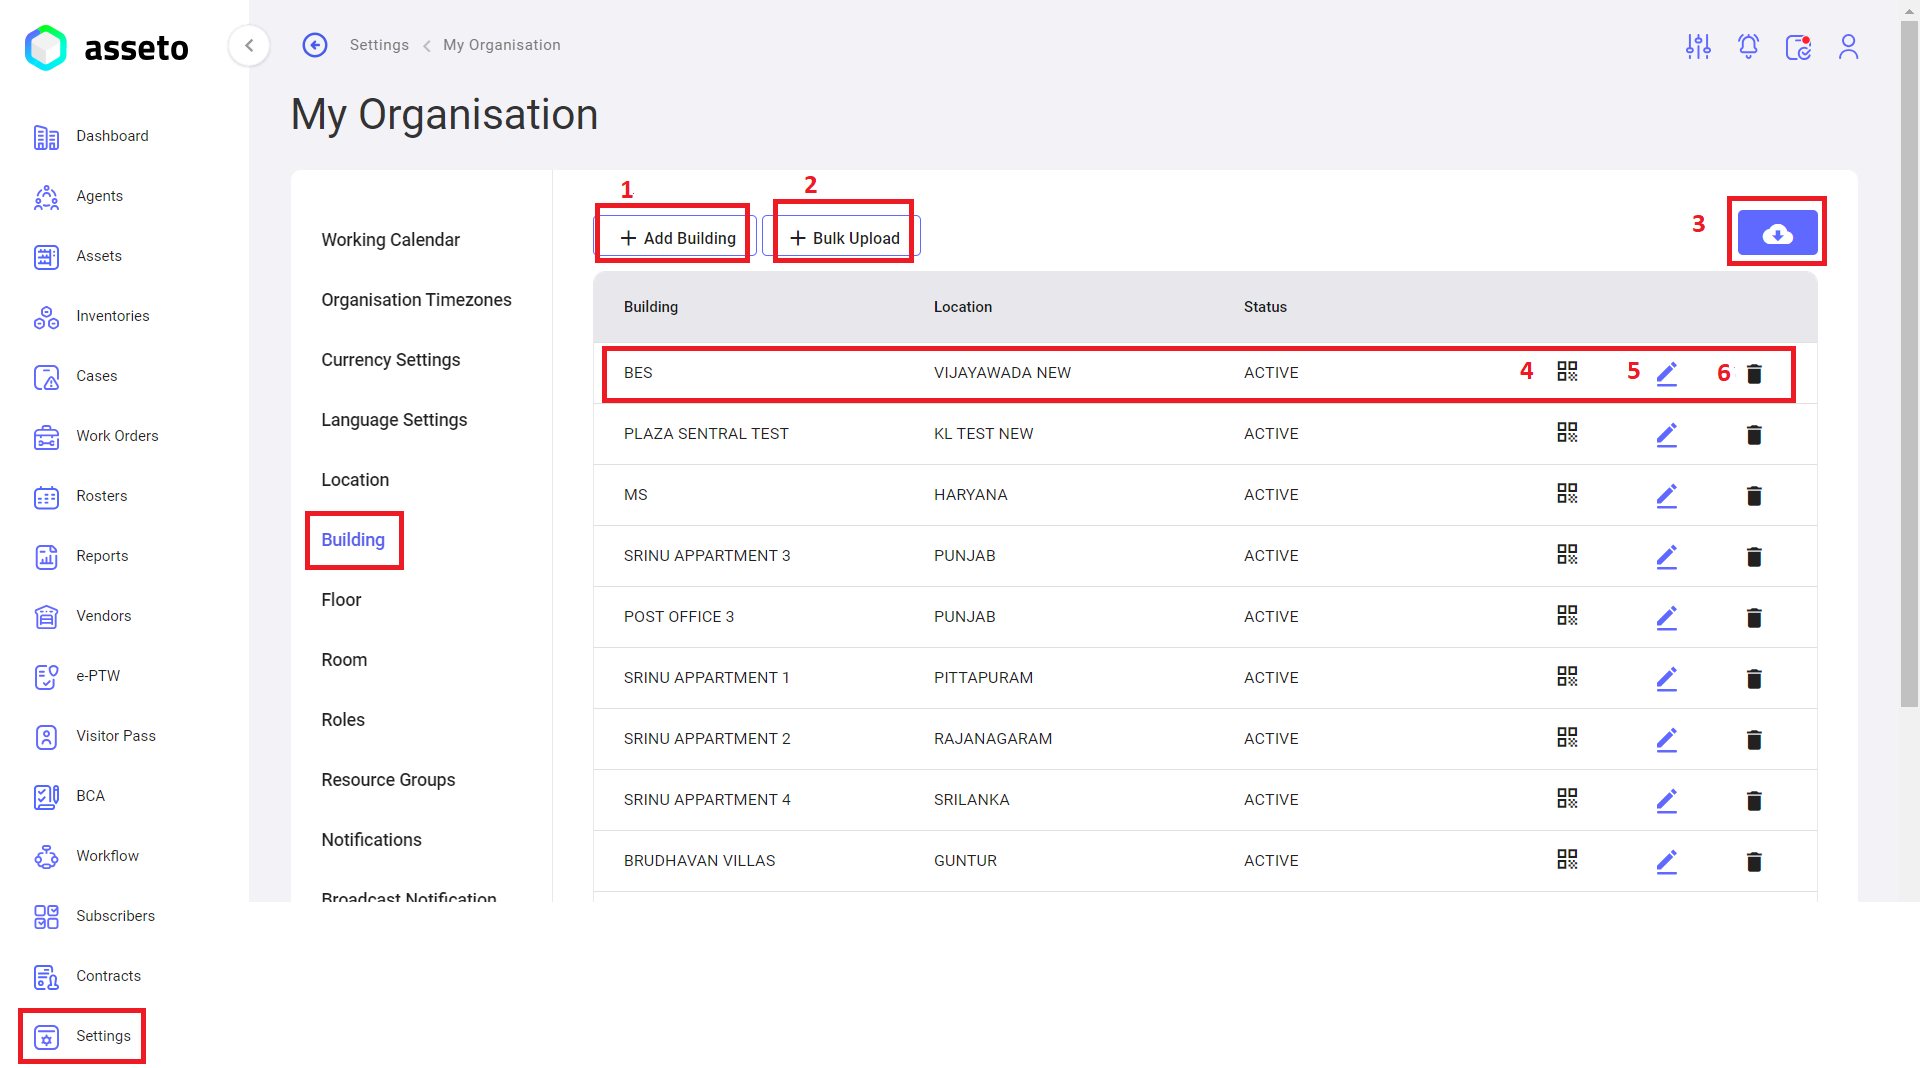
- Add Building: Click on the "Add Building" button to create individual building names.
 When clicking the "Add Building" button, the following page will appear. Fill in the mandatory fields to enable the "Save" button. After clicking the "Save" button, the building details will be saved and displayed in the first row of the table.
 - Bulk Upload Building: Click the bulk upload button to create multiple buildings at once. Download the CSV file, fill in the data, and upload it.
- Export Button: Download the QR list of buildings, with options to export either with image or without image.
- QR: Click the QR icon and scan the QR code to view the building name along with its location.
- Edit Building: Edit existing building names by clicking the edit icon in each row of the building list.
- Delete Building: Delete existing building names by clicking the delete icon in each row of the building list.
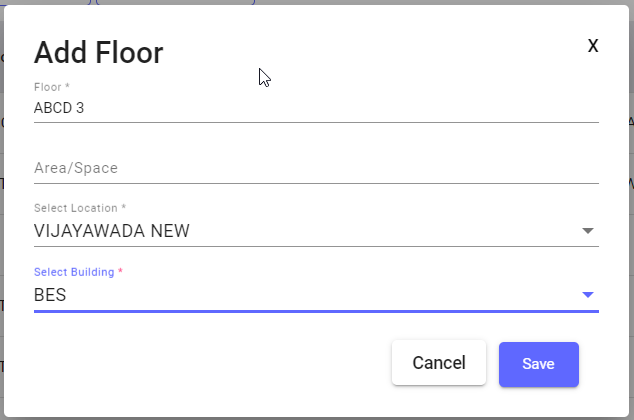
Settings -> My Organization -> Floor:
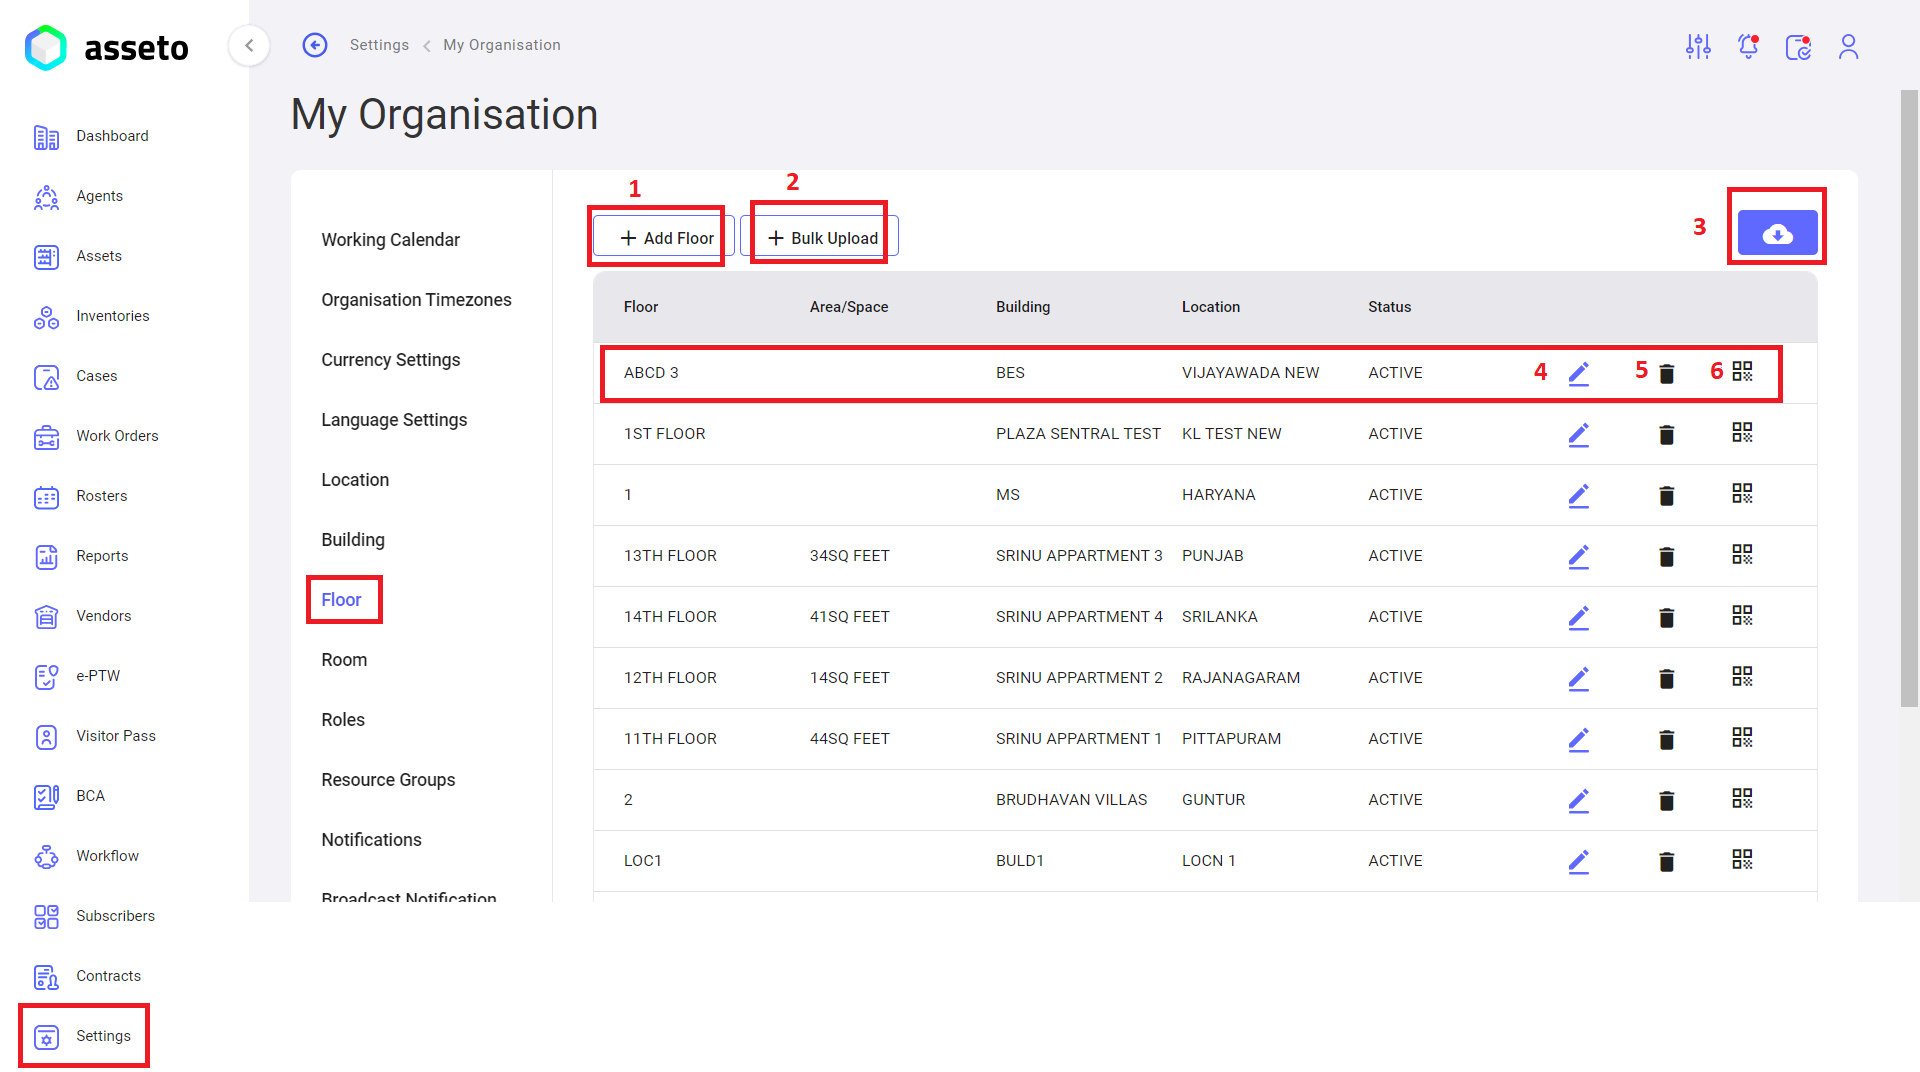
- Add Floor: Click the "Add Floor" button to create an individual floor name.
When the "Add Floor" button is clicked, the following page will appear. Fill in all the mandatory fields to enable the "Save" button. After clicking the "Save" button, the floor details will be saved and displayed in the first row of the table.
- Bulk Upload Floor: Click on bulk upload button to create multiple floors at a time, download csv file and fill in the data then upload.
- Export button: to download QR list (floors), you can export as with image or without image.
- Edit Floor: Here you edit already created floor names by clicking on edit icon available in each row of floor list
- Delete Floor: Here you delete already created floor names by clicking on delete icon available in each row of floor list.
- QR: click on QR icon and Scan QR to view that floor name with location.
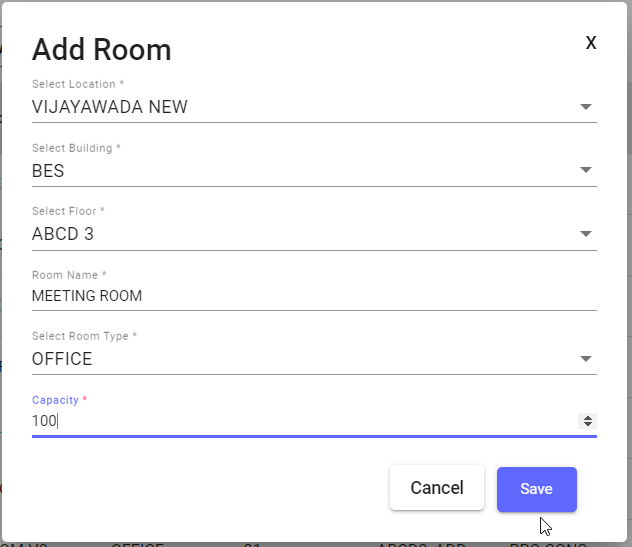
Settings -> My Organization -> Room:
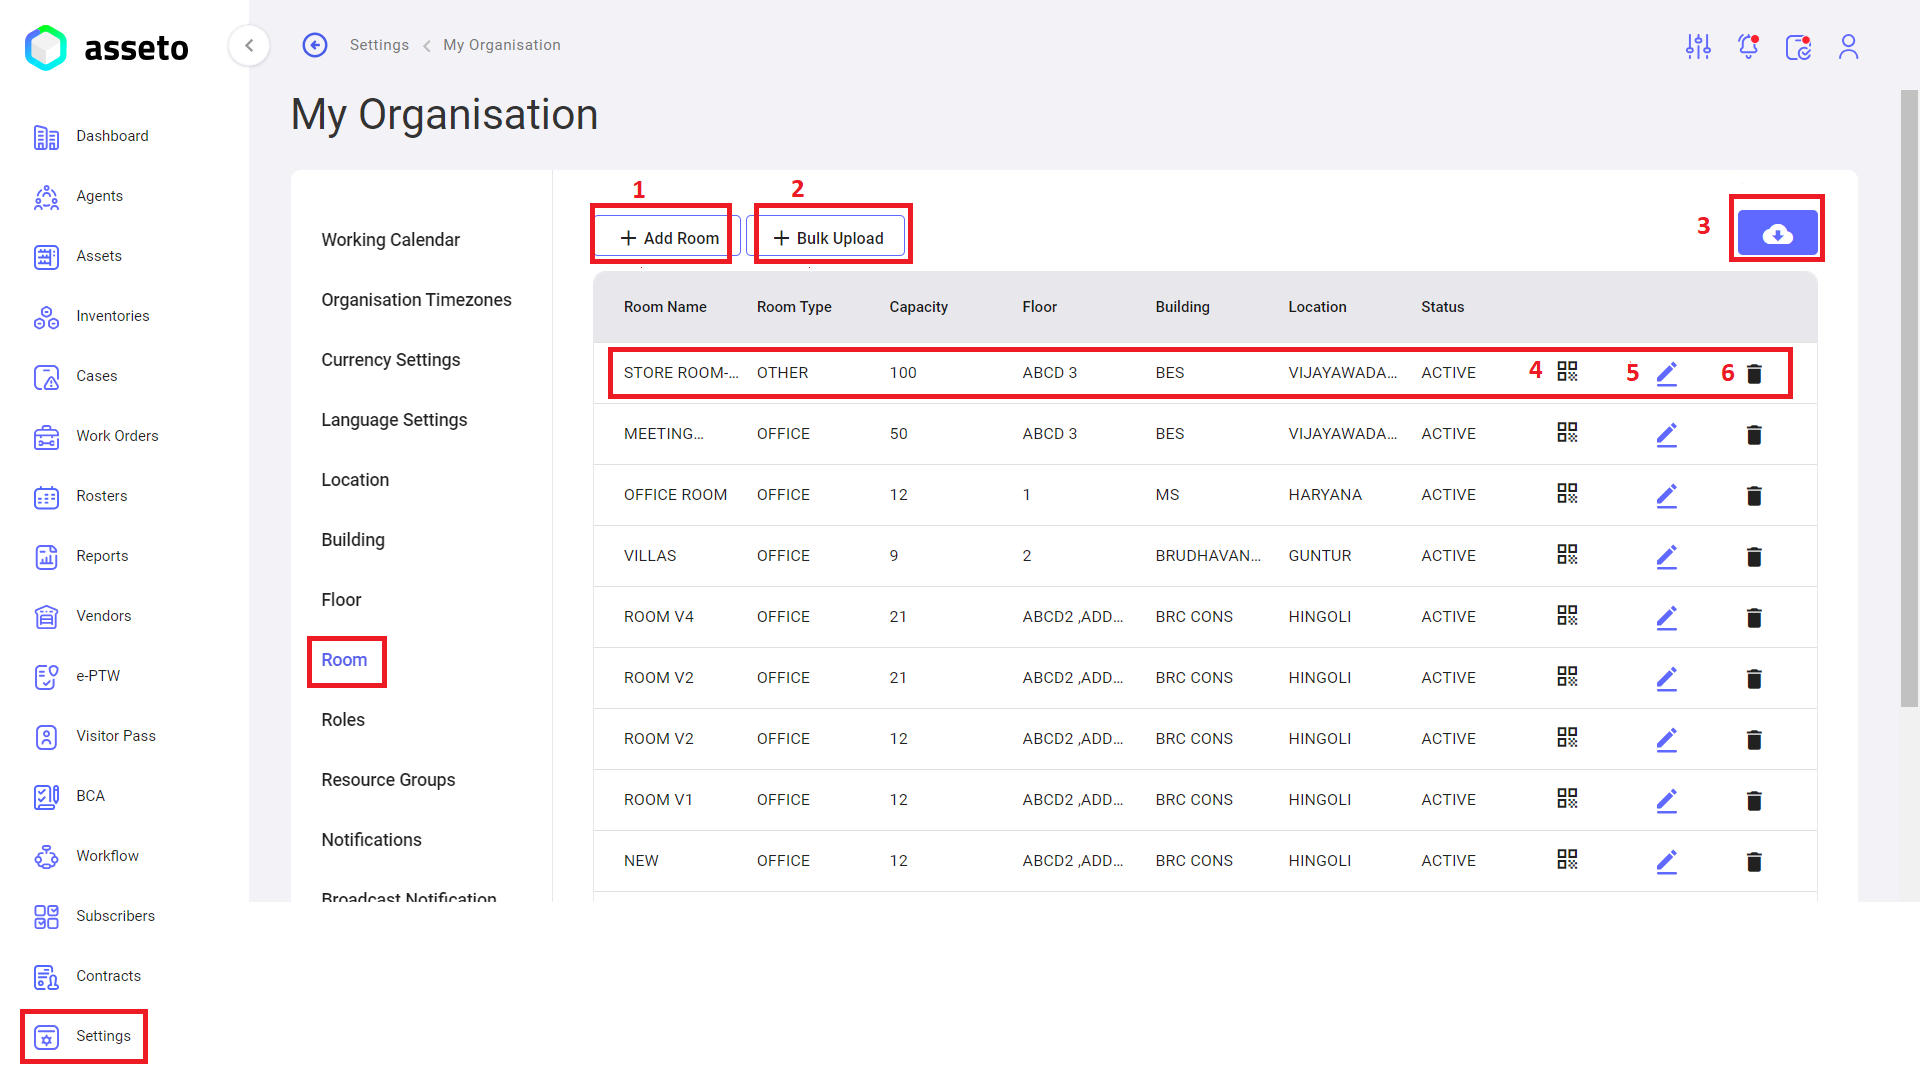
- Add Room: When the "Add Room" button is clicked, the following page will appear. Fill in all the mandatory fields to enable the "Save" button. After clicking the "Save" button, the room details will be saved and displayed in the first row of the table.

- Bulk Upload Room: Click the bulk upload button to create multiple rooms at once. Download the CSV file, fill in the data, and upload it.
- Export Button: Download the QR list of rooms, with options to export either with image or without image.
- QR: Scan the QR code to view the room along with its associated building and location.
- Edit Room: Edit existing room names by clicking the edit icon in each row of the room list.
- Delete Room: Delete existing room names by clicking the delete icon in each row of the room list.
Settings -> My Organization -> Roles:
Here, users can create a new role for onboarding, which can be used across various modules such as agents and asset creation.
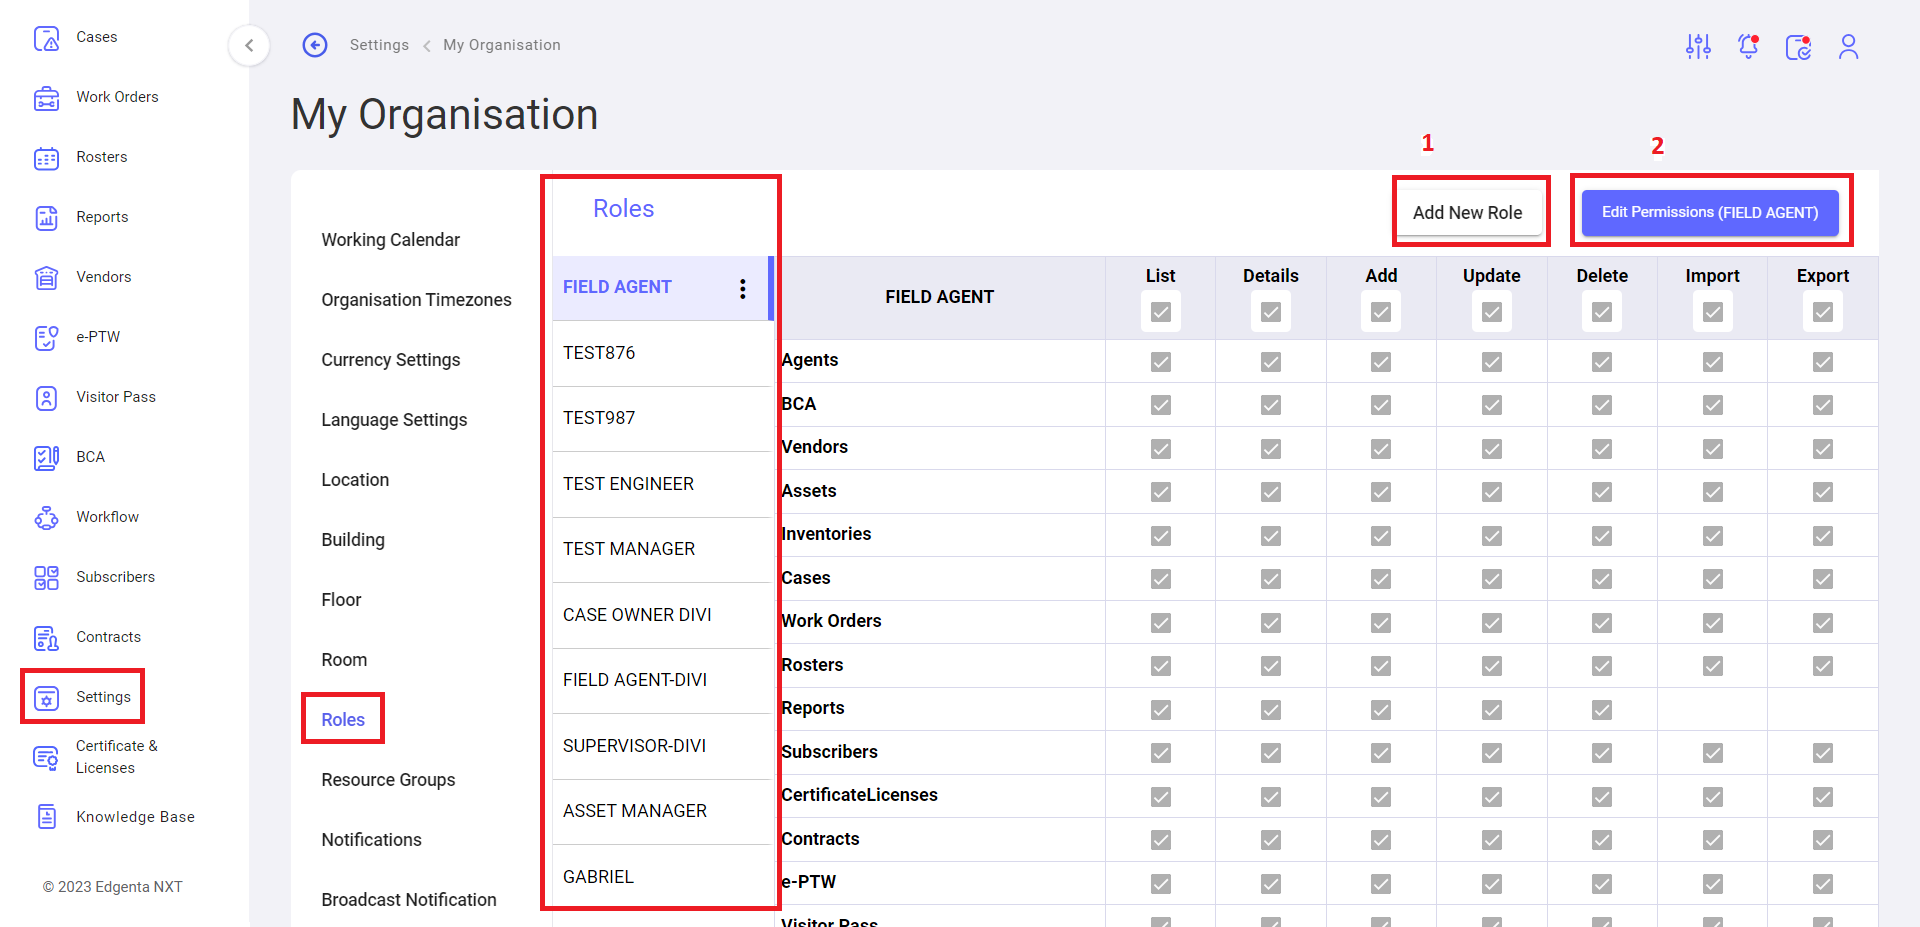
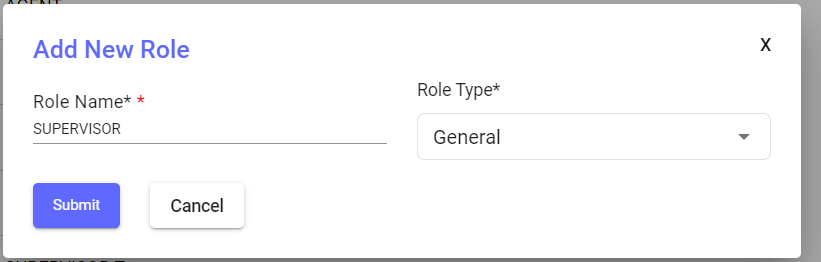
- Add Role: Click on the add “new role” button provide role name and add role type (mandatory fields) as shown by below screenshot then click on submit button to save the role details.

- Permissions: Permissions can be assigned to a role by clicking on the "Edit Permissions" button. Select the checkboxes to grant permissions for the previously created role, as shown in the screenshot below.

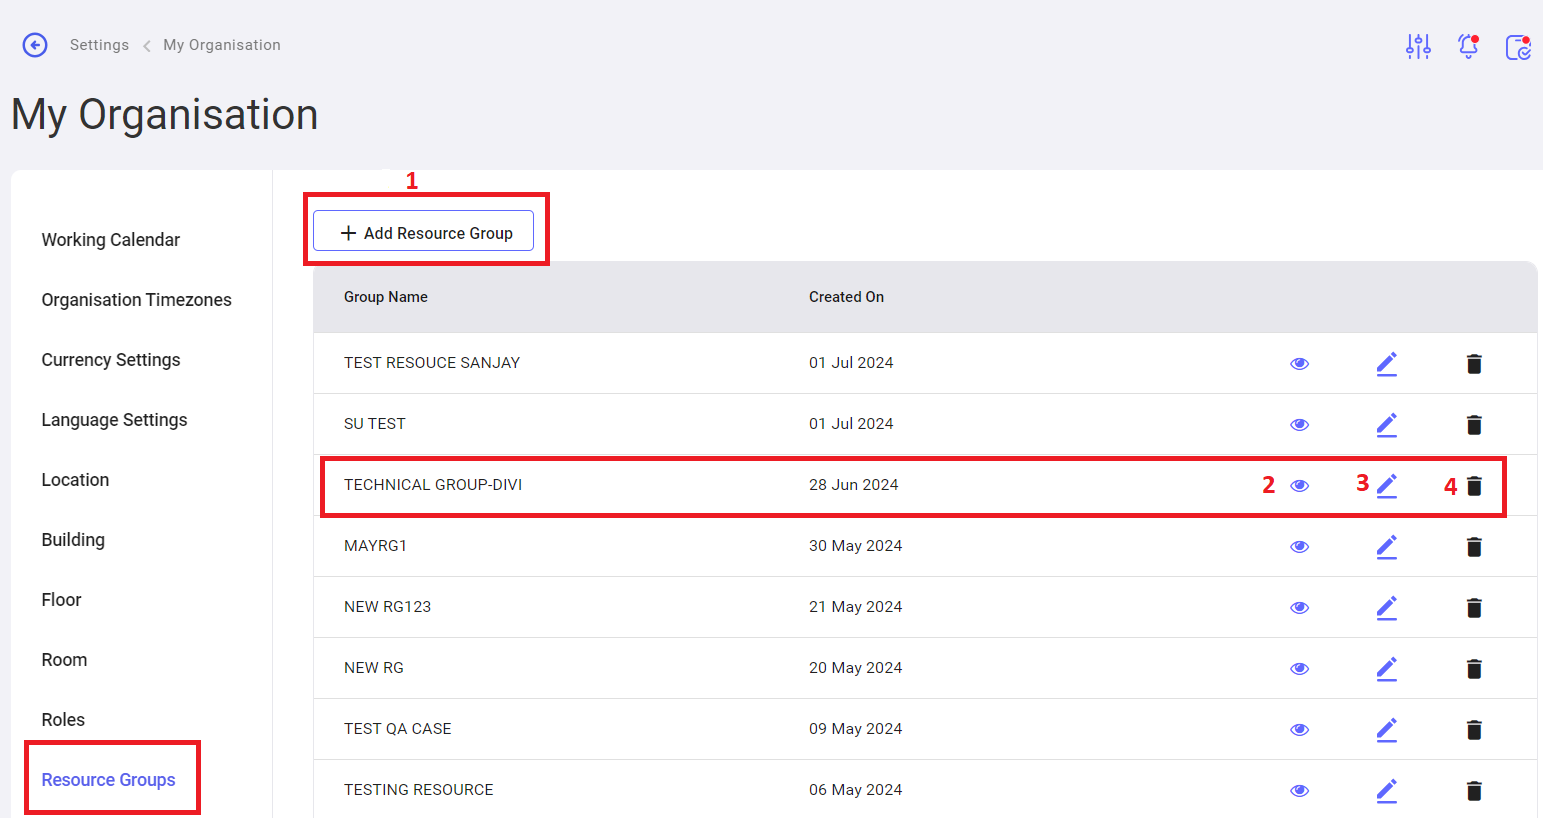
Settings -> My Organization -> Resource Groups:
The user can create a new resource group by clicking the "Add Resource Group" button. This resource group can then be used across various modules, such as agents and asset creation.
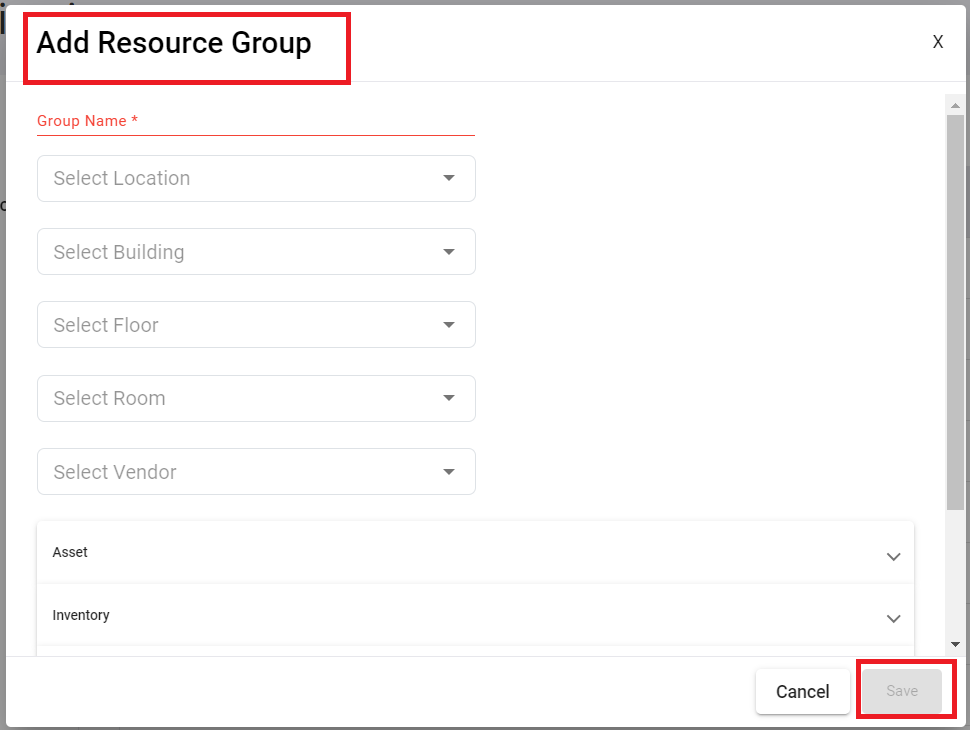
- Add Resource Group: When the "Add Resource Group" button is clicked, the following page will be displayed. Fill in all the mandatory fields to enable the "Save" button. Click the "Save" button to save the resource group.

- View: View the details of the selected resource group that was created earlier.
- Edit: Edit the details of the selected resource group that was created earlier.
- Delete: Delete the selected resource group that was created earlier.
iii. Settings -> Agents -> Skillset:

- Add Skillset: To create a new skillset, type the skillset name in the text box and click the "Add Skillset" button.
- Skillset Bulk Upload: To create multiple skillsets at once, click the bulk upload button. Download the CSV file, fill in the data, and upload the file to save multiple skillsets.
- Edit Skillset: Edit an existing skillset by clicking the edit icon in each row of the skillset list.
- Delete Skillset: Delete an existing skillset by clicking the delete icon in each row of the skillset list.
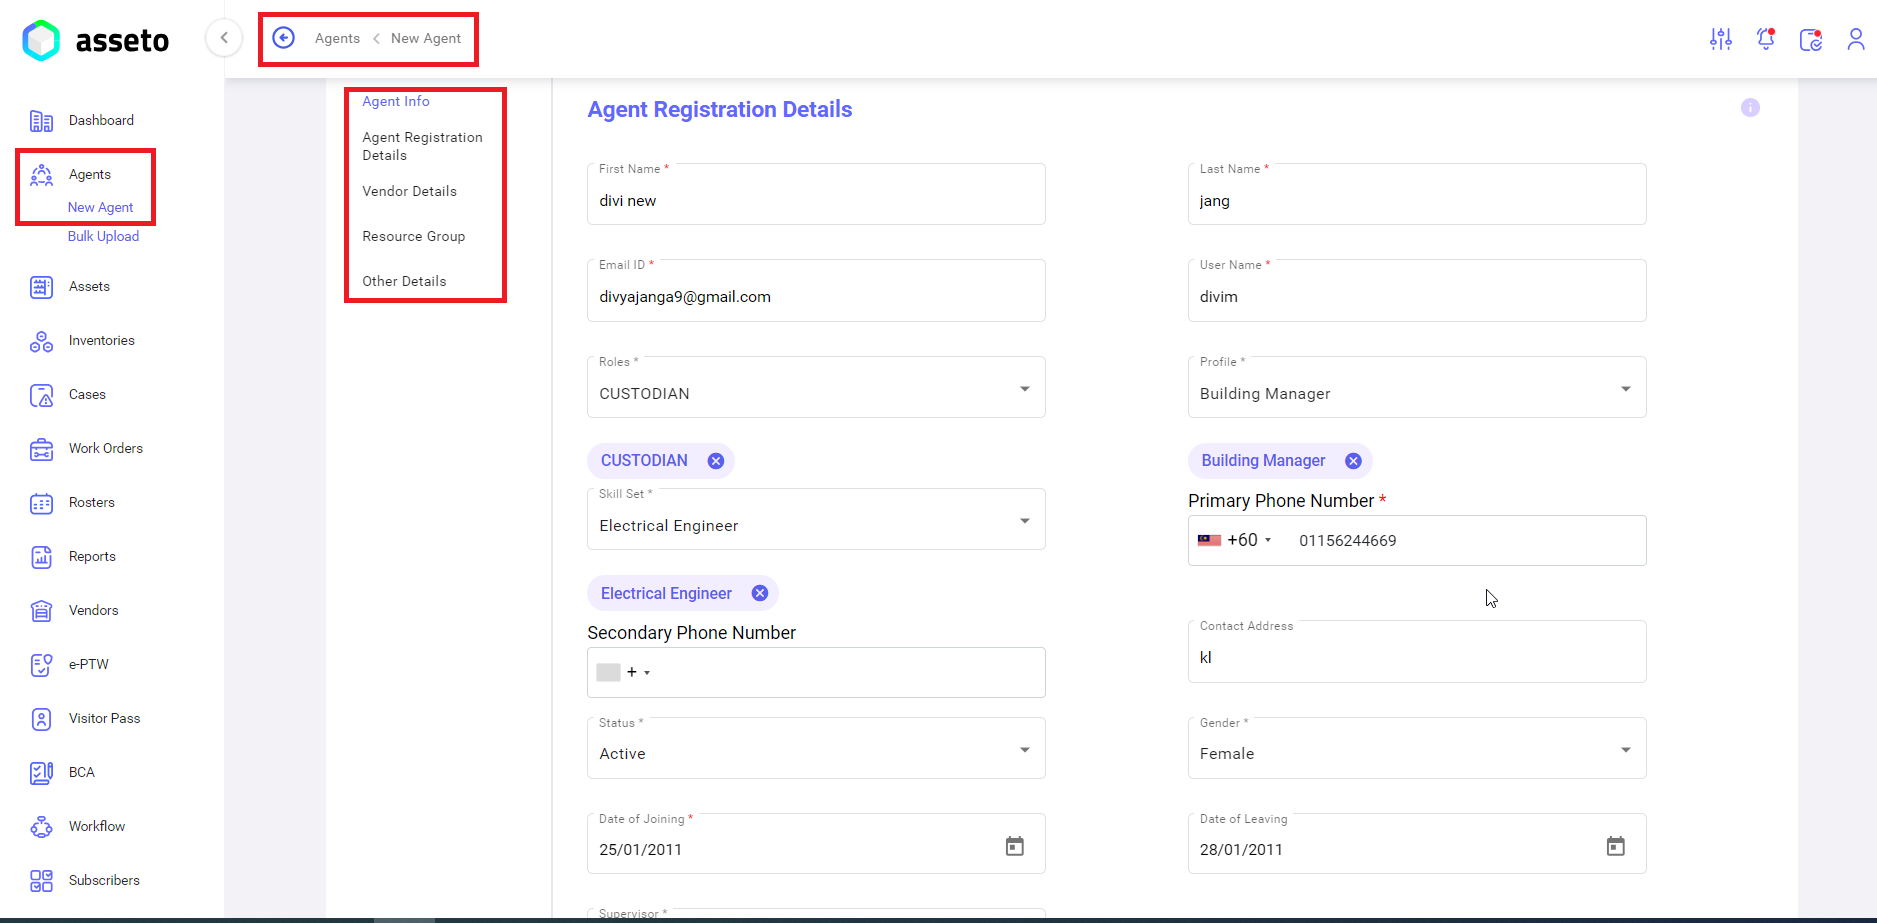
Fill in all mandatory and non-mandatory fields to save the agent details.
Note: For more details, please review 2. Agents module 2.2. Pre-requisites for agent(s) creation and 2.3. New Agent.
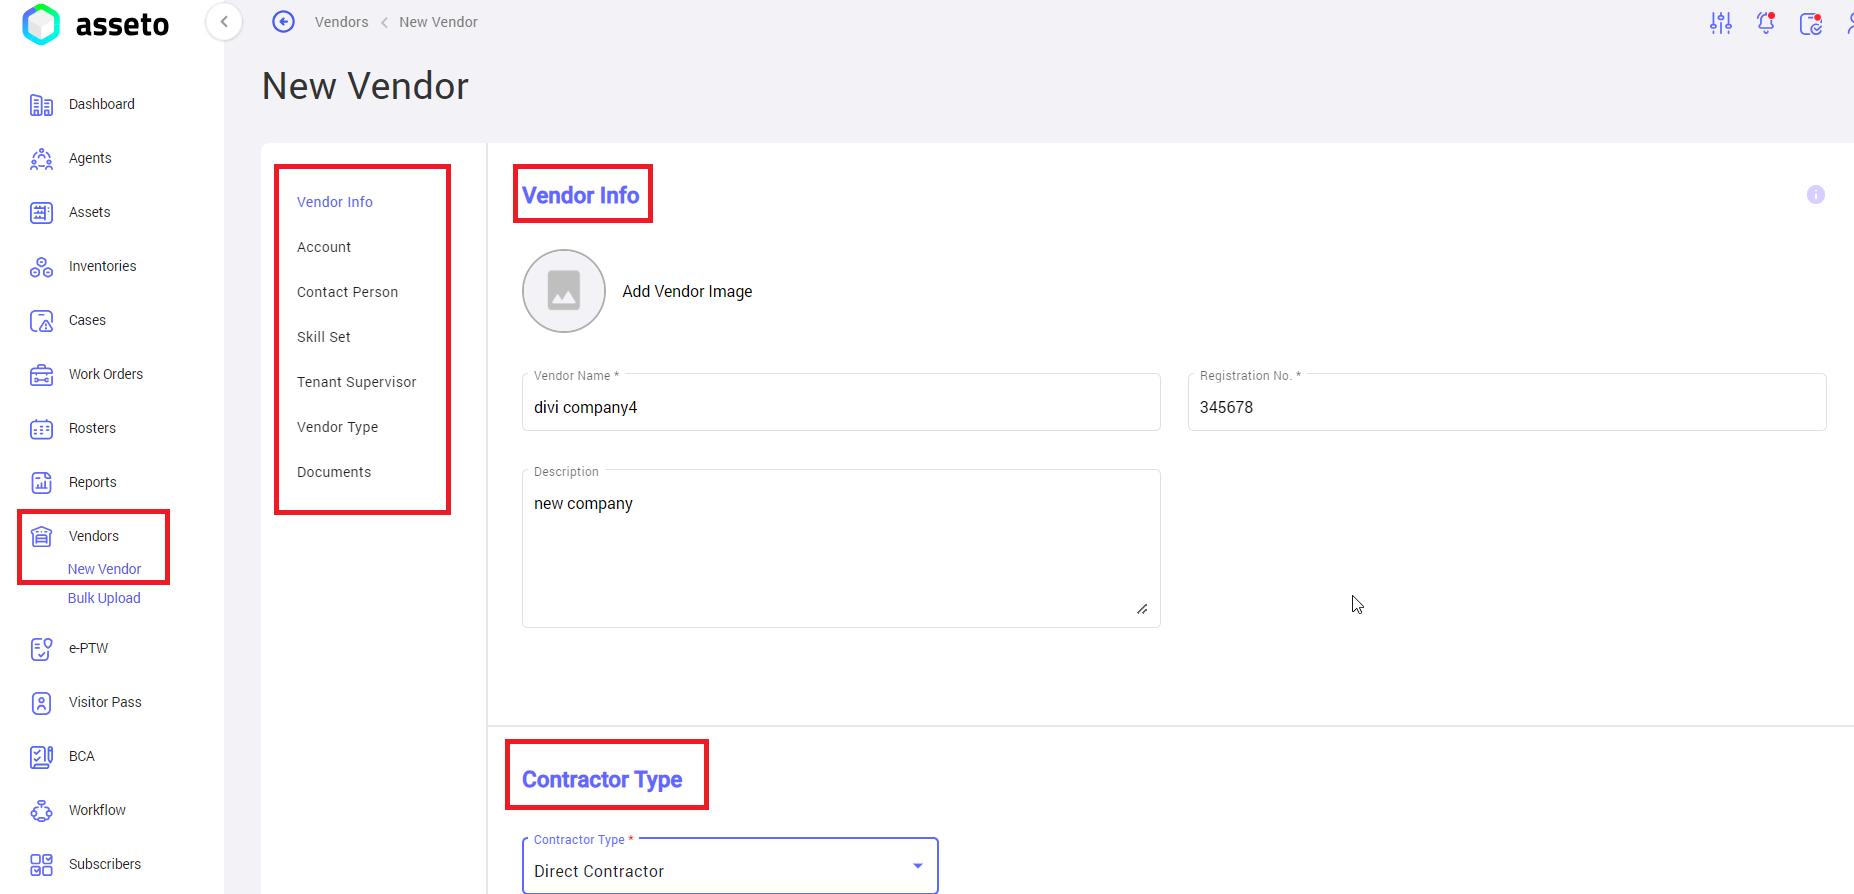
Fill the mandatory and non-mandatory fields to save the vendor details.
Note: For more details, please review 9. Vendor module 9.2. Pre-requisites for vendor creation and 9.3. New Vendor.
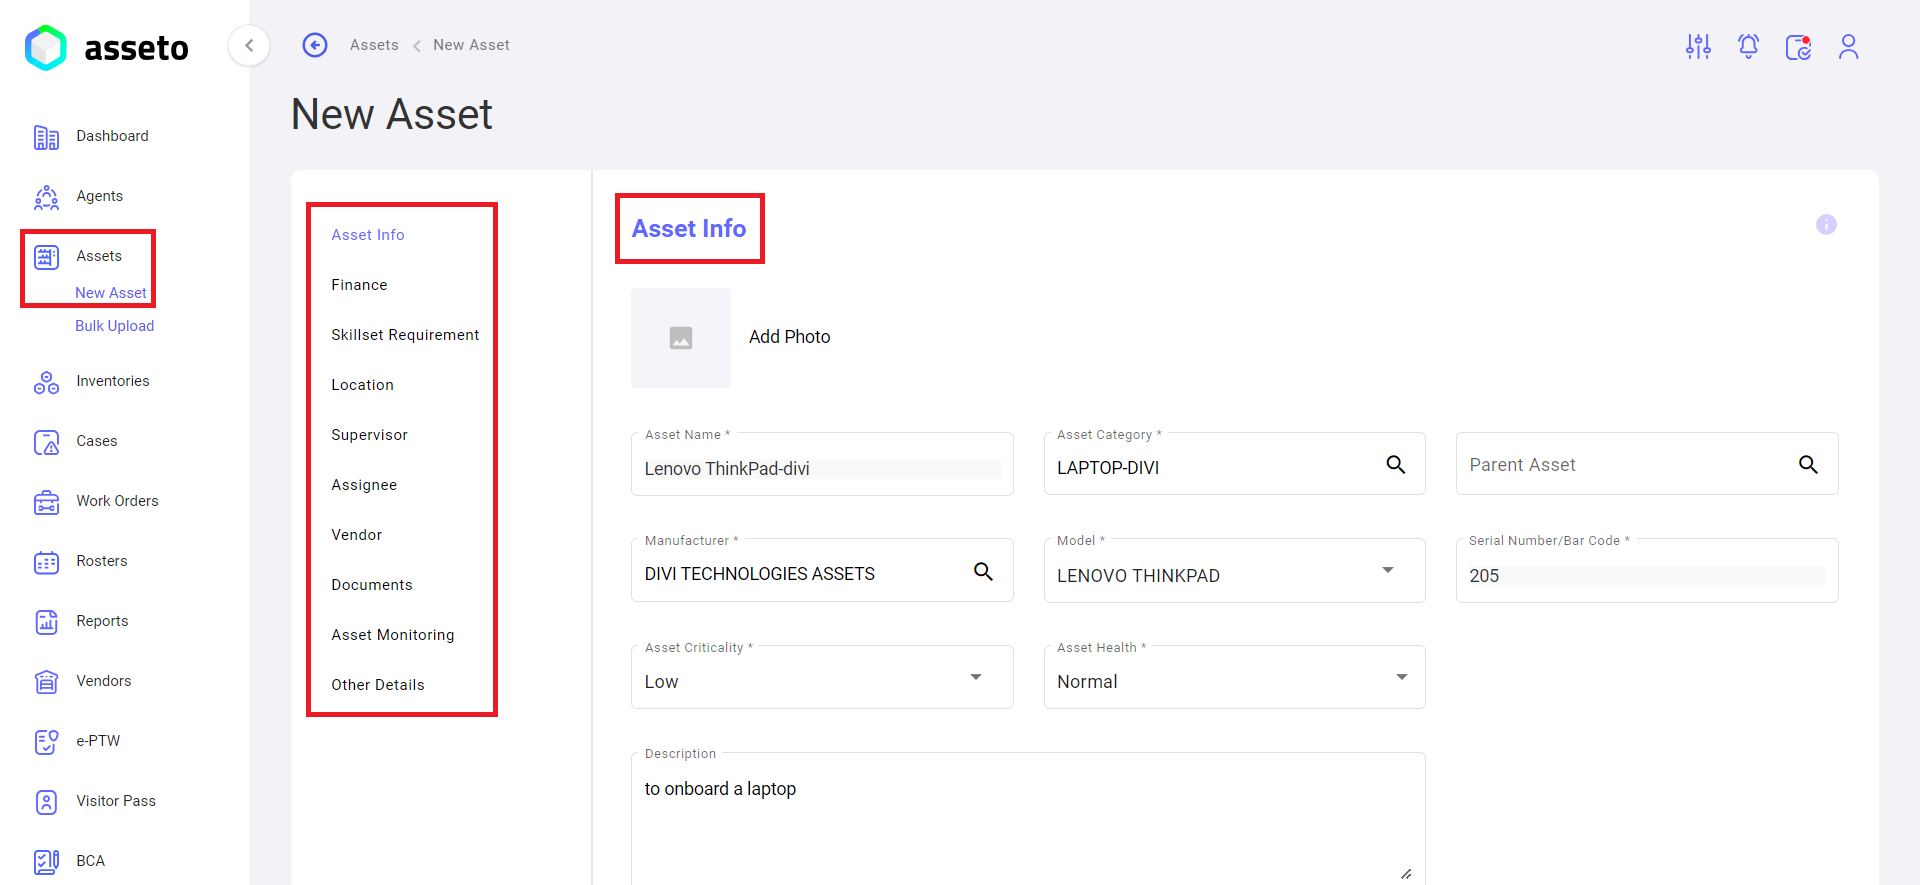
3.3. New Asset
Click on "New Asset" to onboard an individual asset.
Left panel -> Assets -> New Asset:
The new asset page will display a list of sections with links. To navigate to a particular section, simply click on the corresponding link.
On the new asset page, as shown in the screenshot below, fill in the mandatory fields to enable the "Save" button.
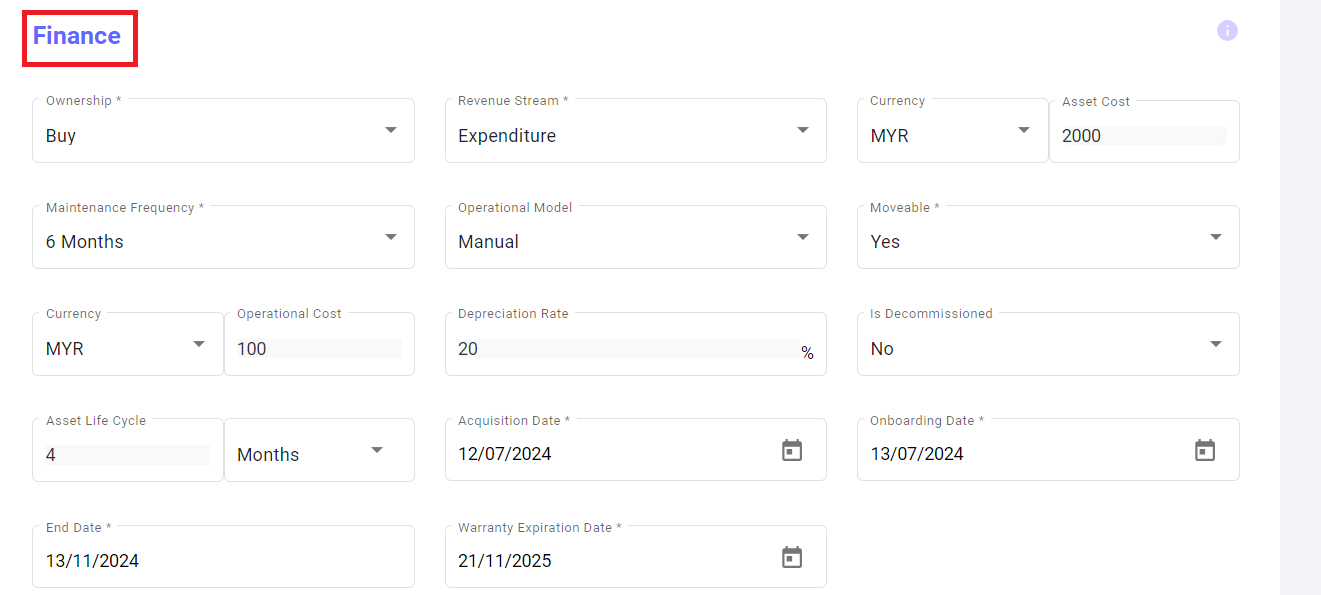
Next: Finance Section
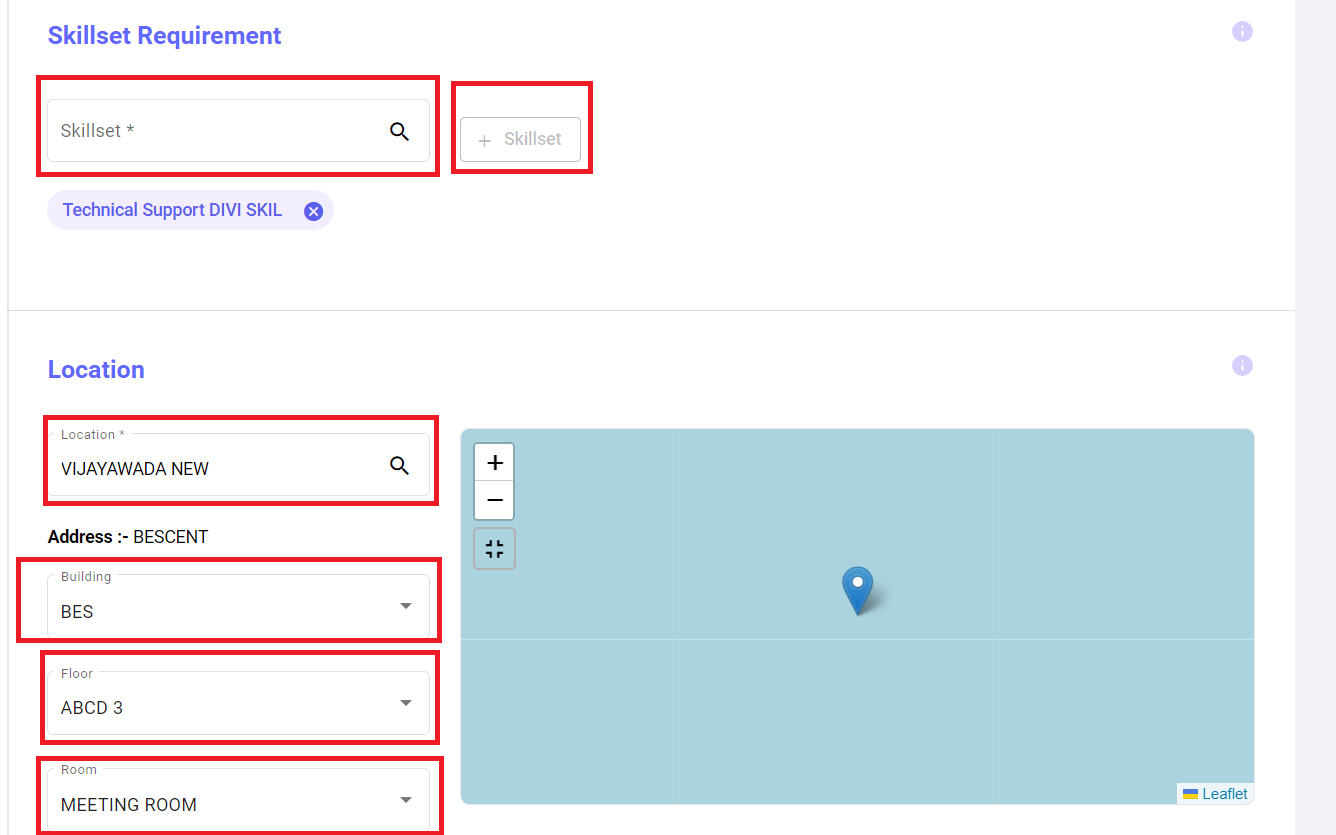
Next: Select Skillset Requirement and Location Section
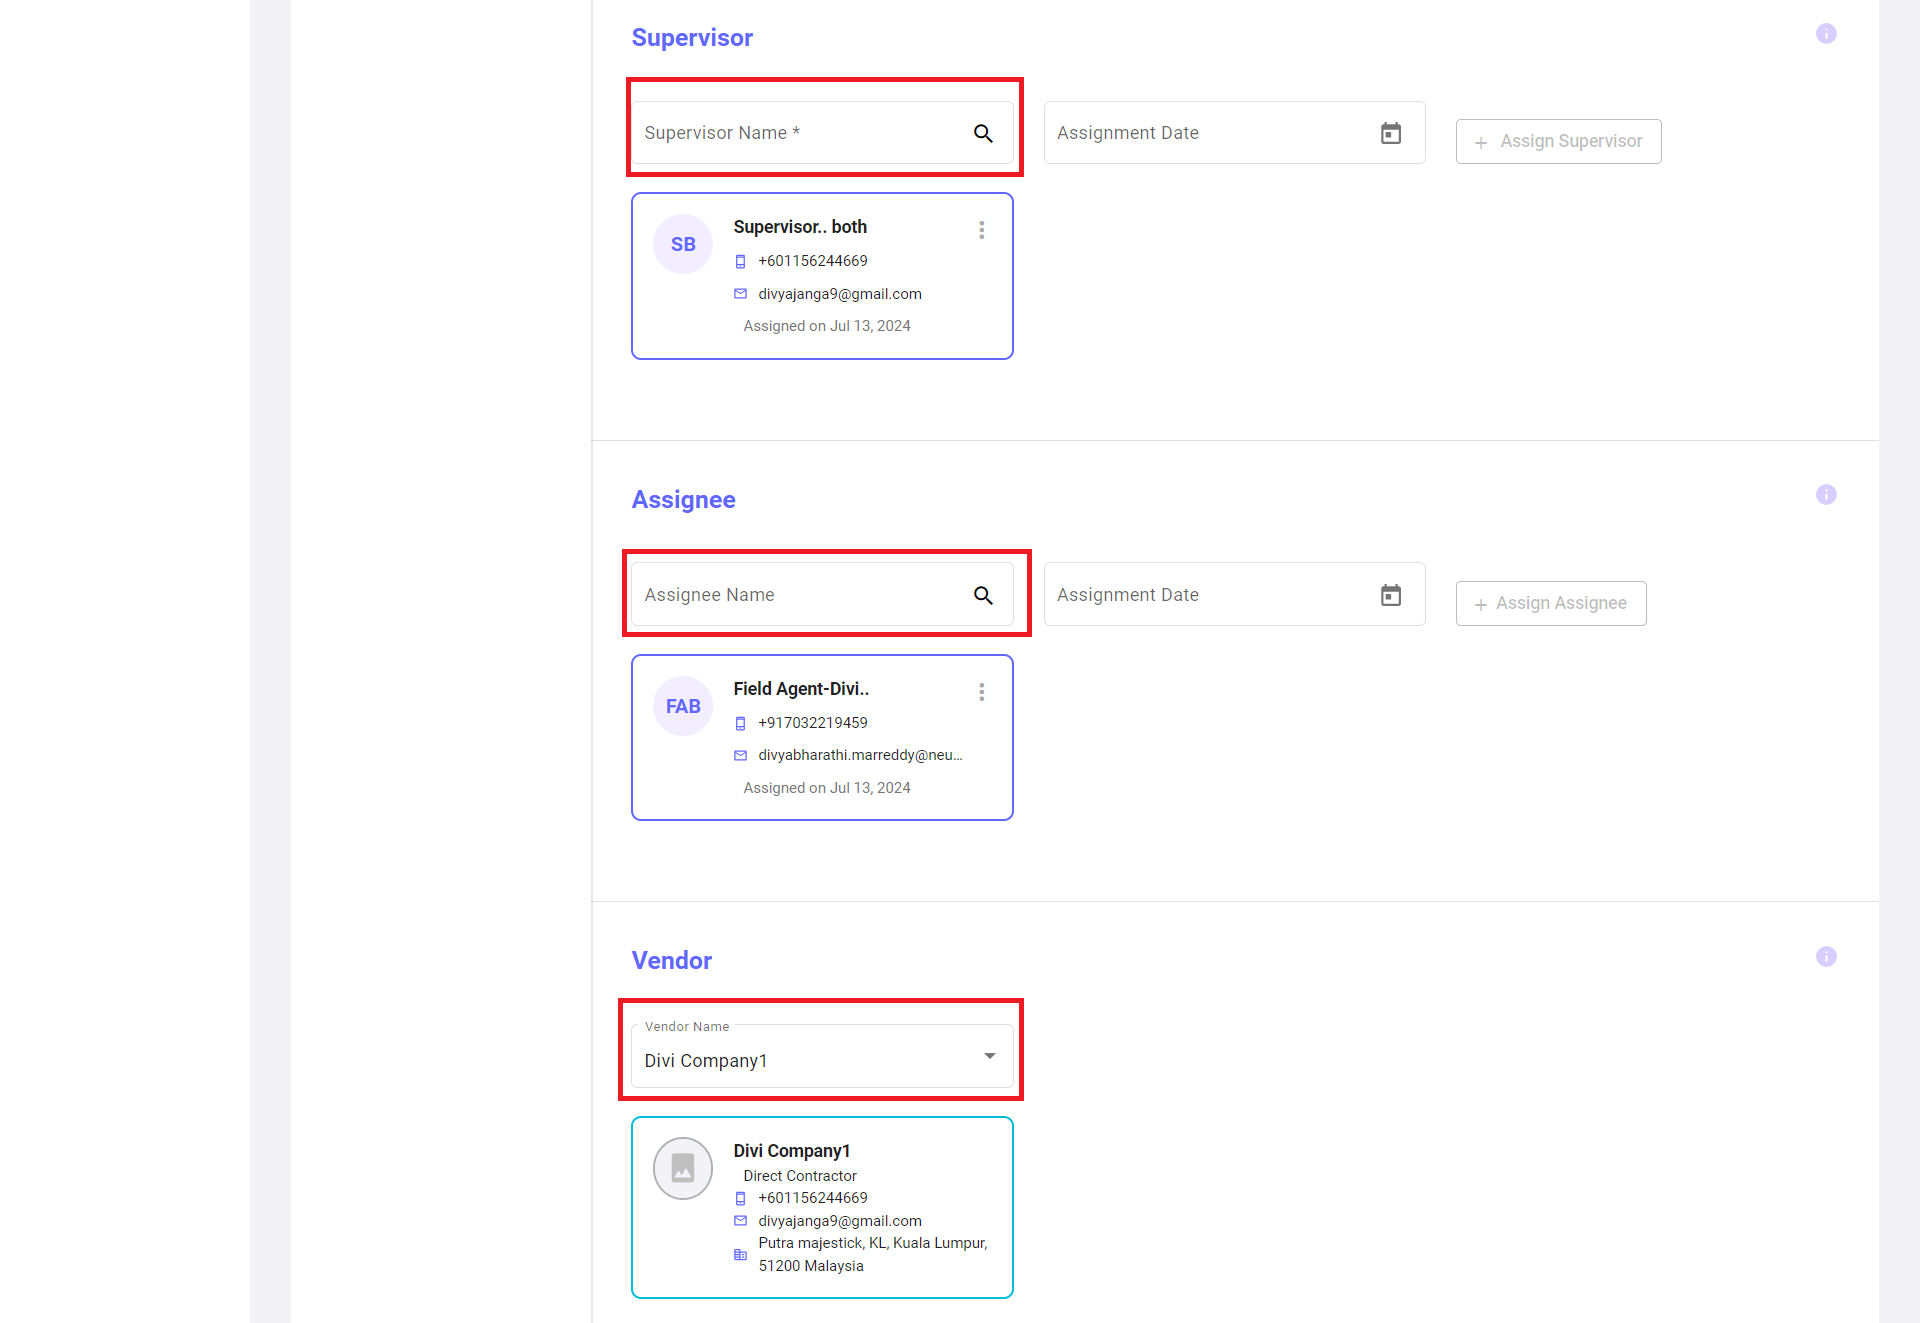
Next: Select the supervisor, assignee, and vendor from the list. The assignee field is non-mandatory.
Next: Click on the "Save" button to onboard the new asset.

The asset will be saved and displayed in the first row of the asset list.
3.4. Bulk Upload
To onboard multiple assets in bulk:
Left panel -> Assets -> Bulk Upload:
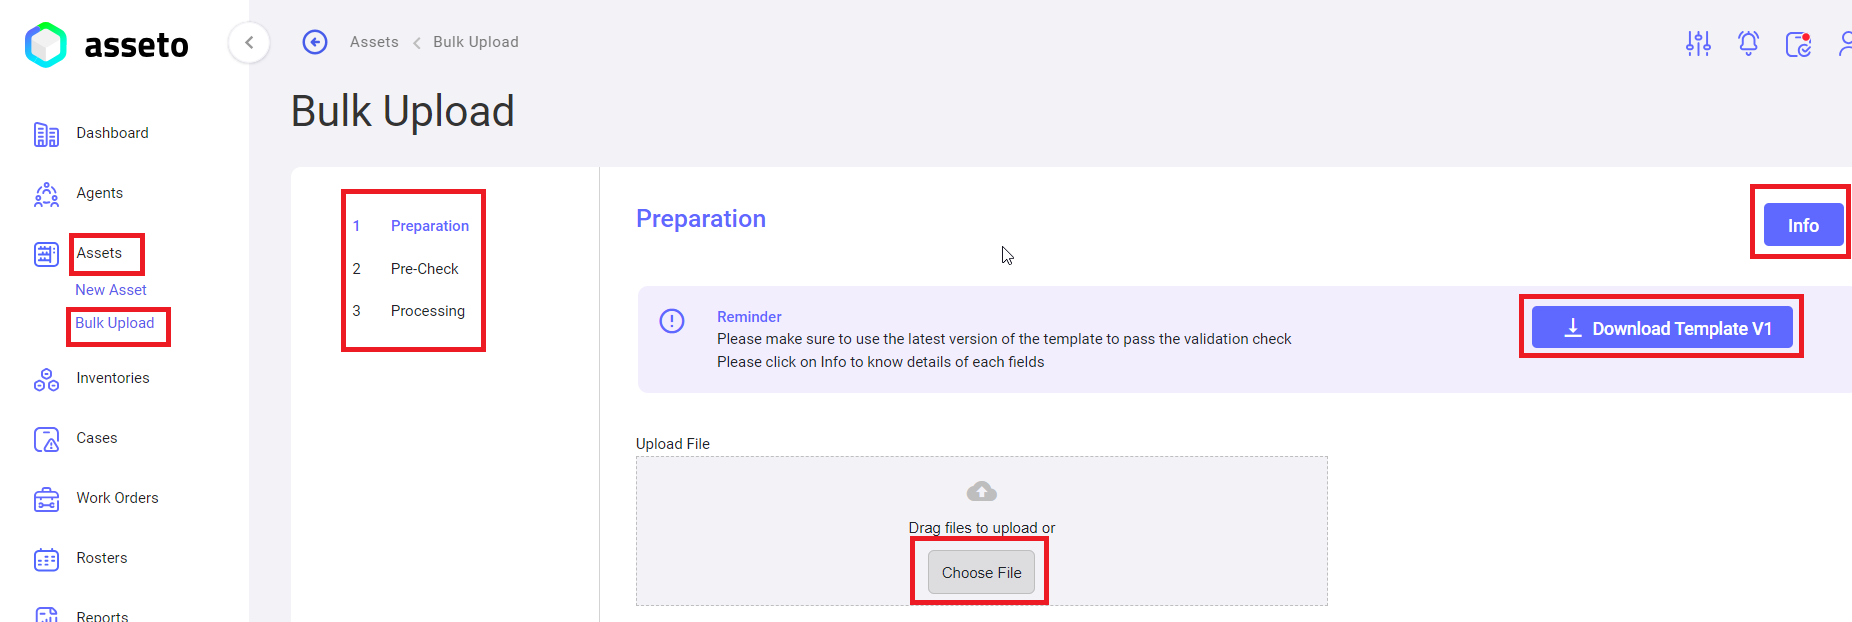
The Bulk Upload process consists of three sections:
- Preparation: Download the bulk upload template by clicking the "Download Template" button.
- Pre-check: Check for any errors in the uploaded sheet.
- Processing: View the progress of the bulk upload process.
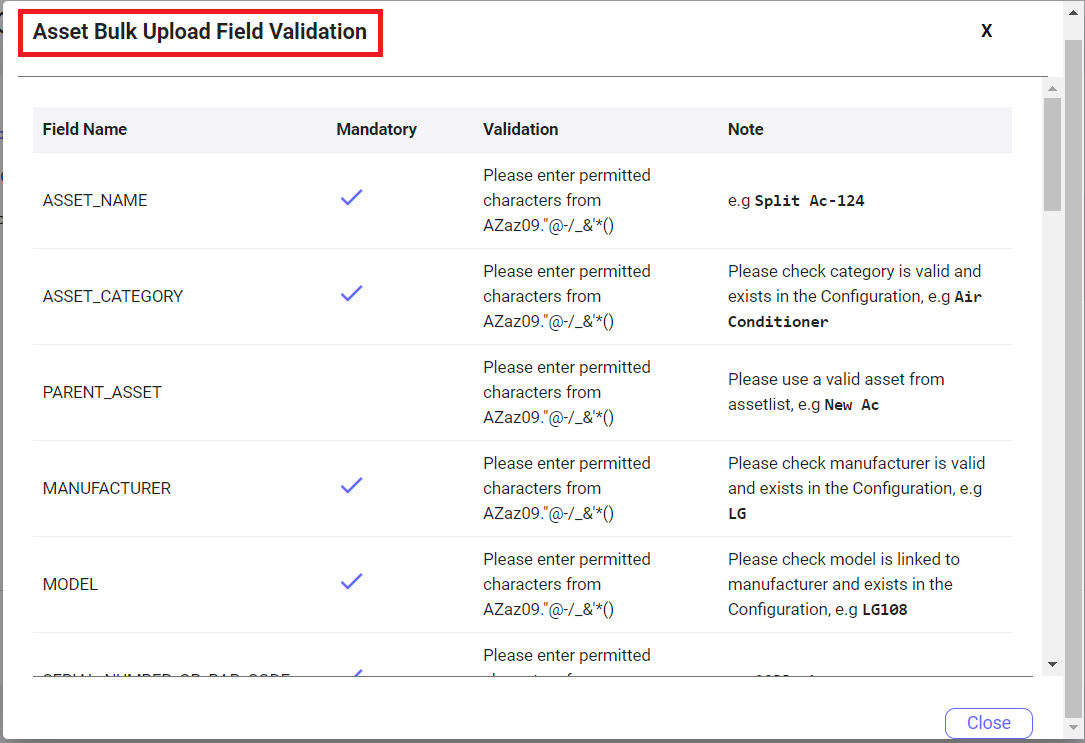
Click on the "Info" button to display field validation rules (as shown in the following screenshot). Follow these rules to fill in the data in the CSV file accordingly.
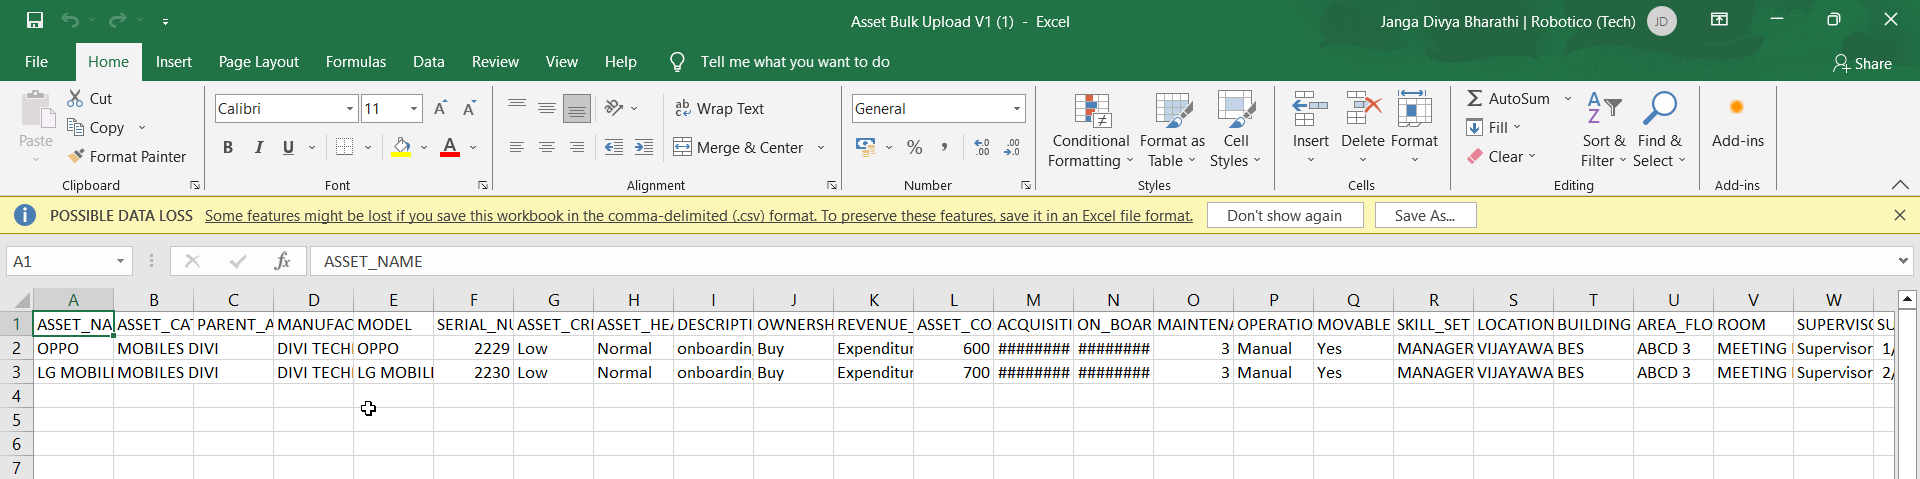
1. Preparation: Click the "Download Template" button to download the CSV file, which will be saved in your local PC's Downloads folder, as shown in the following screenshot.

Fill in the data on the downloaded CSV file for all assets to be onboarded using bulk upload.
Upload the file by clicking the "Choose File" button.
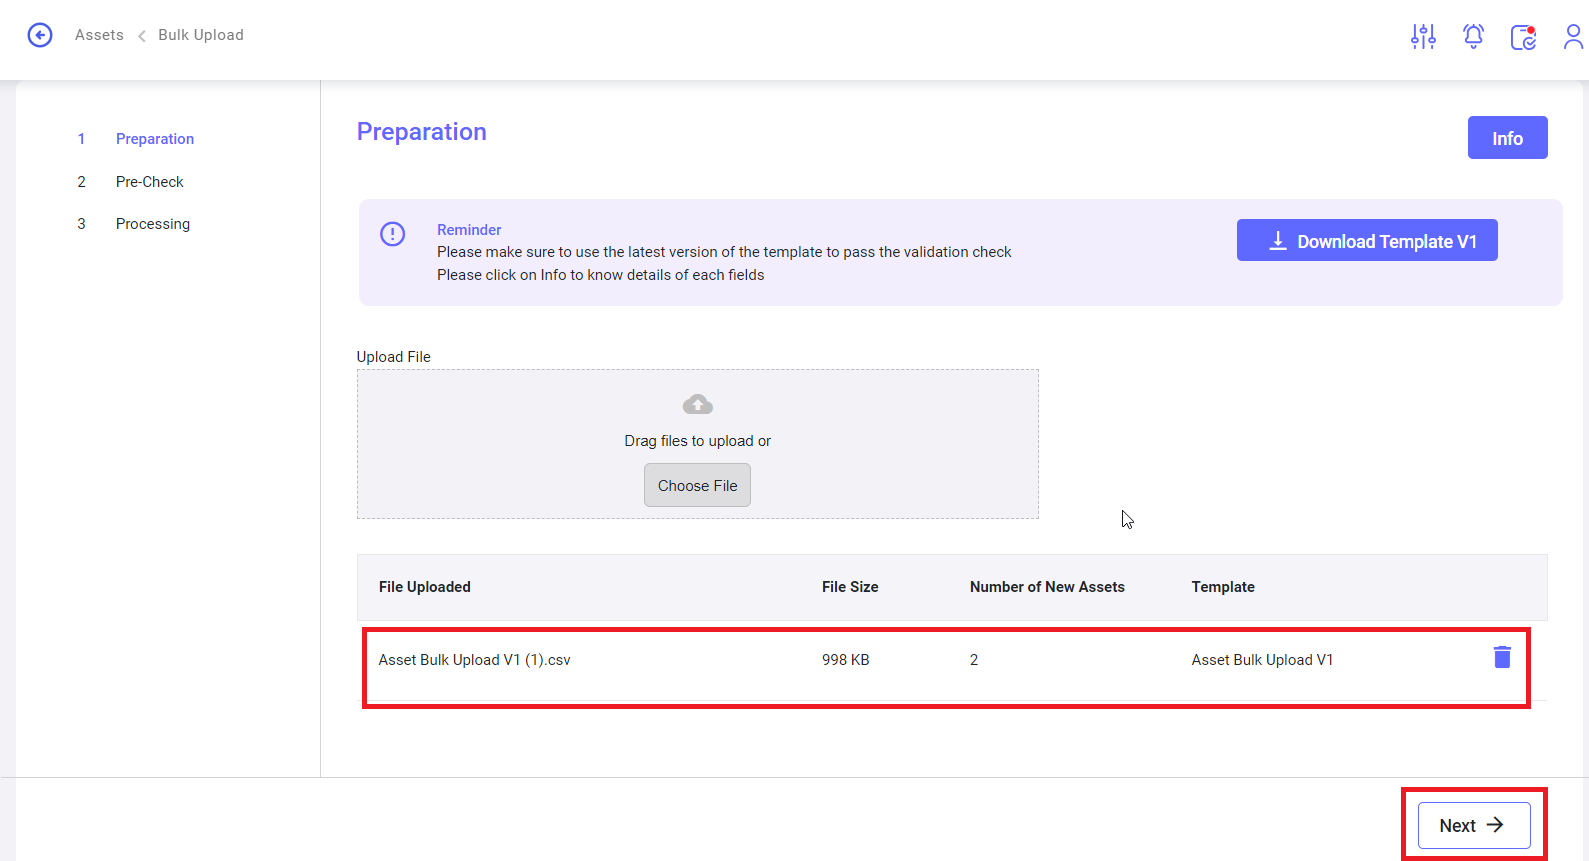
After uploading the CSV file, the 'Next' button will be enabled. Click the 'Next' button to navigate to the validation check page.
2. Precheck/Validation Check: If the uploaded file contains any errors, they will be displayed here. The user will not be able to proceed to the next stage until these errors are corrected. The "Submit" button will be enabled (as shown in the screenshot below) if there are no errors in the CSV file.
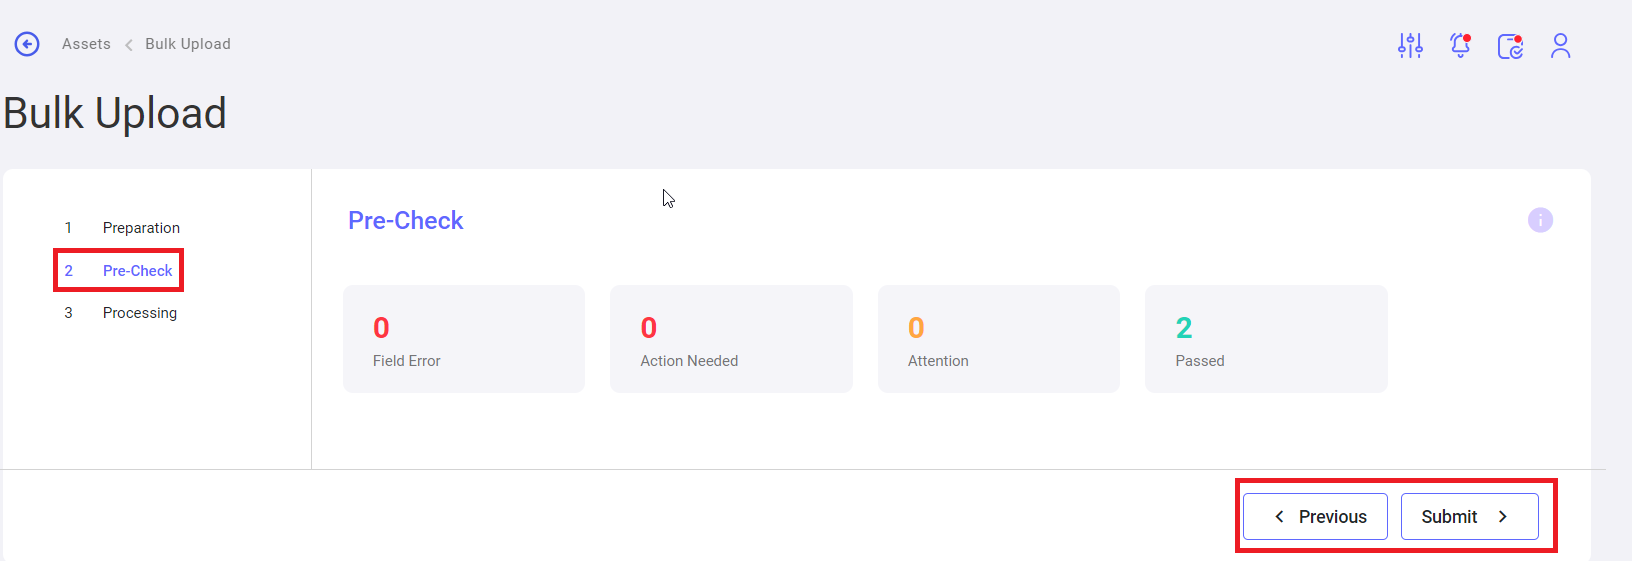
Note: Check the tooltip to view the validation status on the validation/pre-check page.
Clicking the "Submit" button will navigate you to the next page.
3. Processing: The user can view the progress of the bulk upload process. A confirmation message will be displayed indicating that the assets have been created successfully.
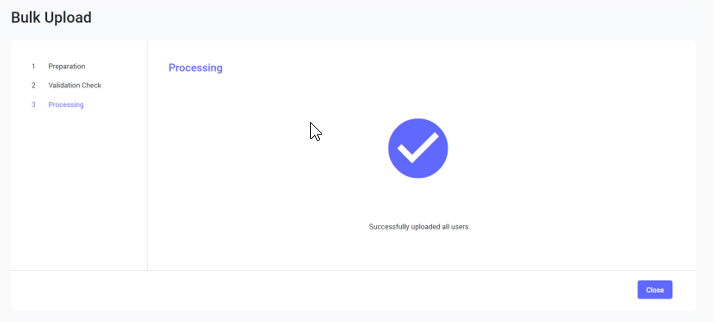
Click on "Close." The uploaded assets will be displayed on the assets list page, as shown in the following screenshot.
3.5. Asset Detail View
Asset detail view:
Here, users can view detailed information about the asset (as shown in the following screenshots). Clicking on a specific asset in the asset list will navigate users to the asset detail view.
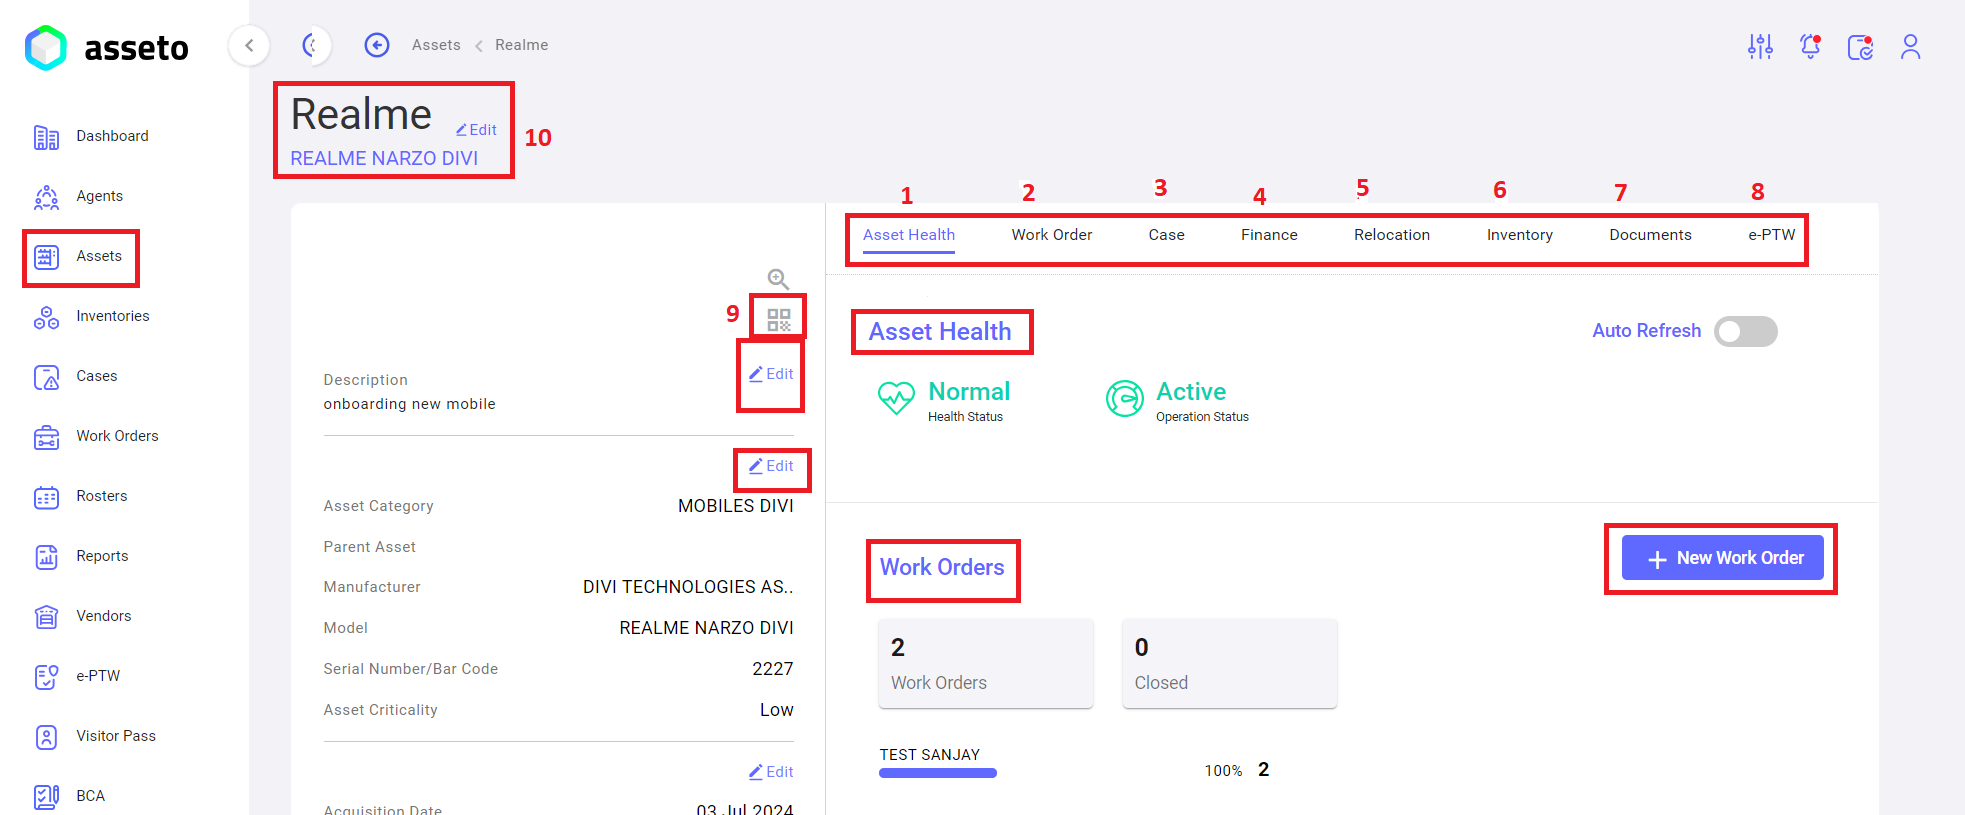
The following features and tabs are displayed. Clicking on a specific section will allow the user to navigate to that respective section.
-
- Asset health (default)
- Work order
- Case
- Finance
- Relocation
- Inventory
- Documents
- E-PTW
1. Asset Health Section: Users can view the asset health information, including status categories such as normal, warning, critical, and whether the asset is active or inactive.
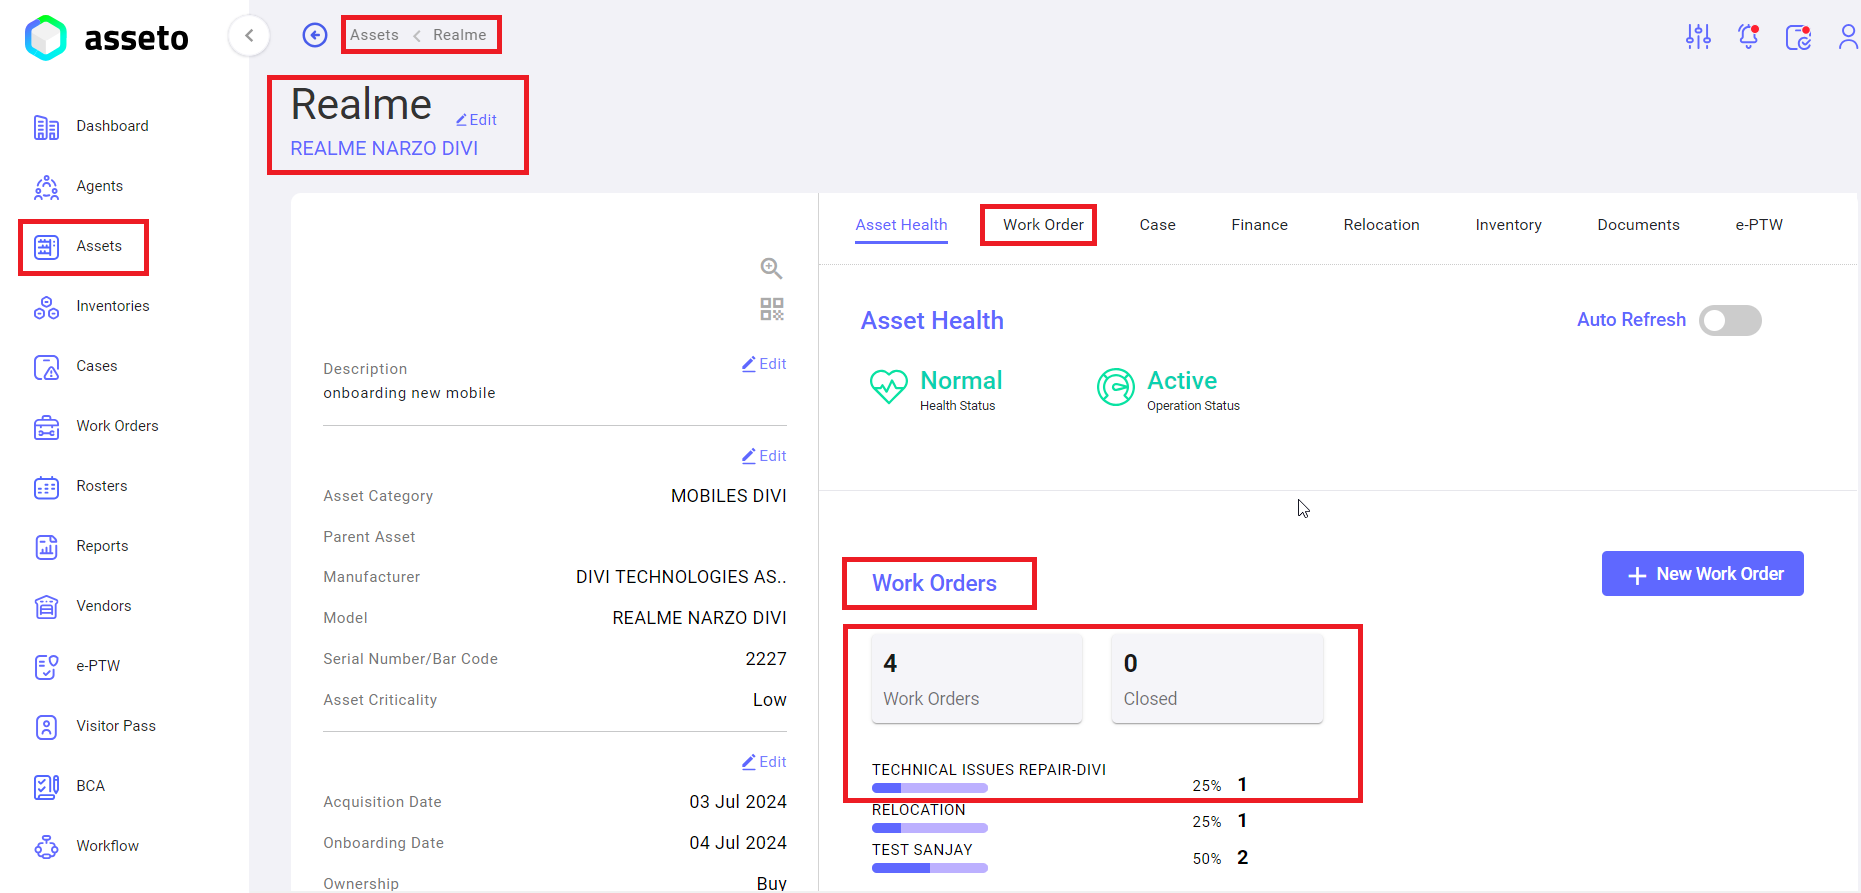
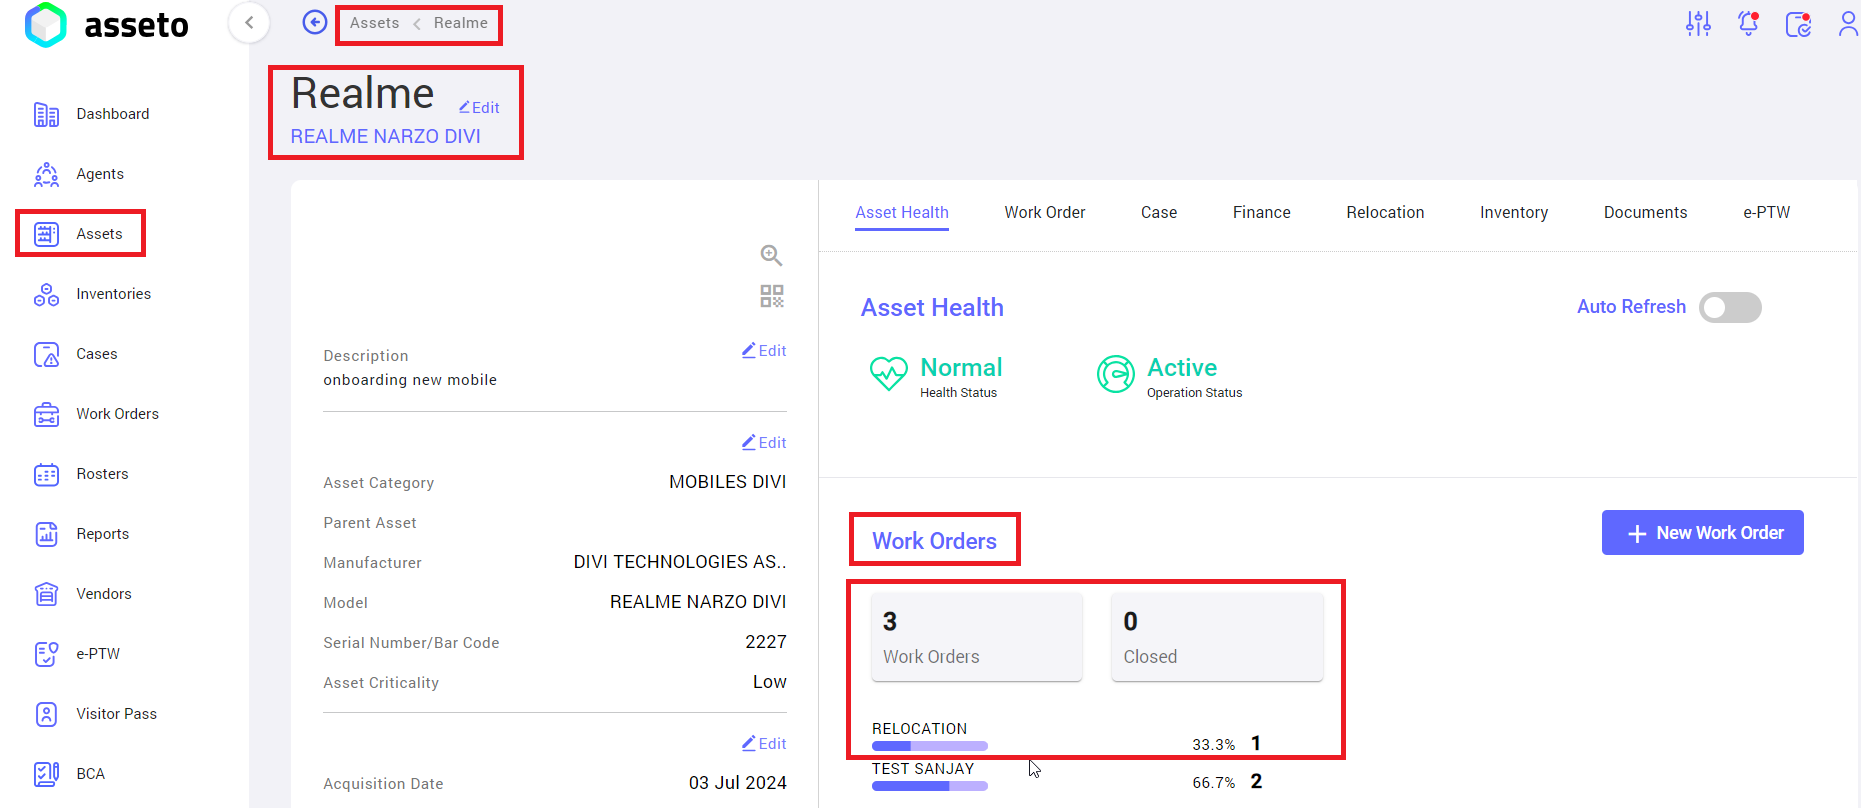
2. Work Order Section: Users can view the number of work orders and their associated statuses for the asset.
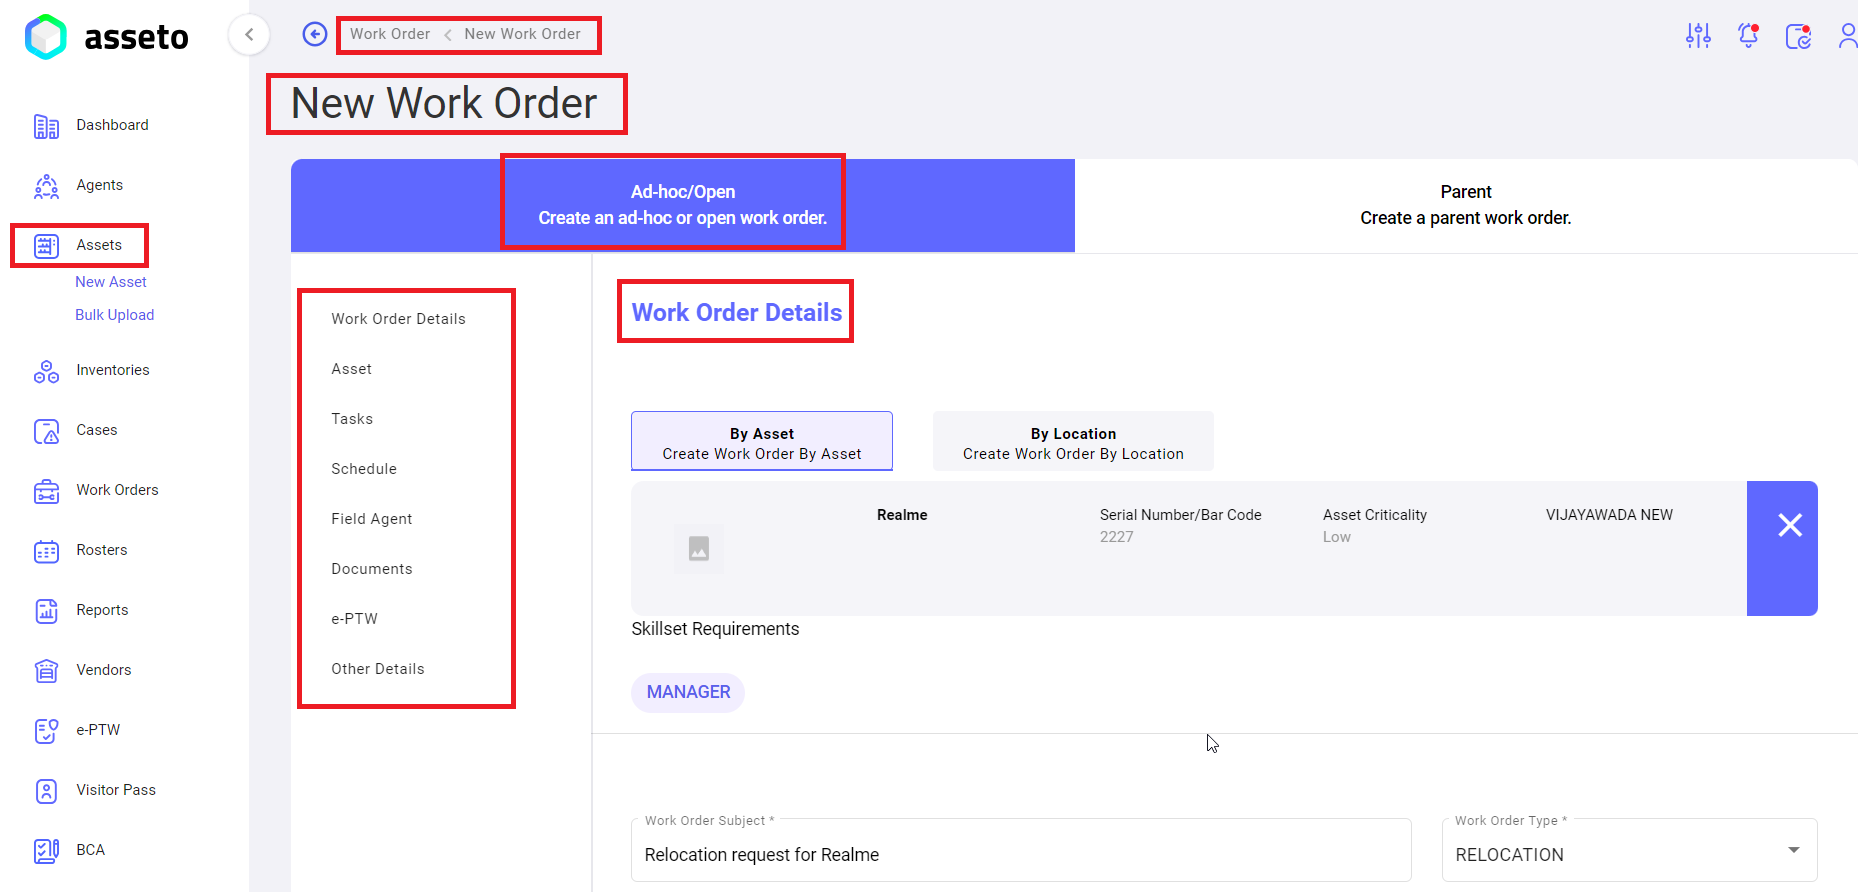
Clicking on the “Work Order” button (as shown in the above screenshot) will navigate the user to the new work order page to create a work order under the asset's name.
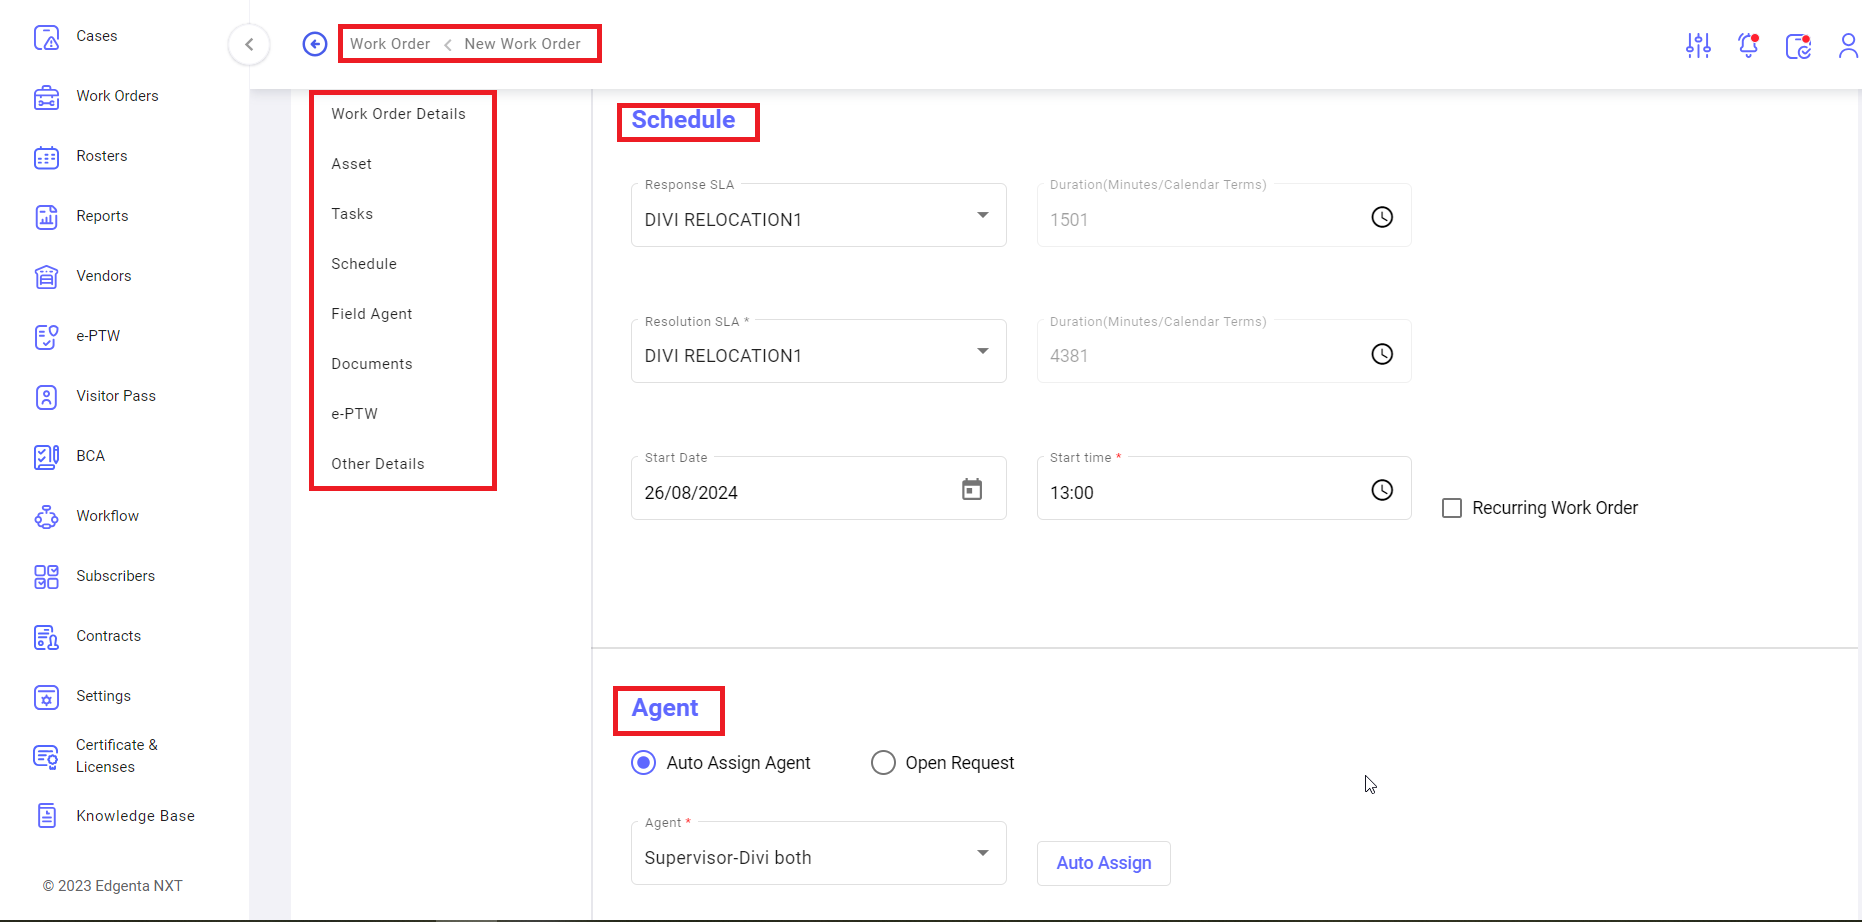
To request the Relocation of an asset, follow these steps:
Note: Refer to sections 6.2, "Pre-requisites for Work Orders Creation," and 6.3, "New Work Order," in the “6. Work Orders” module for more details.
Step 1: In the Work Orders settings module, add a new Category, SLA type (for both resolution and response), Auto Assignment Agent, and Auto Assignment Supervisor. Configure Resource Groups in the My Organisation module settings.
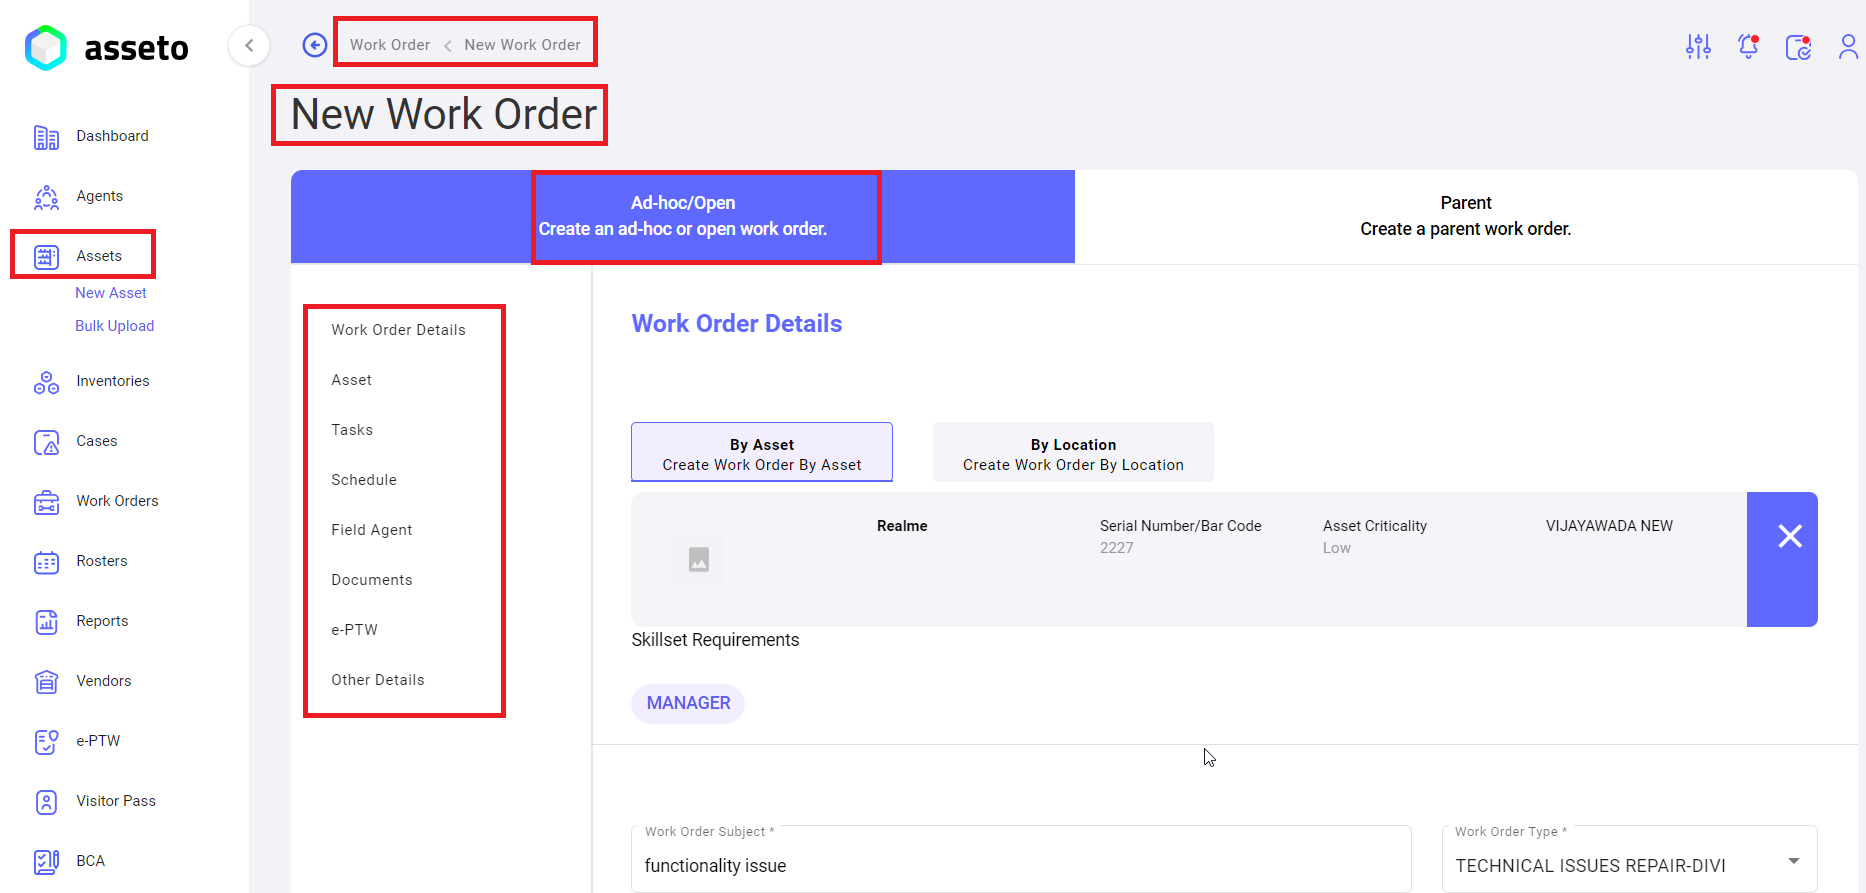
Note: Asset details will be auto-filled by the system
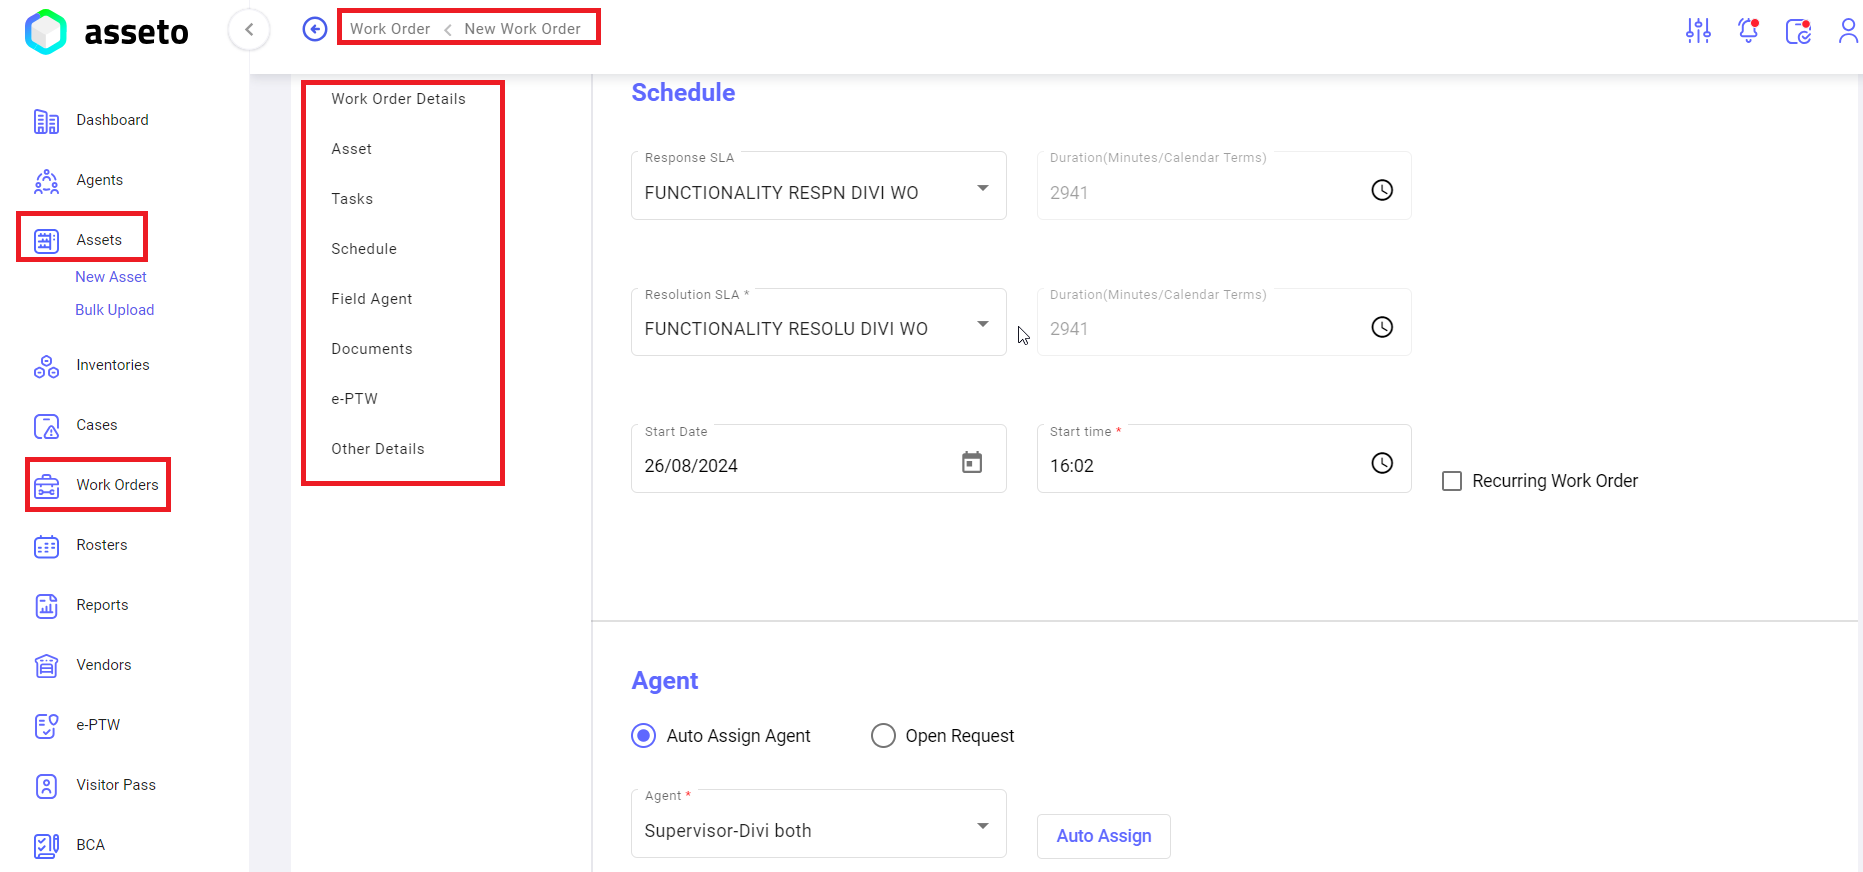
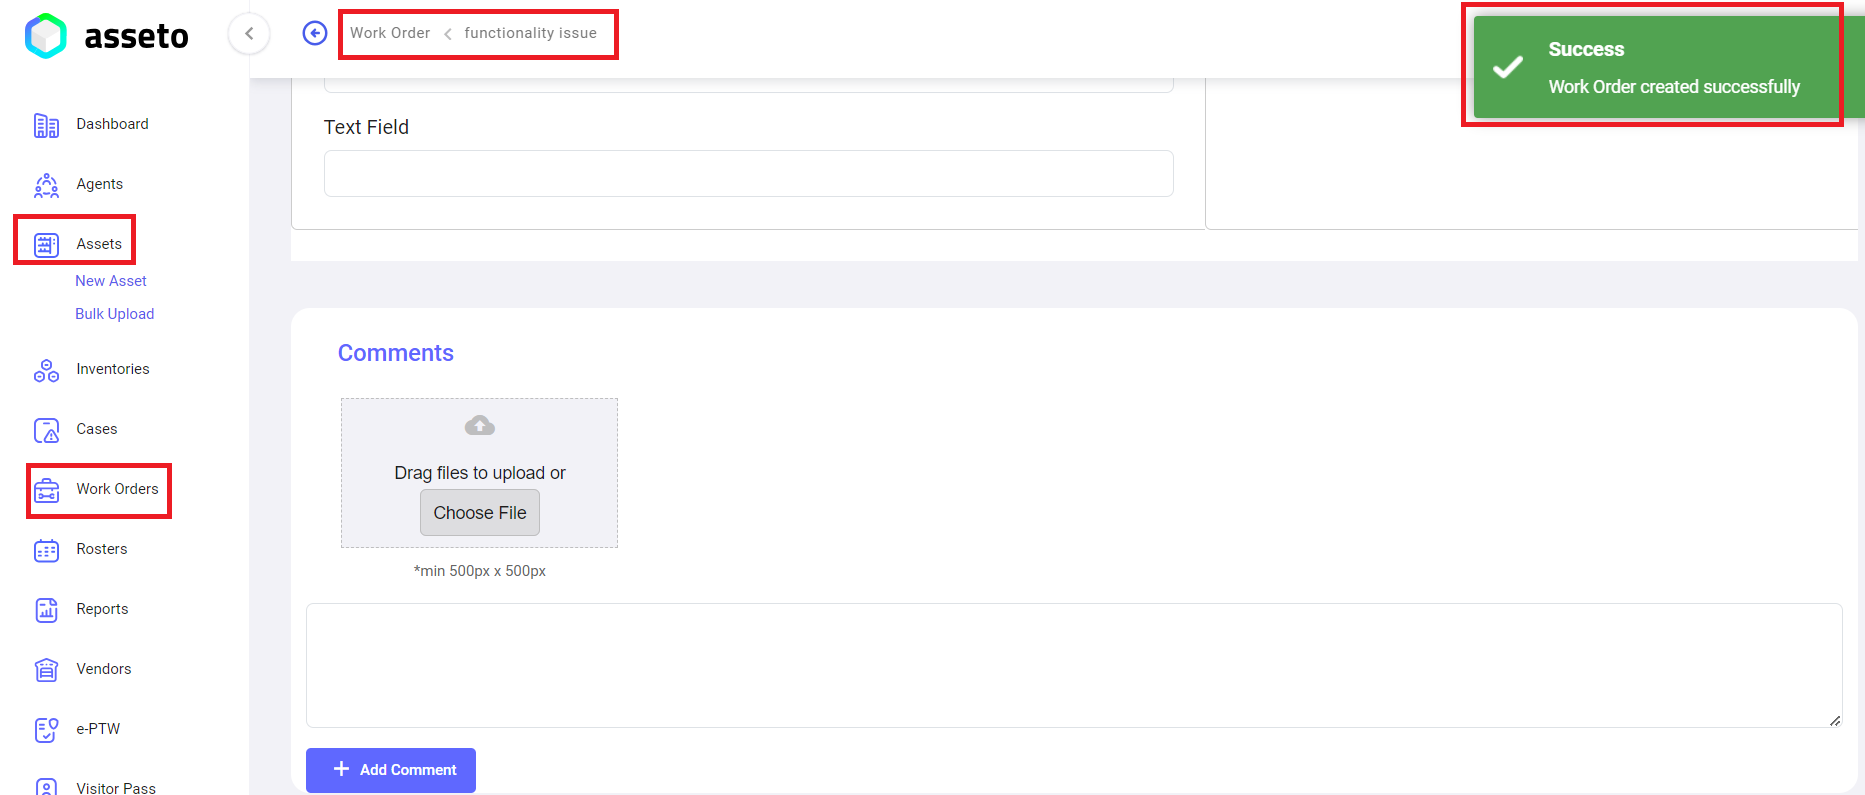
Ensure all mandatory fields are filled in to enable the "Save" button.
![]()
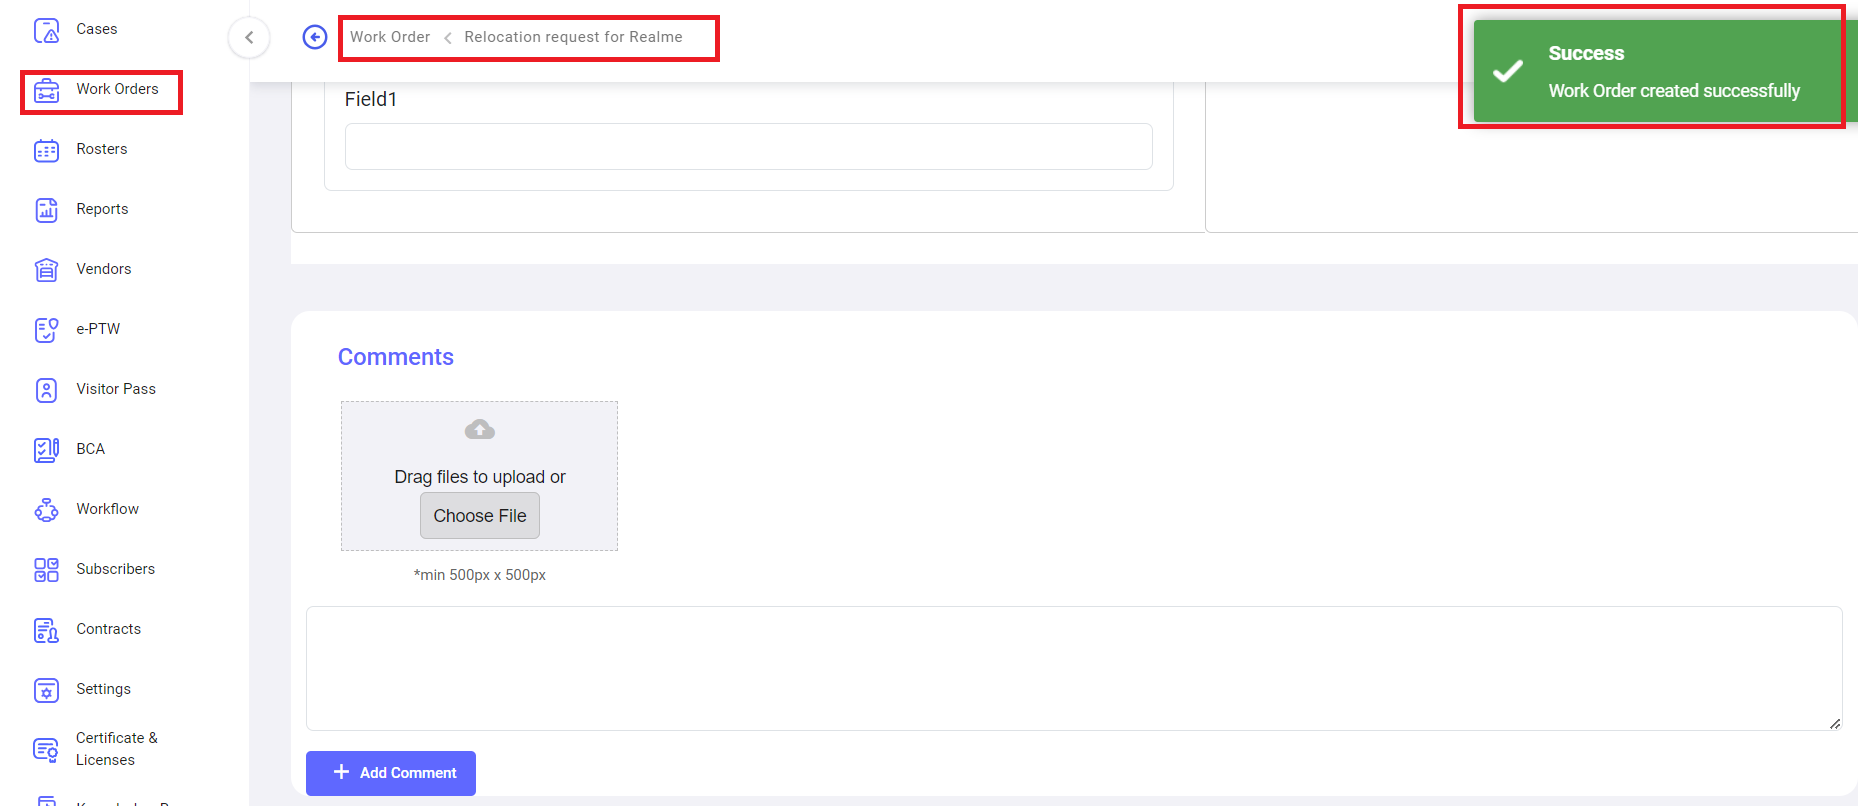
Click on the "Save" button. A confirmation message stating "Work order created successfully" will be displayed, and the system will navigate to the work order detail view page as shown in the following screenshot.
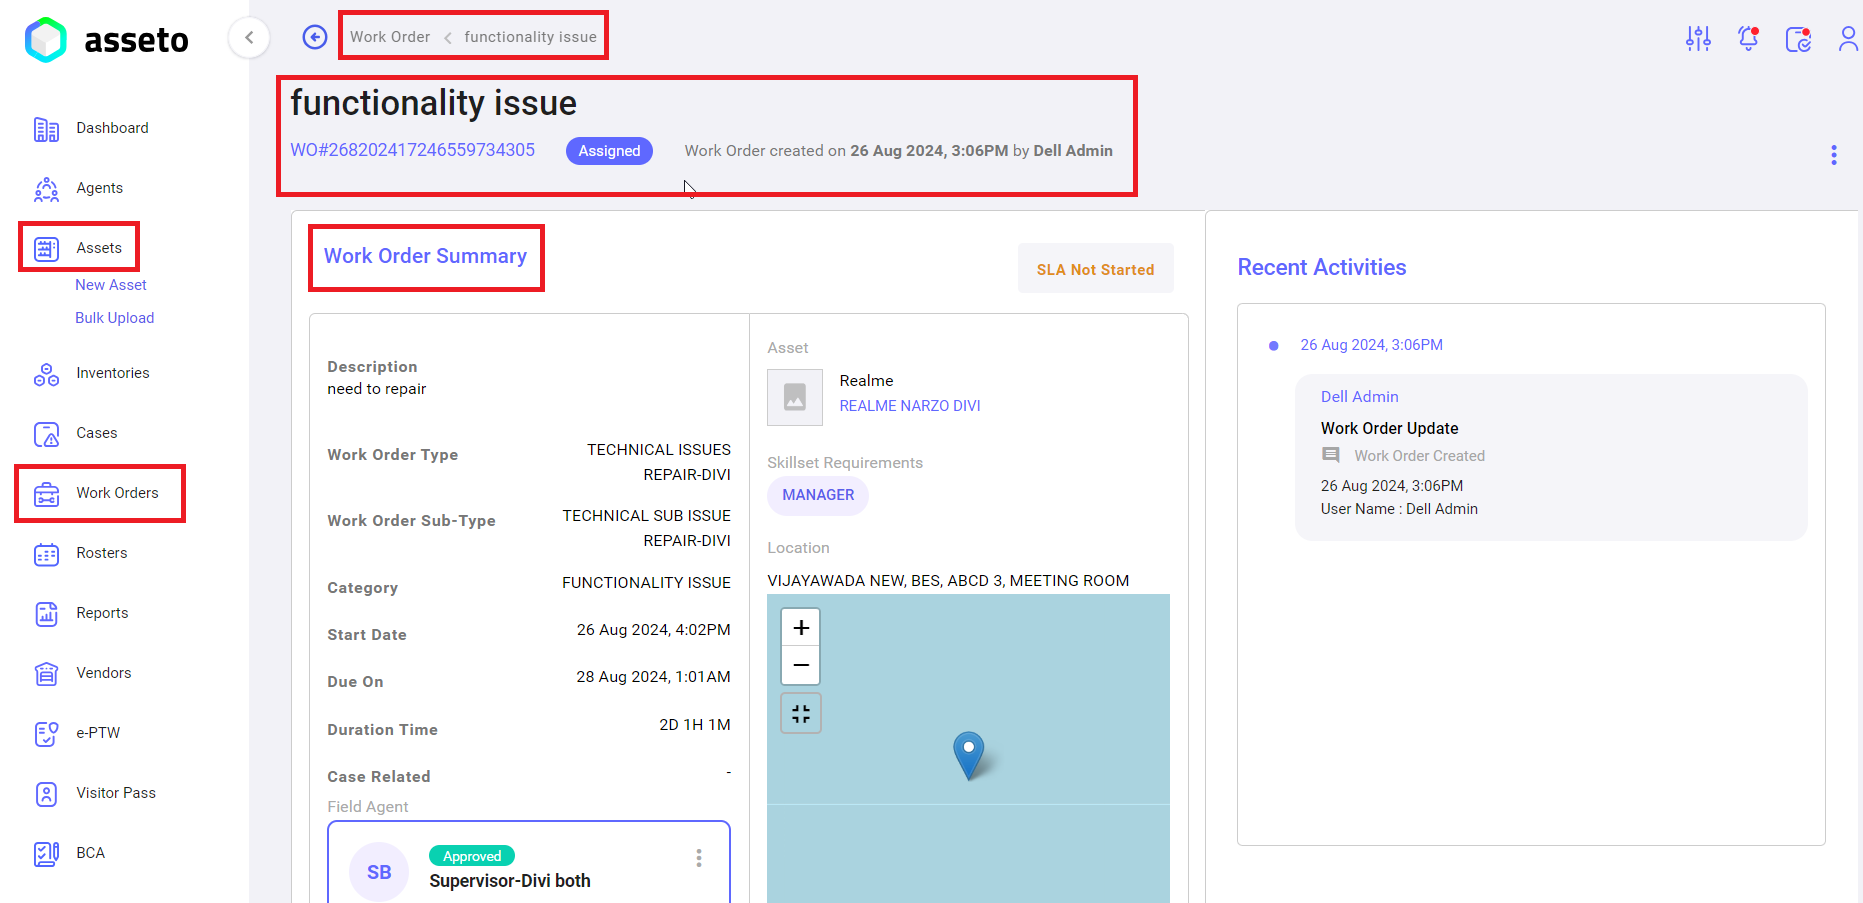
The user can view the work order details for an asset on the work order view page, as displayed in the following screenshot.
Step 3: The user can view the work order for an asset in the work orders section of the asset view page, as shown in the following screenshot.
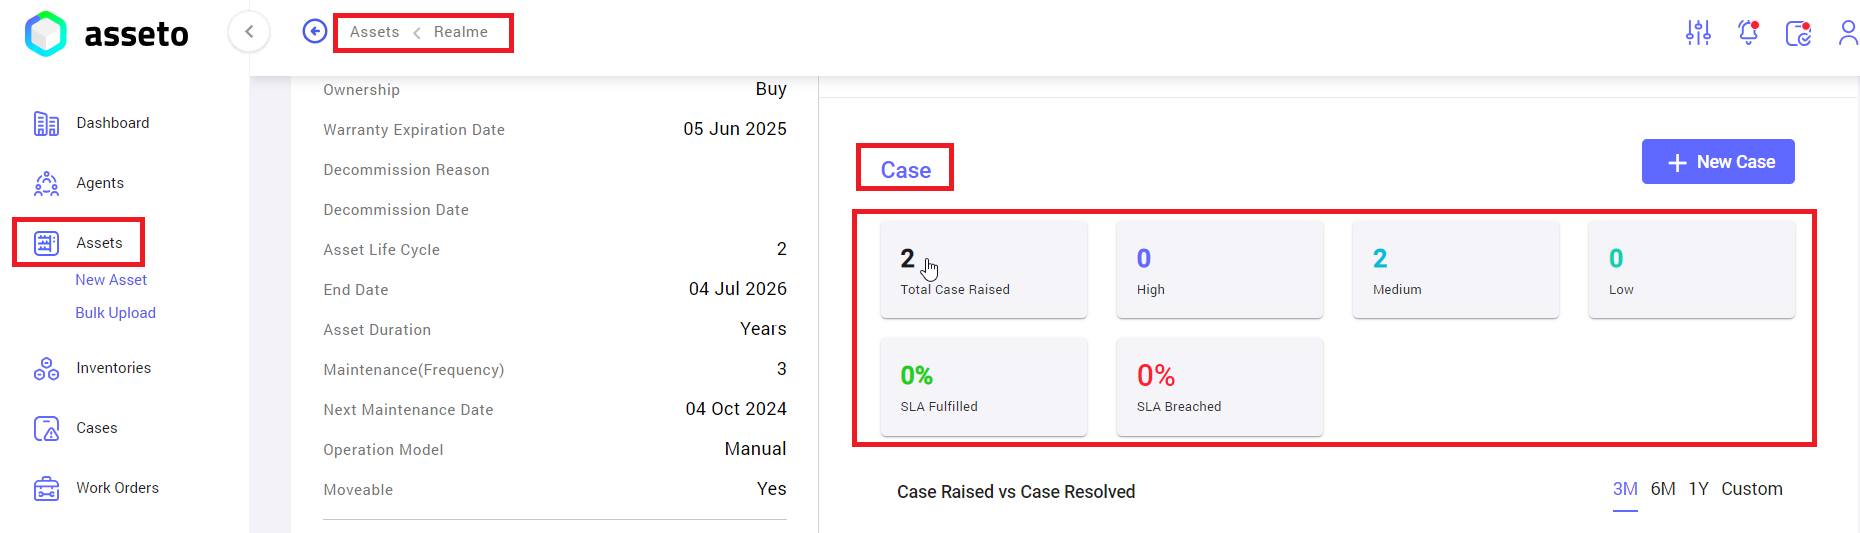
3. Case Section: Here user can view all the associated case with the asset.
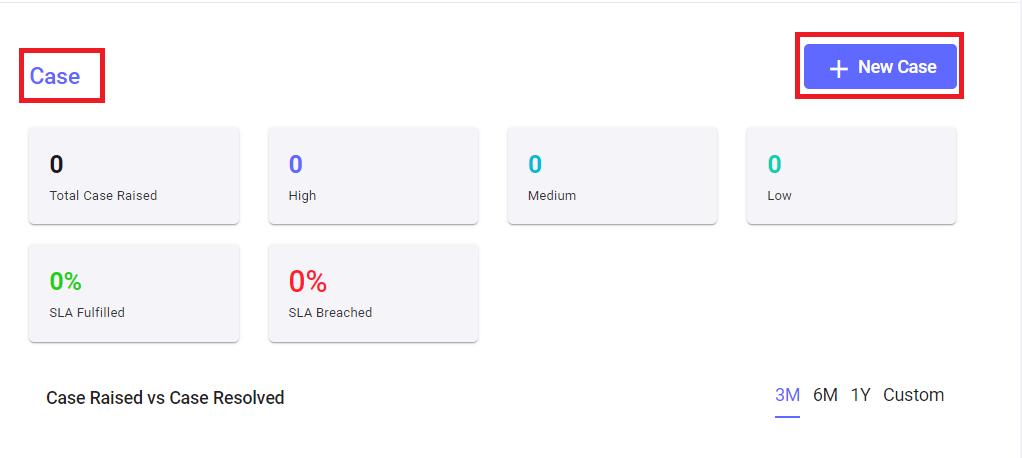
Here, the user has the option to create a new case for an asset by using the “New Case” button (as shown in the above screenshot). Clicking this button will navigate the user to the New Case page, where asset details are displayed, allowing the creation of a new case for the asset.
Please follow the steps below to request the relocation of an asset:
Note: For more information, please refer to sections "Pre-requisites for Case Creation," and "New Case," in the 5. Case module.
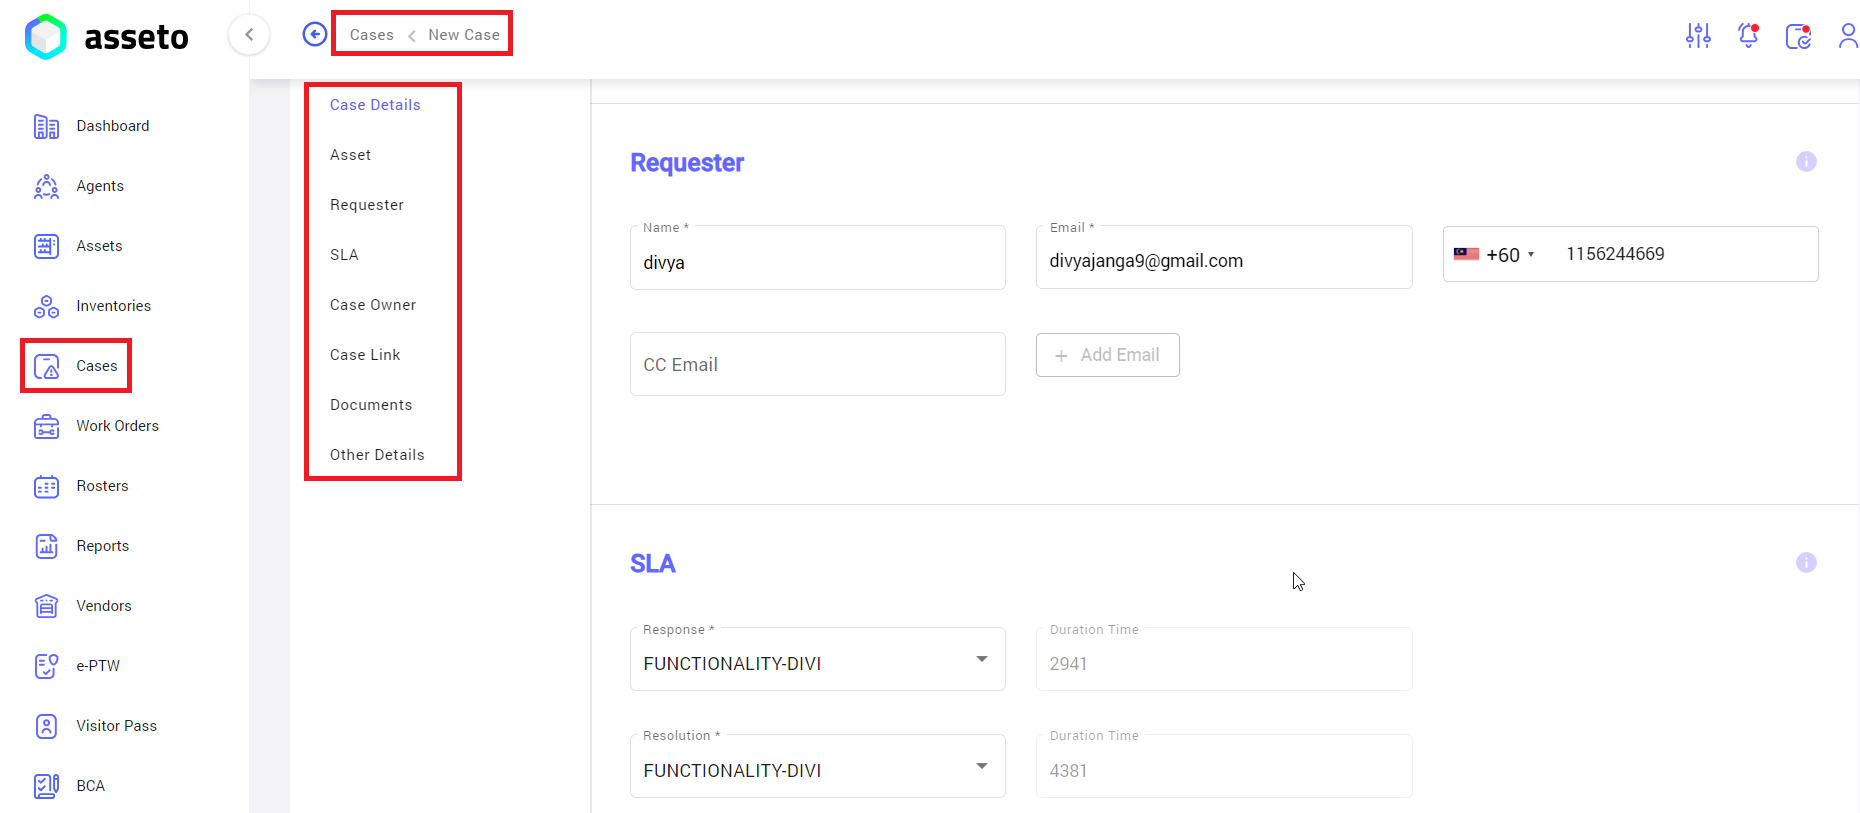
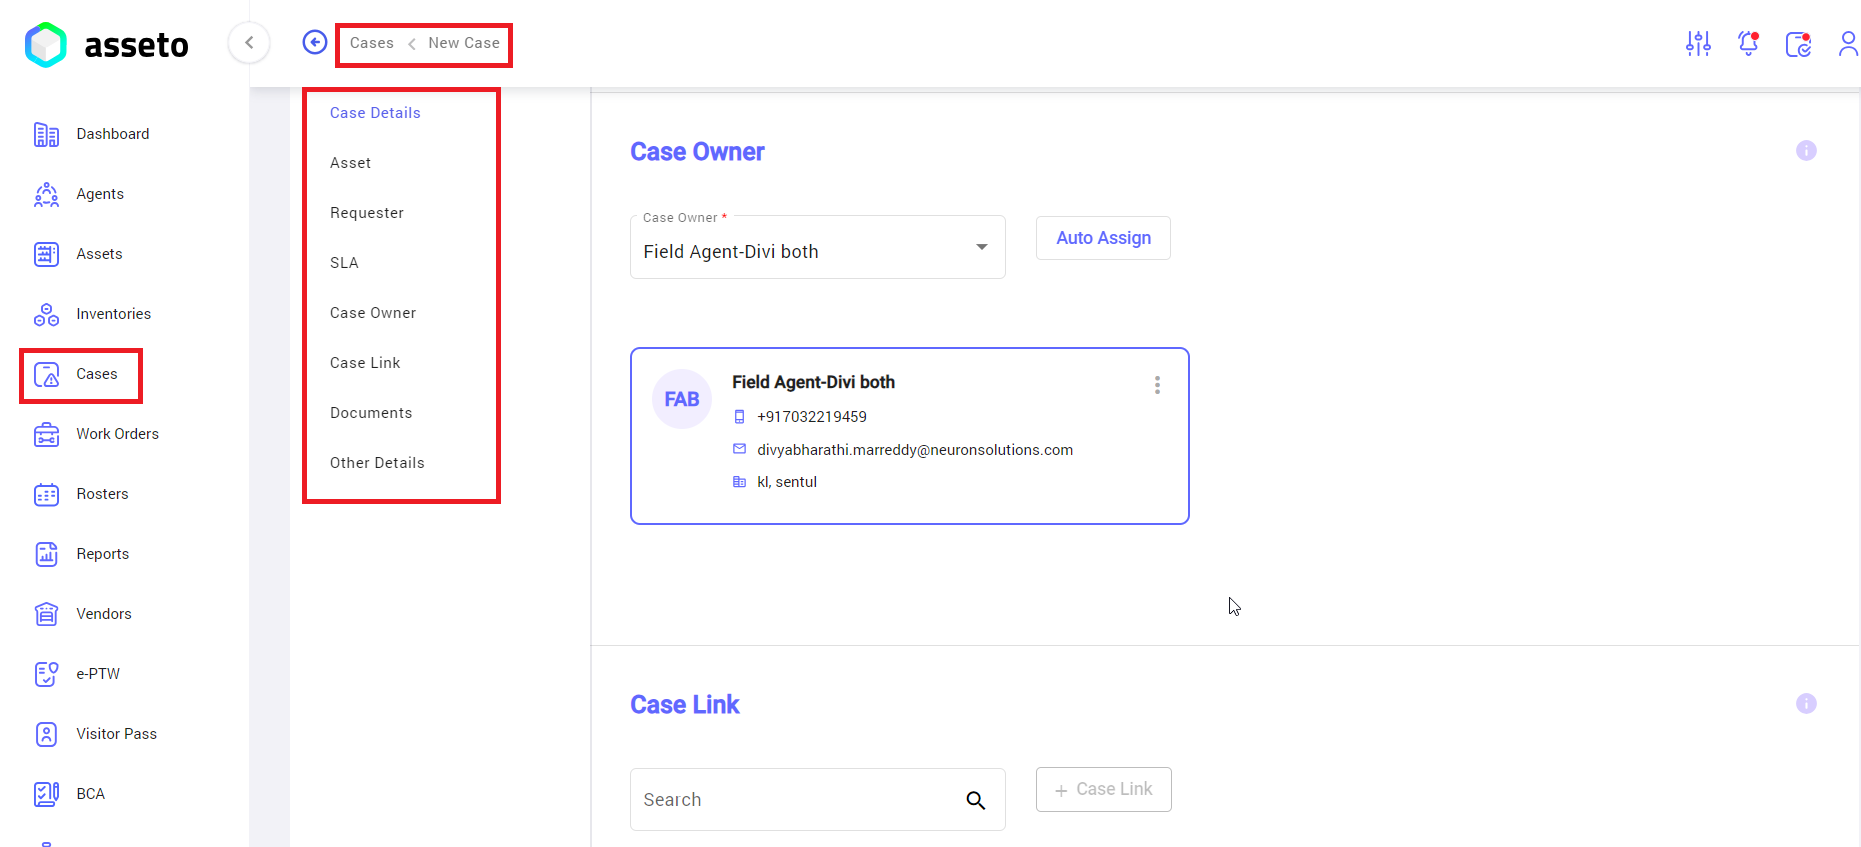
Step 1: Add the case type, case subtype, SLA configuration, auto-assignment for case owner and agents, and case association configuration in the Settings -> Case module. Create an agent with the Case Owner role to enable automatic assignment of a case owner when creating a new case. Configure resource groups in the Settings -> My Organisation module.
Step 2: Select an asset from the Assets module and click on it to view the asset details. Then, navigate to the Case section and click the “New Case” button to create a case under this asset.
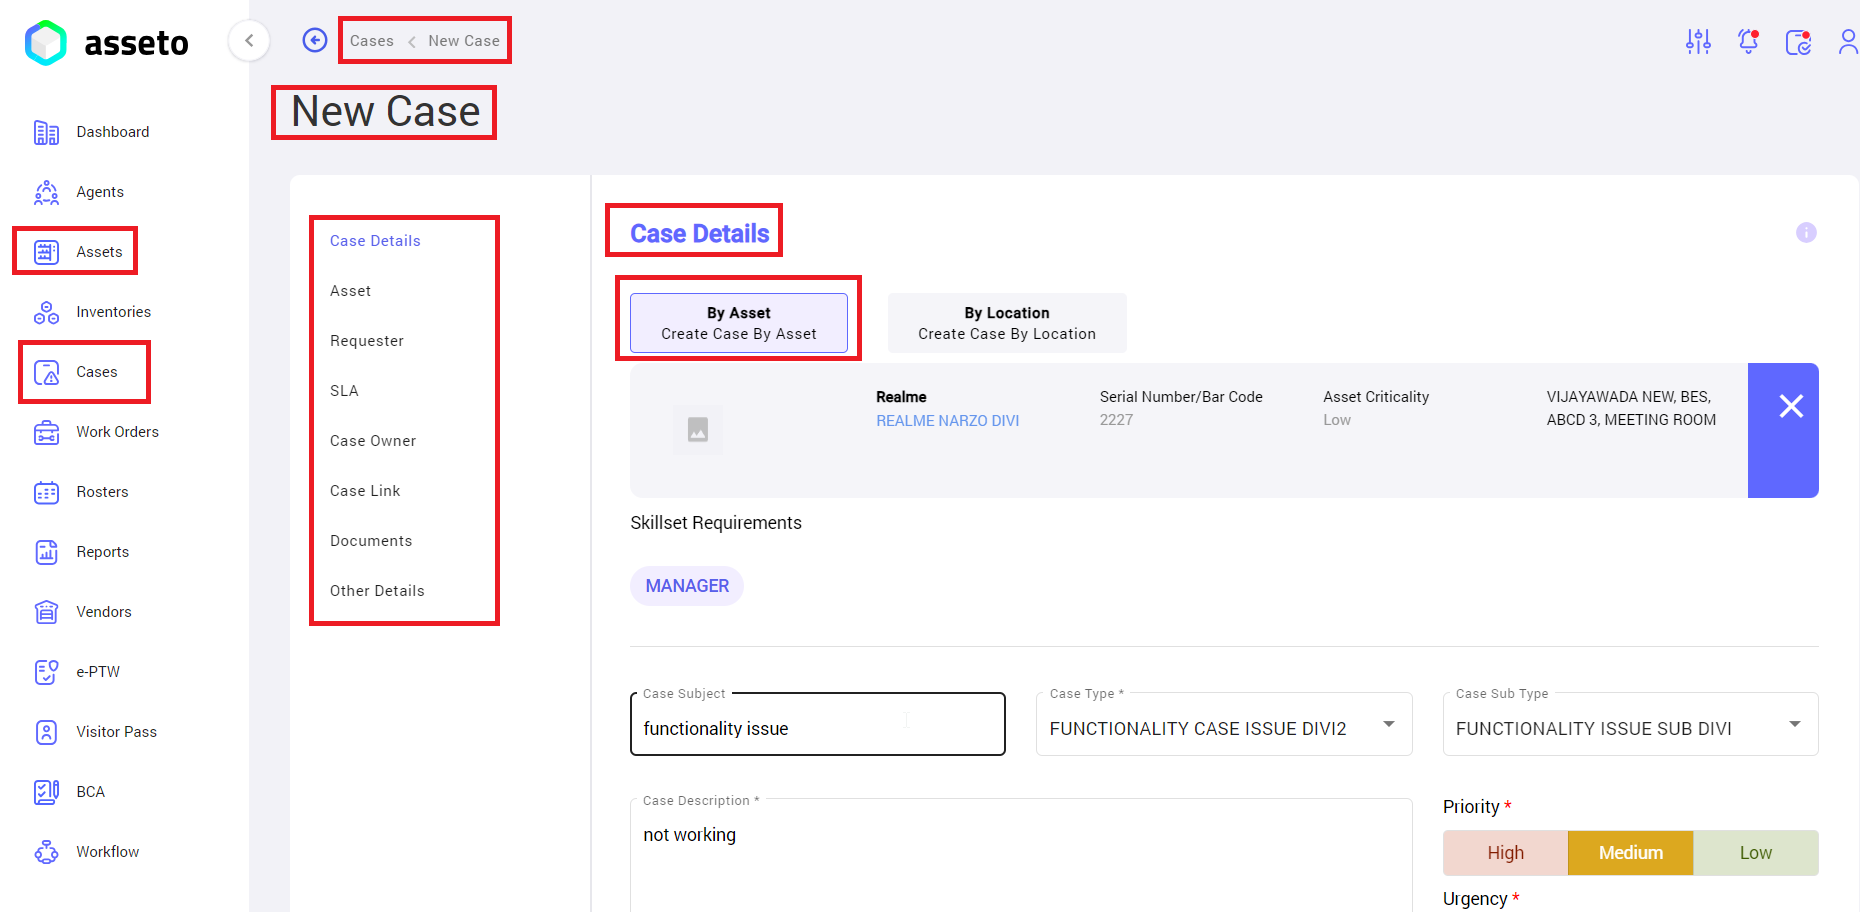
Asset Details are auto filled by system.
Next steps.
Fill in all mandatory fields. The Save button will only be enabled once all required information has been provided.
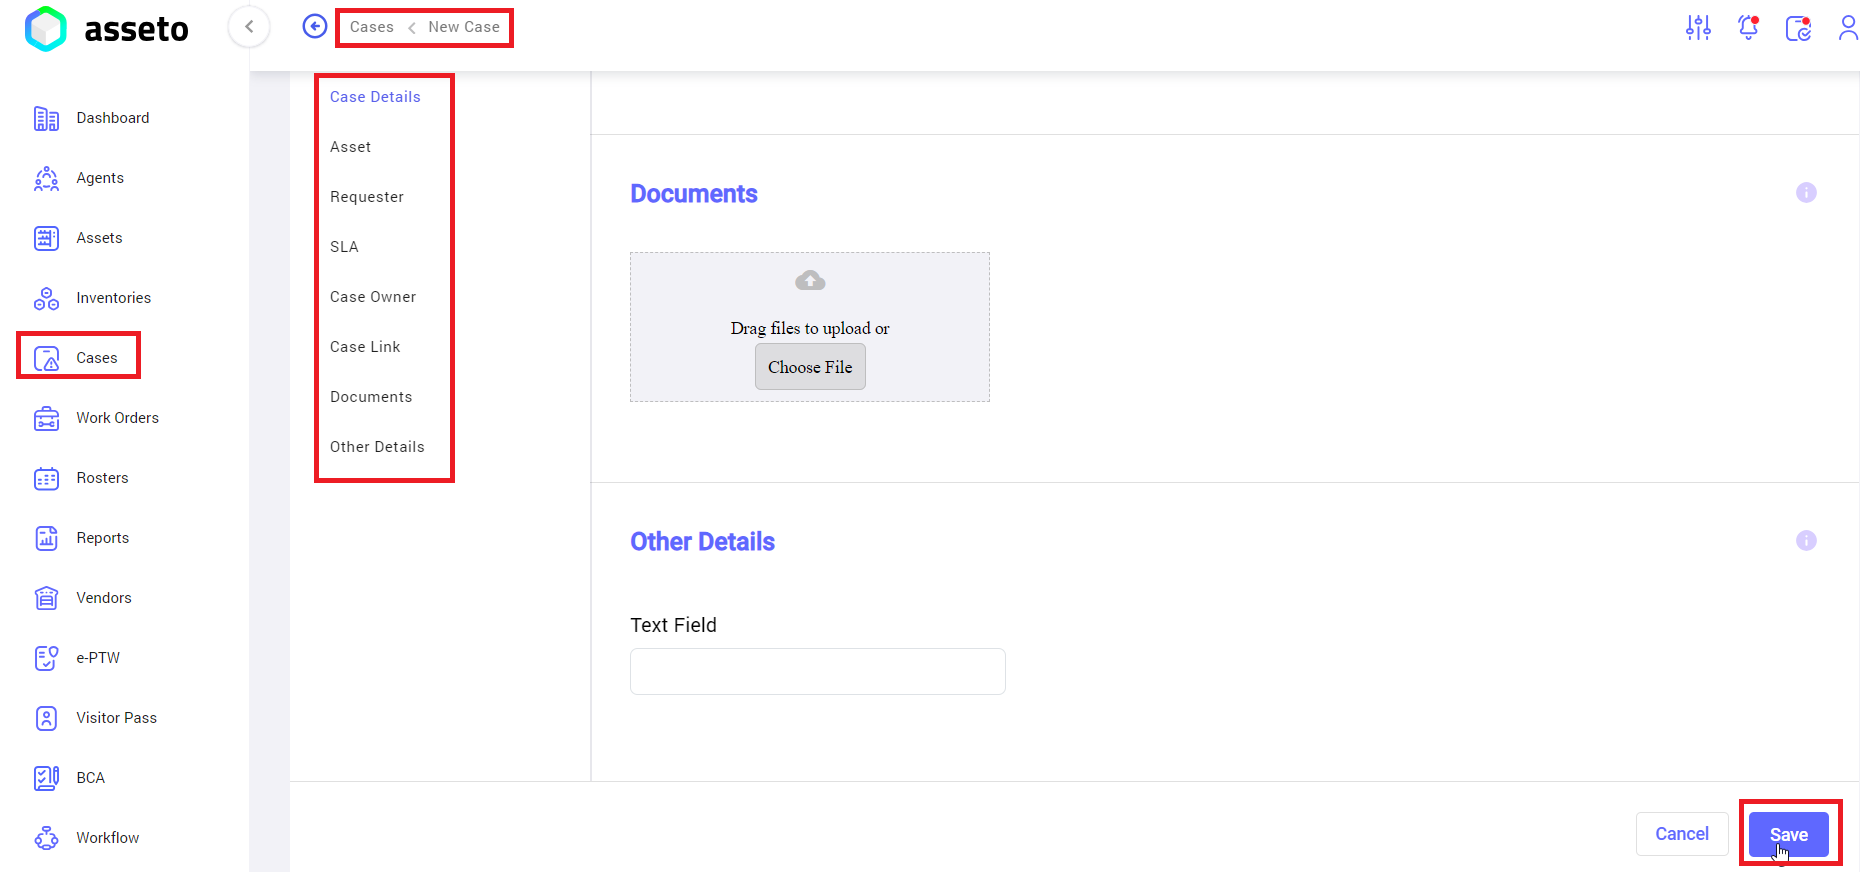
Click on the "Save" button. A confirmation message, "Case created successfully," will be displayed, and the system will navigate to the Case detail view page, as shown in the following screenshot.

The user can view case details for an asset on the Case details view page, as shown in the following screenshot.
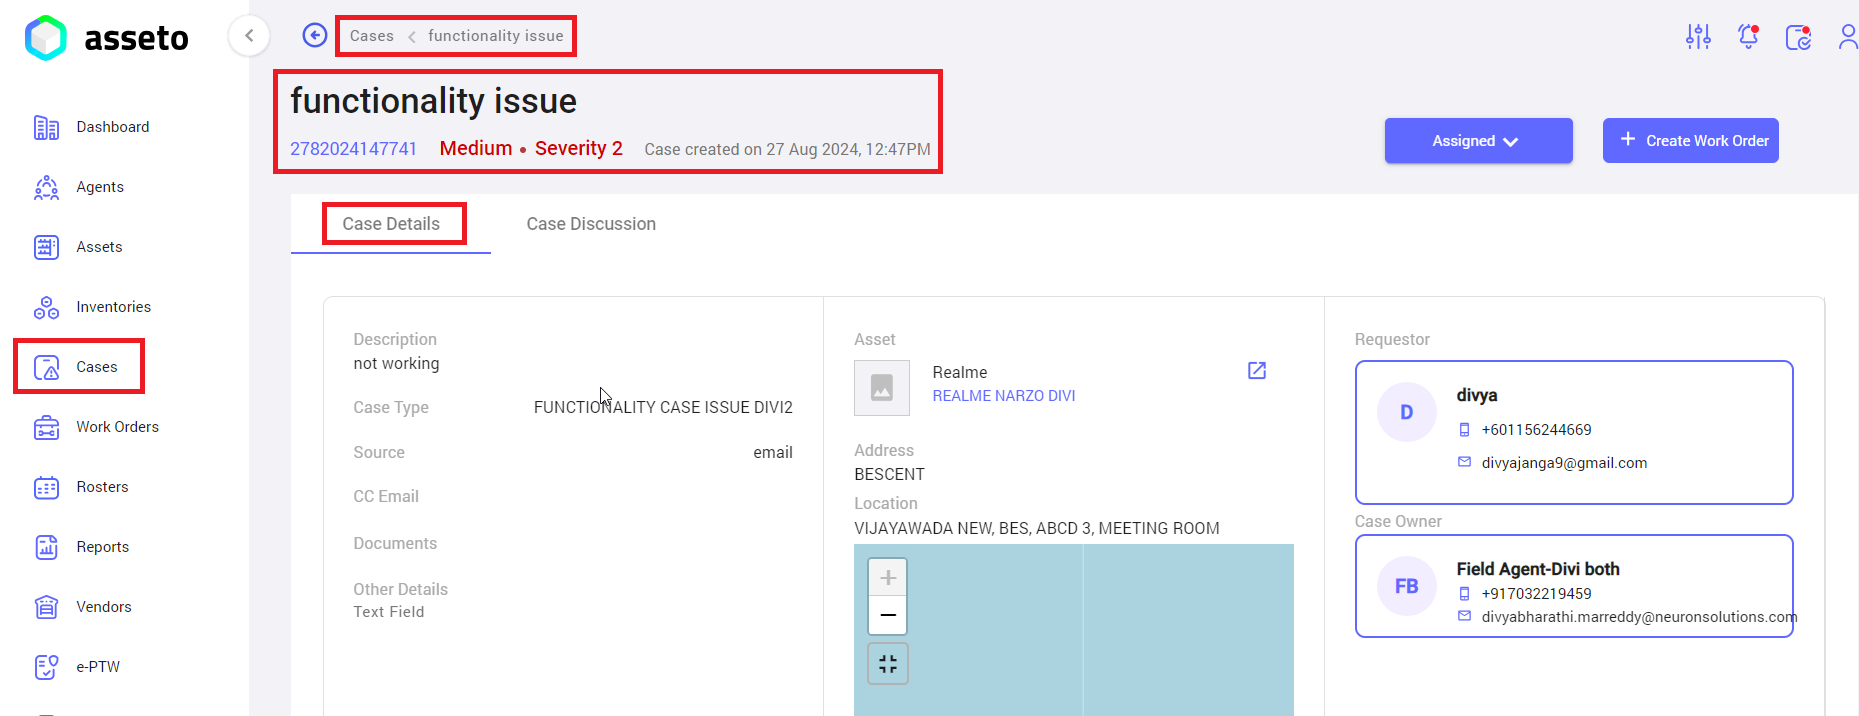
Step 3: The user can view the case details under the asset in the Case section of the Asset module, as shown in the following screenshot.
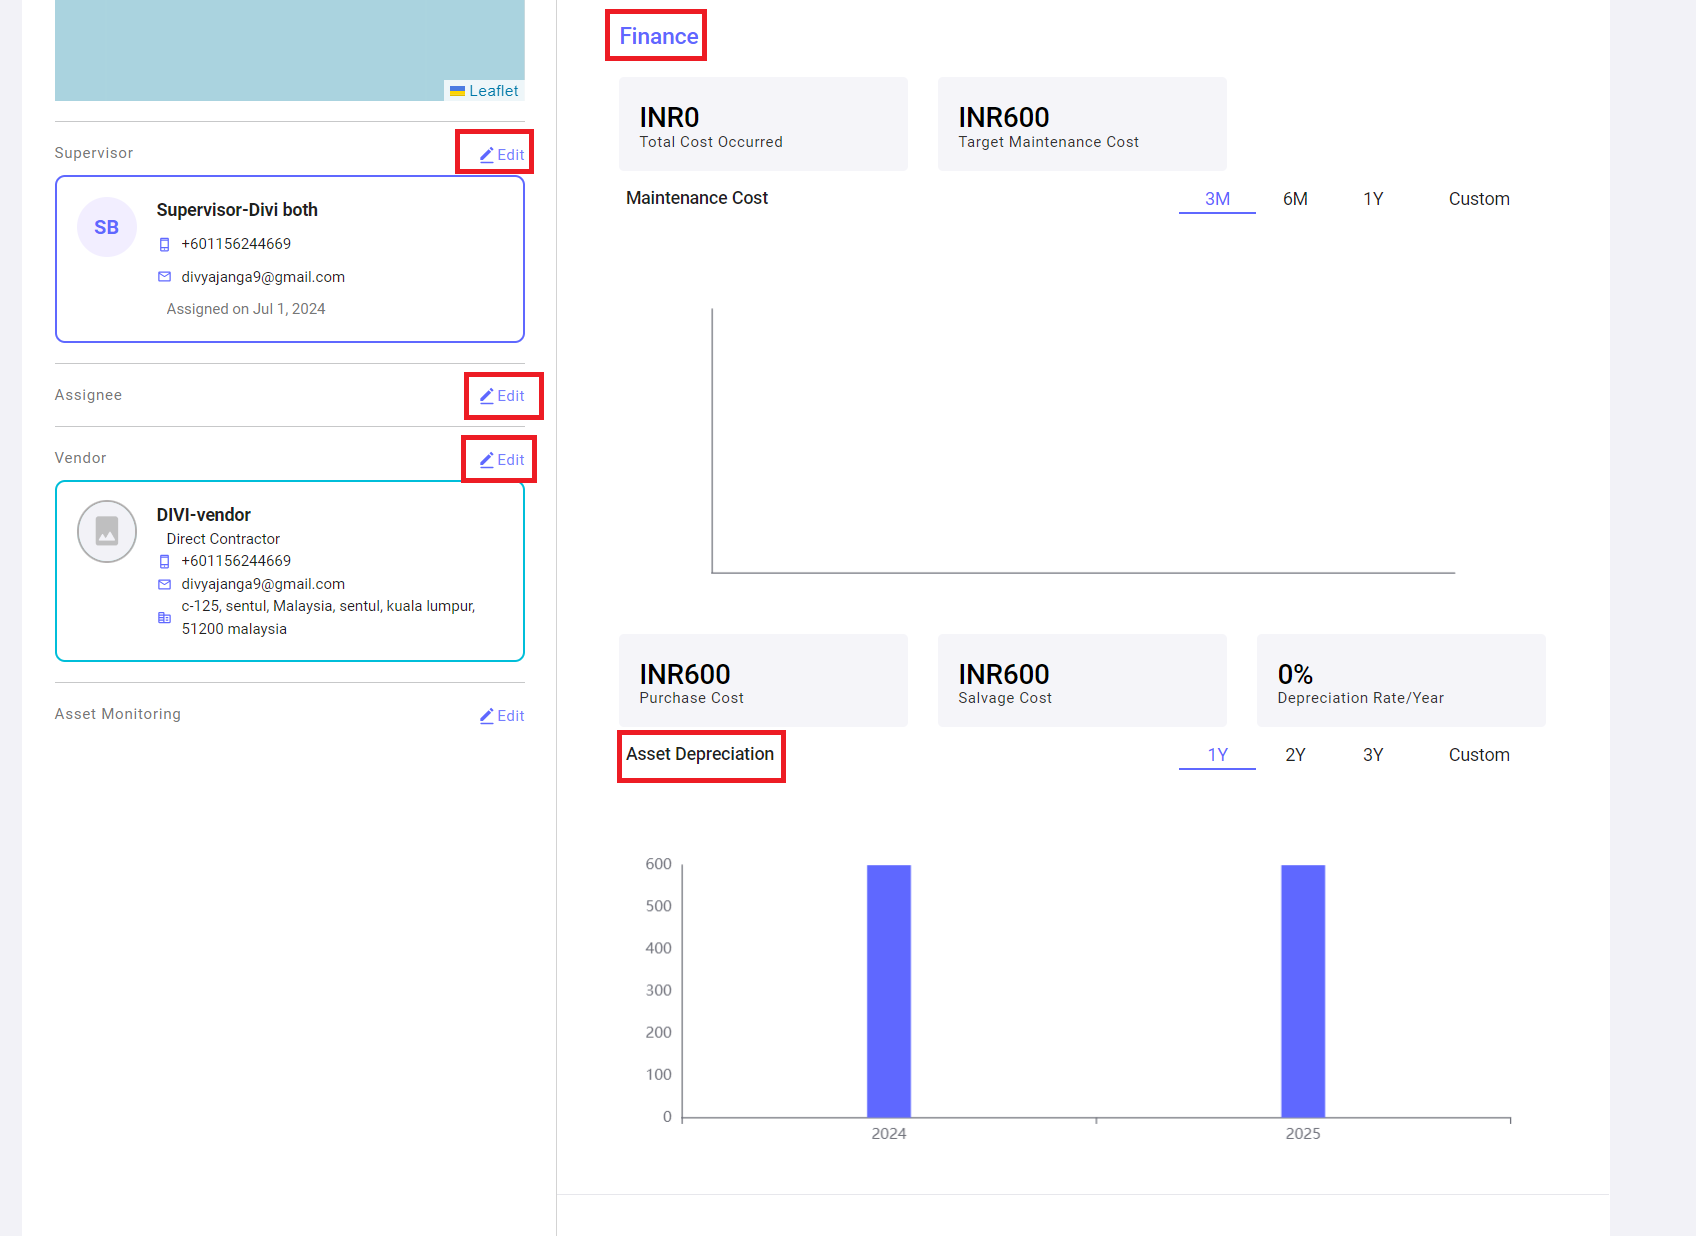
4. Finance Section: Here, users can view the financial information of the asset. Users can refine the data for 3 months, 6 months, 1 year, or customize the date range to view the asset's financial data over the selected period. Based on the selection, the graph will display the relevant financial data. Users can also view the asset's maintenance cost and depreciation rate, as shown in the following screenshot.
5. Relocation Section: Here, the user can view already raised relocation requests. By clicking on the "New Request" button, the user can raise a new request, and the system will redirect the user to the Work Orders page.

When you click on the (Relocation) “New Request” button the system will navigate to a new work order page with some auto filled data of selected asset. Here you can fill remaining fields and click on save to apply for asset relocation.
Please follow the steps below to request the Relocation of an asset.
Note: For more information, please refer to sections "Pre-requisites for Work Orders Creation," and "New Work Order," in the “6. Work Orders” module.
Step 1 : Add a new Category, SLA type both resolution and response, Auto assignment Agent, Auto assignment Supervisor in the settings work orders module. Configure Resource groups in the settings My Organisation module.
Step 2: Select an asset from the Assets module and click on it to view the asset details. Then, navigate to the Relocation section and click the “Relocation” button to add the relocation request of work order to asset.
Note: The details in the relocation request form are auto-filled by the system.
Ensure that all mandatory fields are filled in. Only then will the "Save" button be enabled.

Click on the "Save" button. A confirmation message stating "Work order created successfully" will be displayed, and the system will navigate to the Work Order detail view page, as shown in the following screenshot.
The work order for relocation details will be displayed on the details view page, as shown in the following screenshot.
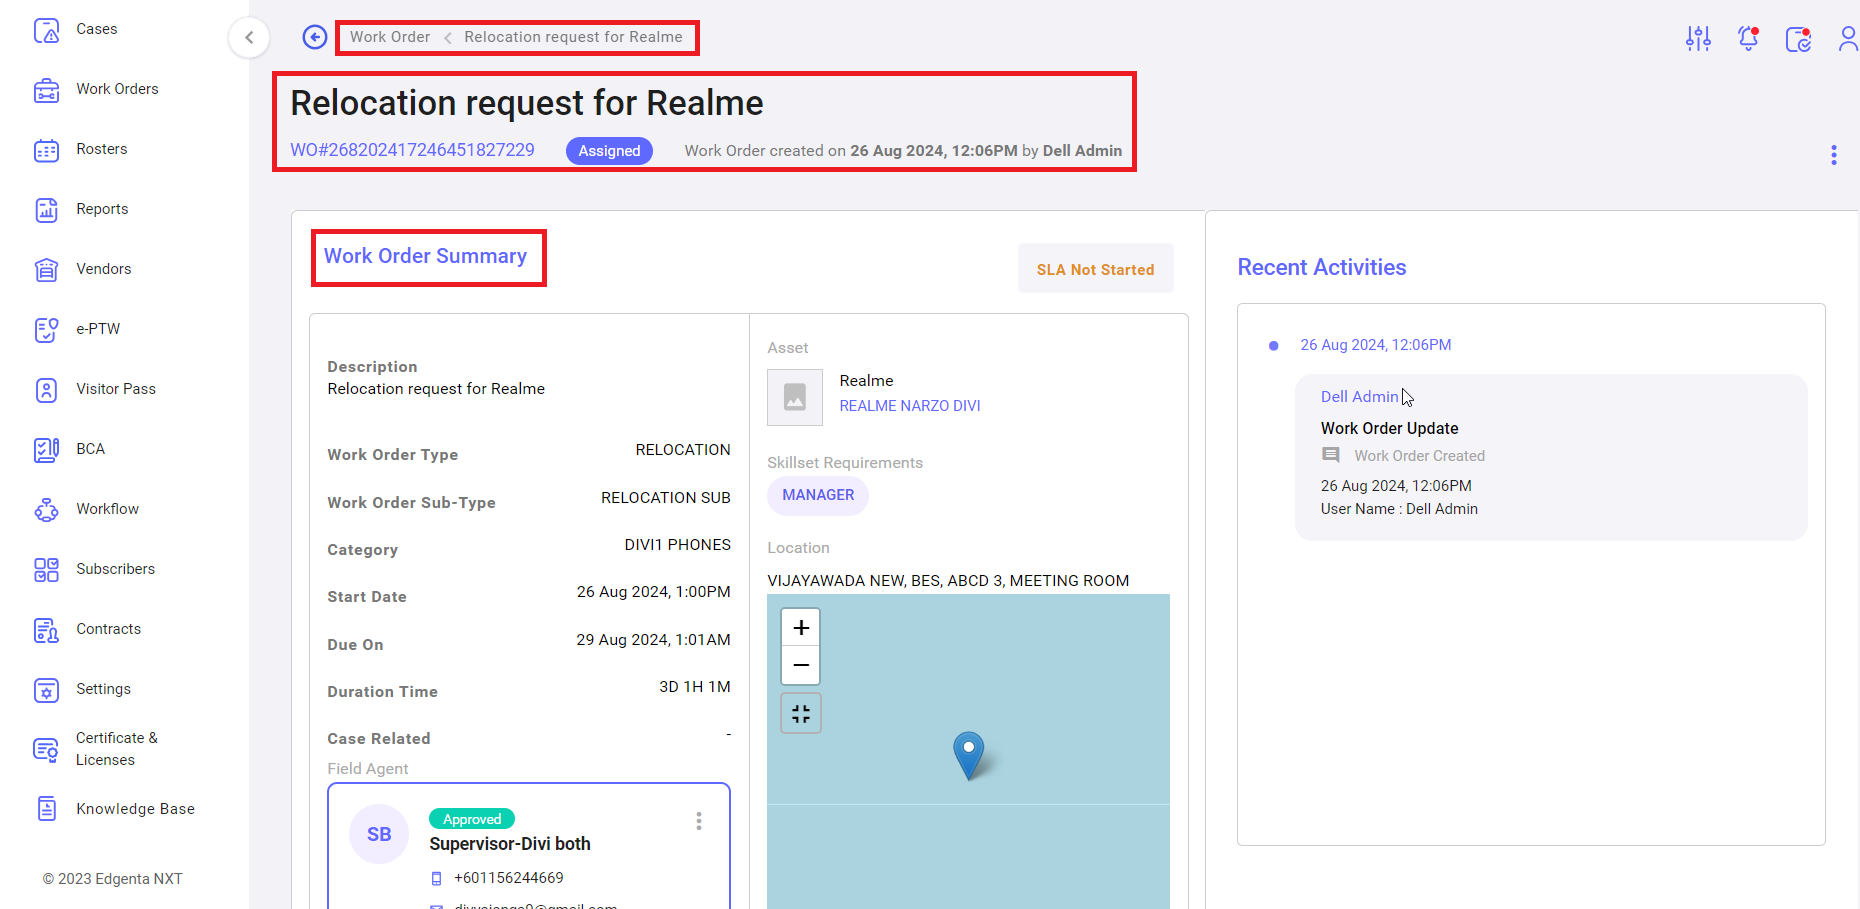
Step 3: The user can view the relocation request under the asset in the Work Orders section, as shown in the following screenshot.
6. Inventory Section: All inventories associated with the selected asset will be displayed in this section.
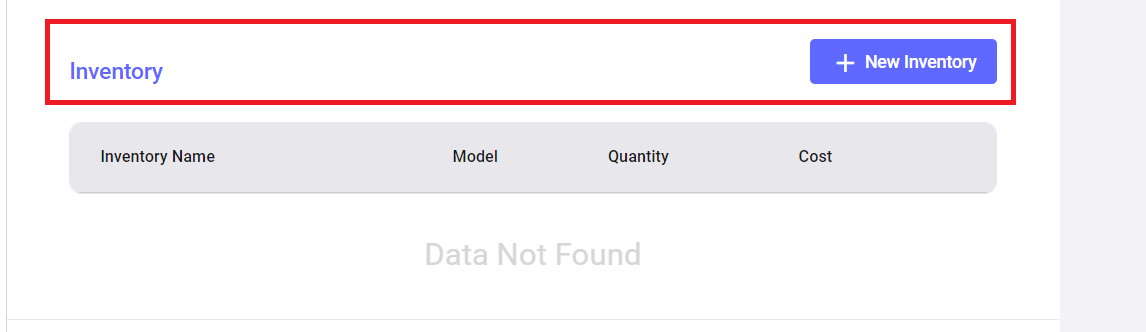
Users can add new inventories by clicking on the “New Inventory” button, which will redirect the system to the new inventory page.
Please follow the steps below to tag inventory to an asset:
Note: For more details, refer to sections 4.2, "Pre-requisites for Inventory Creation," and 4.3, "New Inventory," in the “4. Inventories” module.
Step 1: Add a new SKU in the Inventory feature within the Settings module, as shown in the following screenshots.
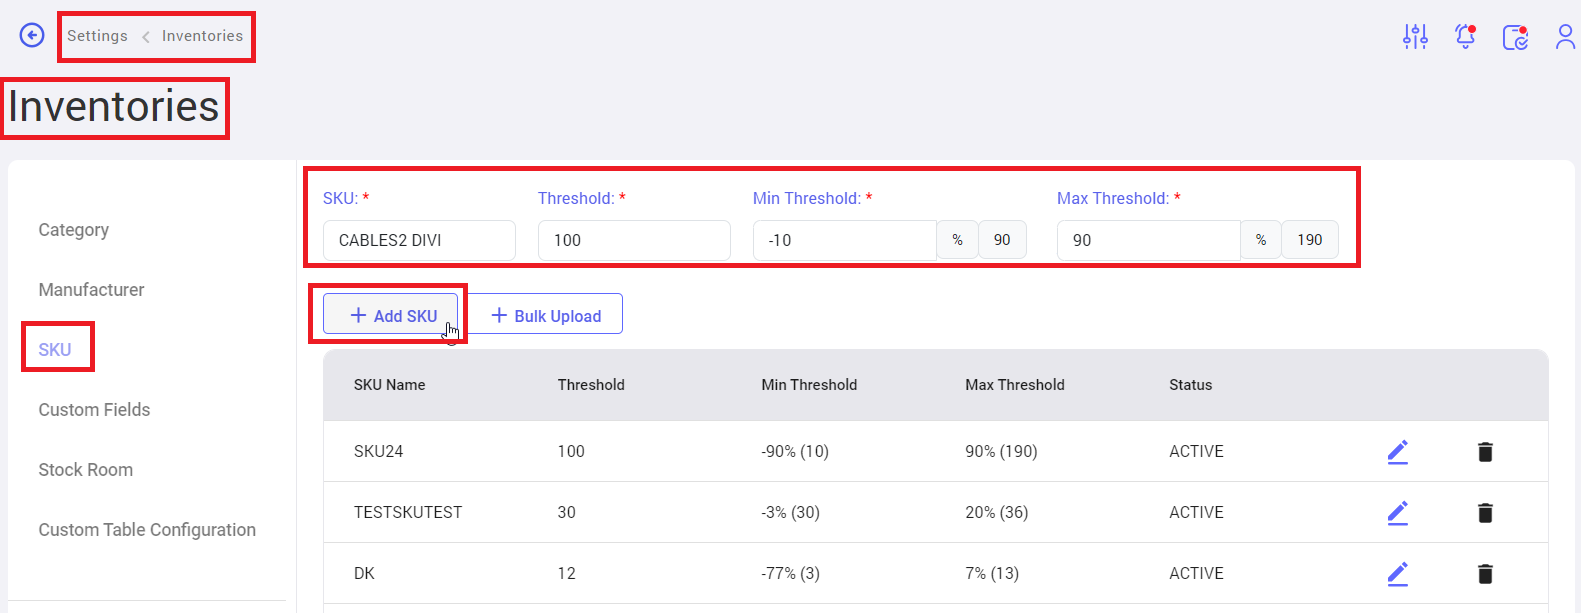
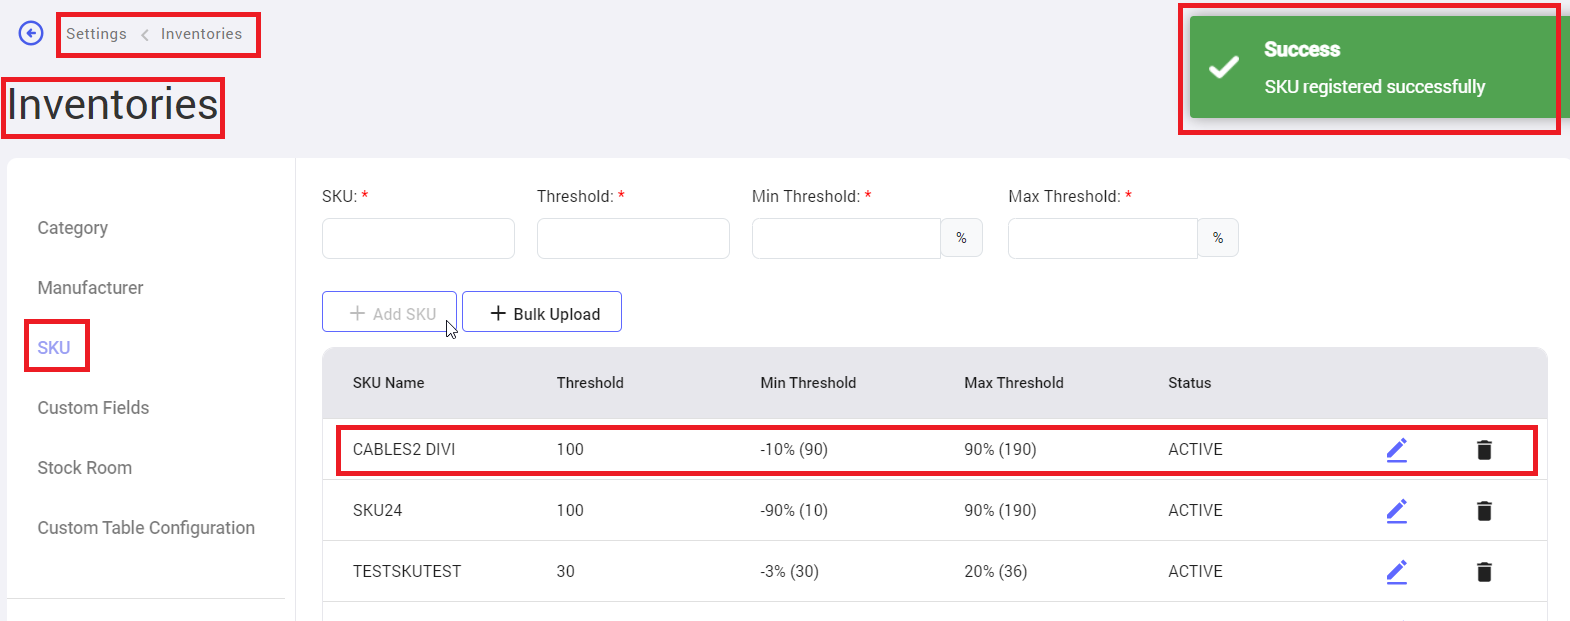
Fill in all mandatory fields and click on the “Add SKU” button. A confirmation message, "SKU registered successfully," will appear. The registered SKU will then be displayed at the top of the SKU table.
Step 2: Select an asset from the Assets module and click on it to view the asset details. Then, navigate to the Inventory section and click the “New Inventory” button to add the inventory to the asset.
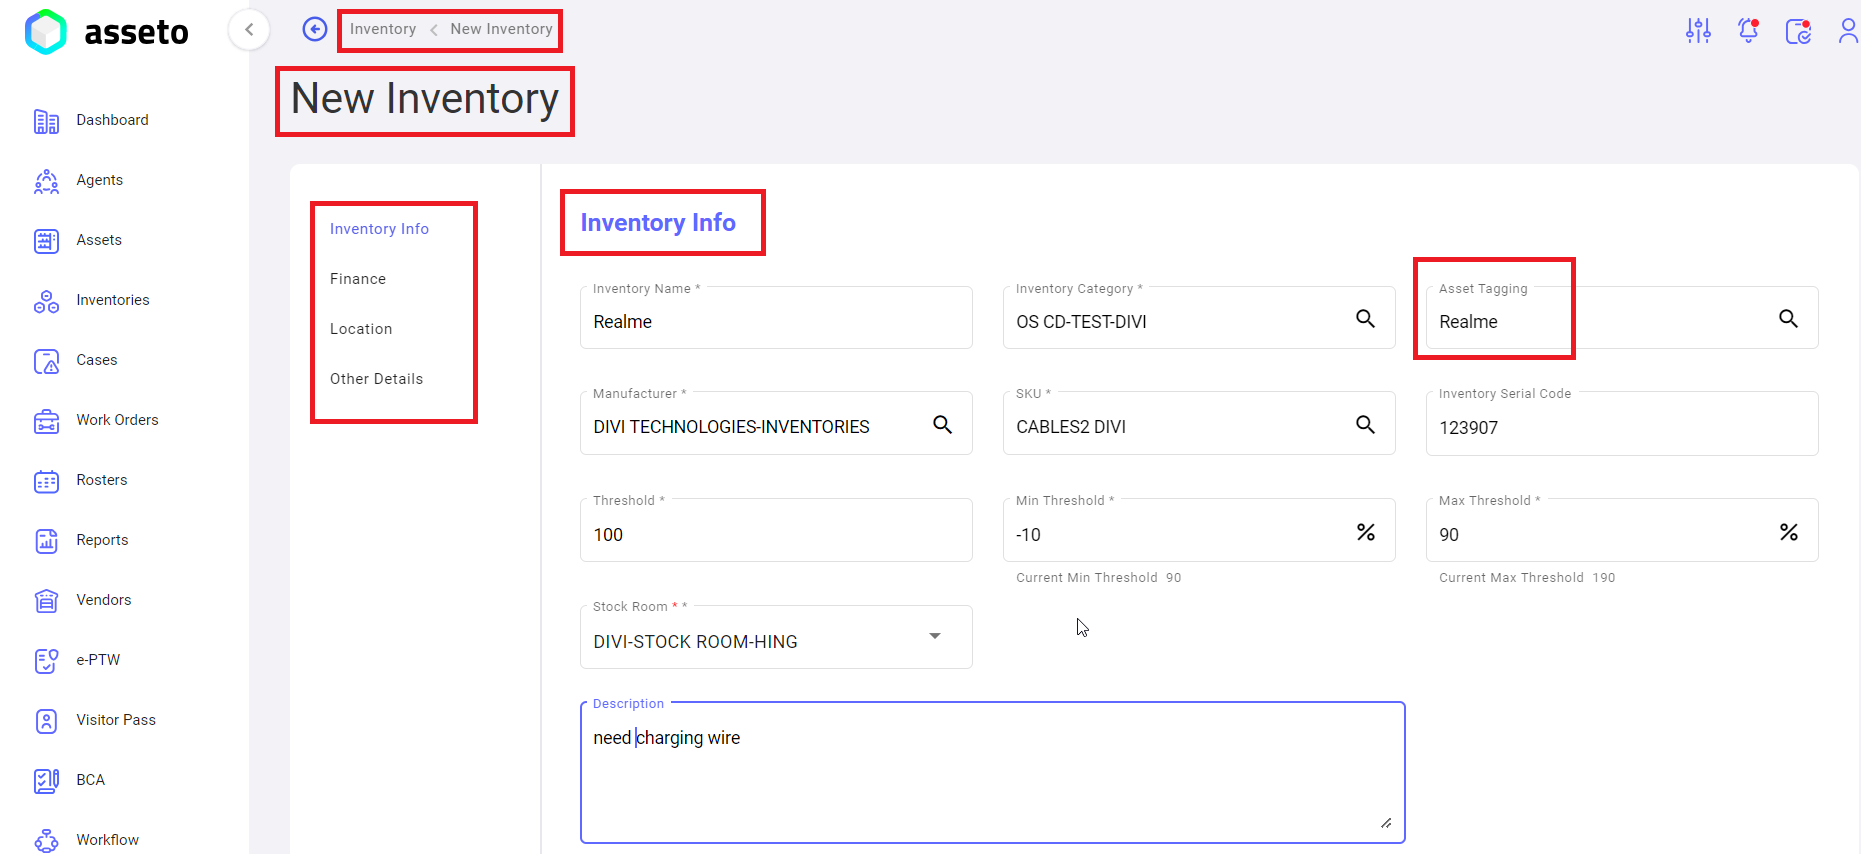
Note: The “Asset Tagging” field is automatically populated by the system. Fill in all the mandatory fields, and once completed, the “Save” button will be enabled.
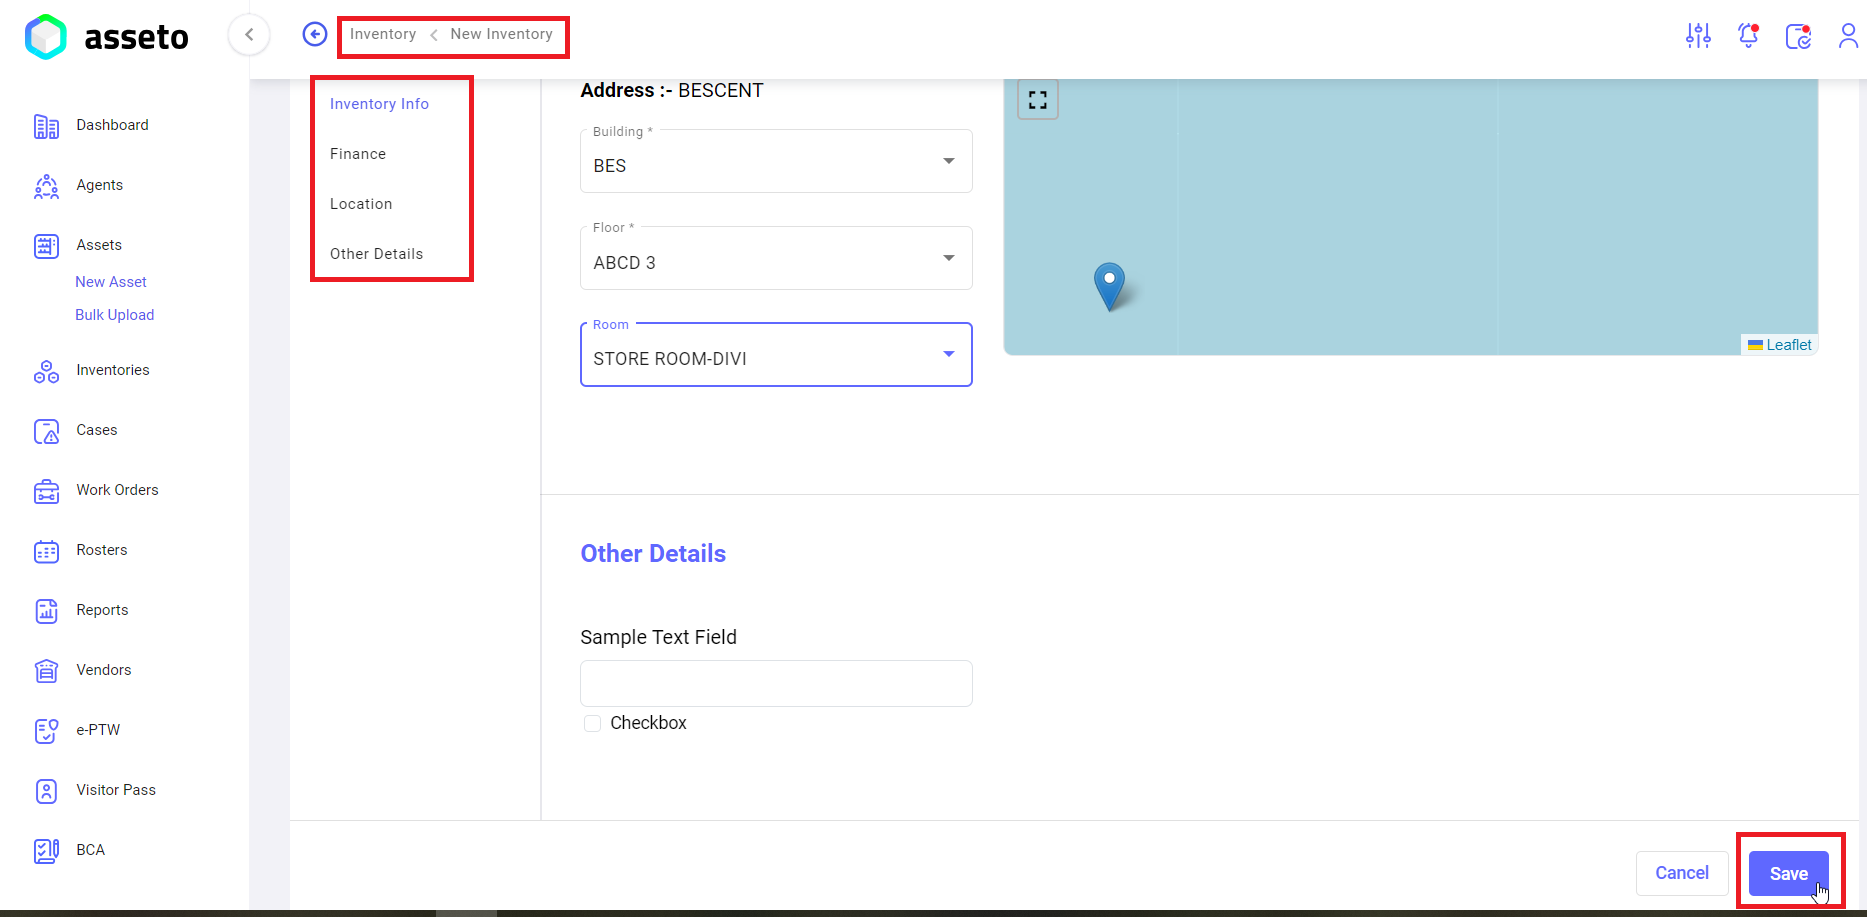
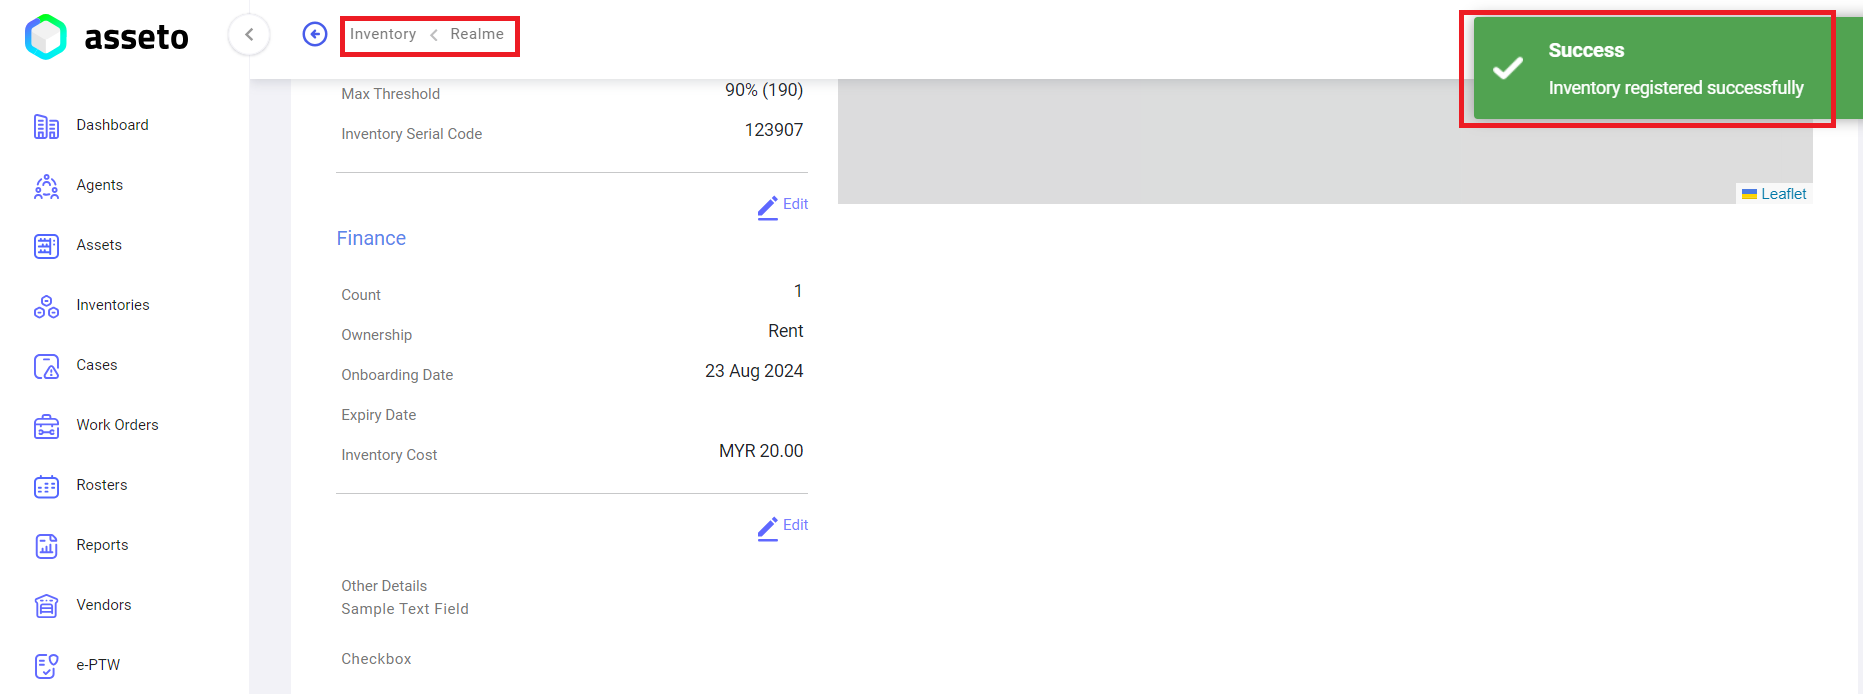
Click on the “Save” button. A confirmation message, “Inventory registered successfully,” will be displayed, and the system will navigate to the inventory view page.
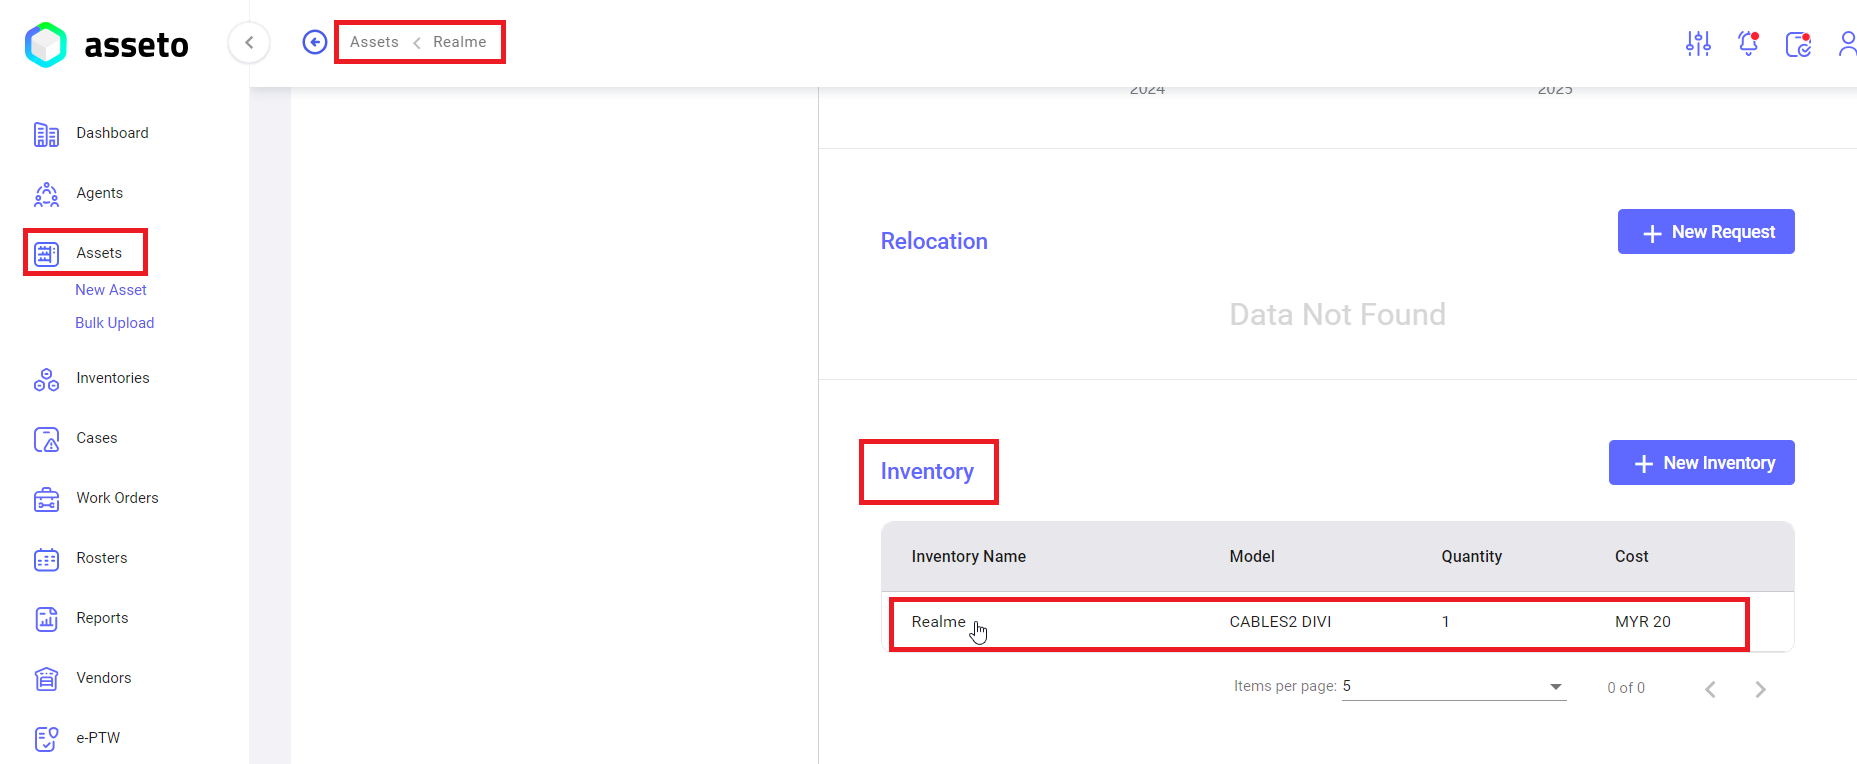
Step 3: To view the inventory tagged to an asset, navigate to the Assets module, select the desired asset to view its details, and then go to the Inventory section. The tagged inventory details will be displayed there.
7. Documents Section: In this section, the user can add new documents by clicking the "New Documents" button. The user can also view and manage existing attached documents. To download any of the attached documents, the user can click the download button, as shown in the following screenshot.

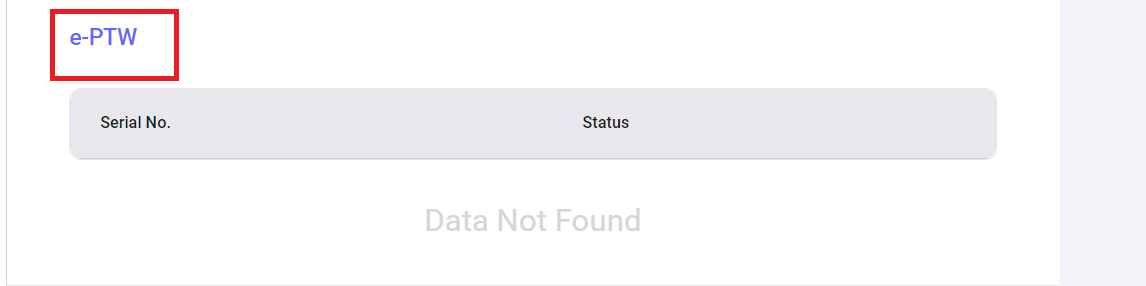
8. e-PTW Section: This section allows users to manage electronic permits to work (ePTW) for the asset.
9. Asset QR Code: QR code generated for the asset which can be downloaded.
When the user clicks on the QR code icon, a window displaying the QR code will appear. The window will also feature a "Download QR Code" button, allowing the user to download the QR code for the asset.

10. Asset Edit: To update asset details, click on the edit icon. The system will navigate to the edit asset page, allowing the user to make and save changes.
11. Comments Section: Users can add new comments in this section.

12. Active Log Section: All activities related to the selected asset are recorded in this section.

3.6. Asset Edit/Update
Users will be able to edit the following options using the edit icon:
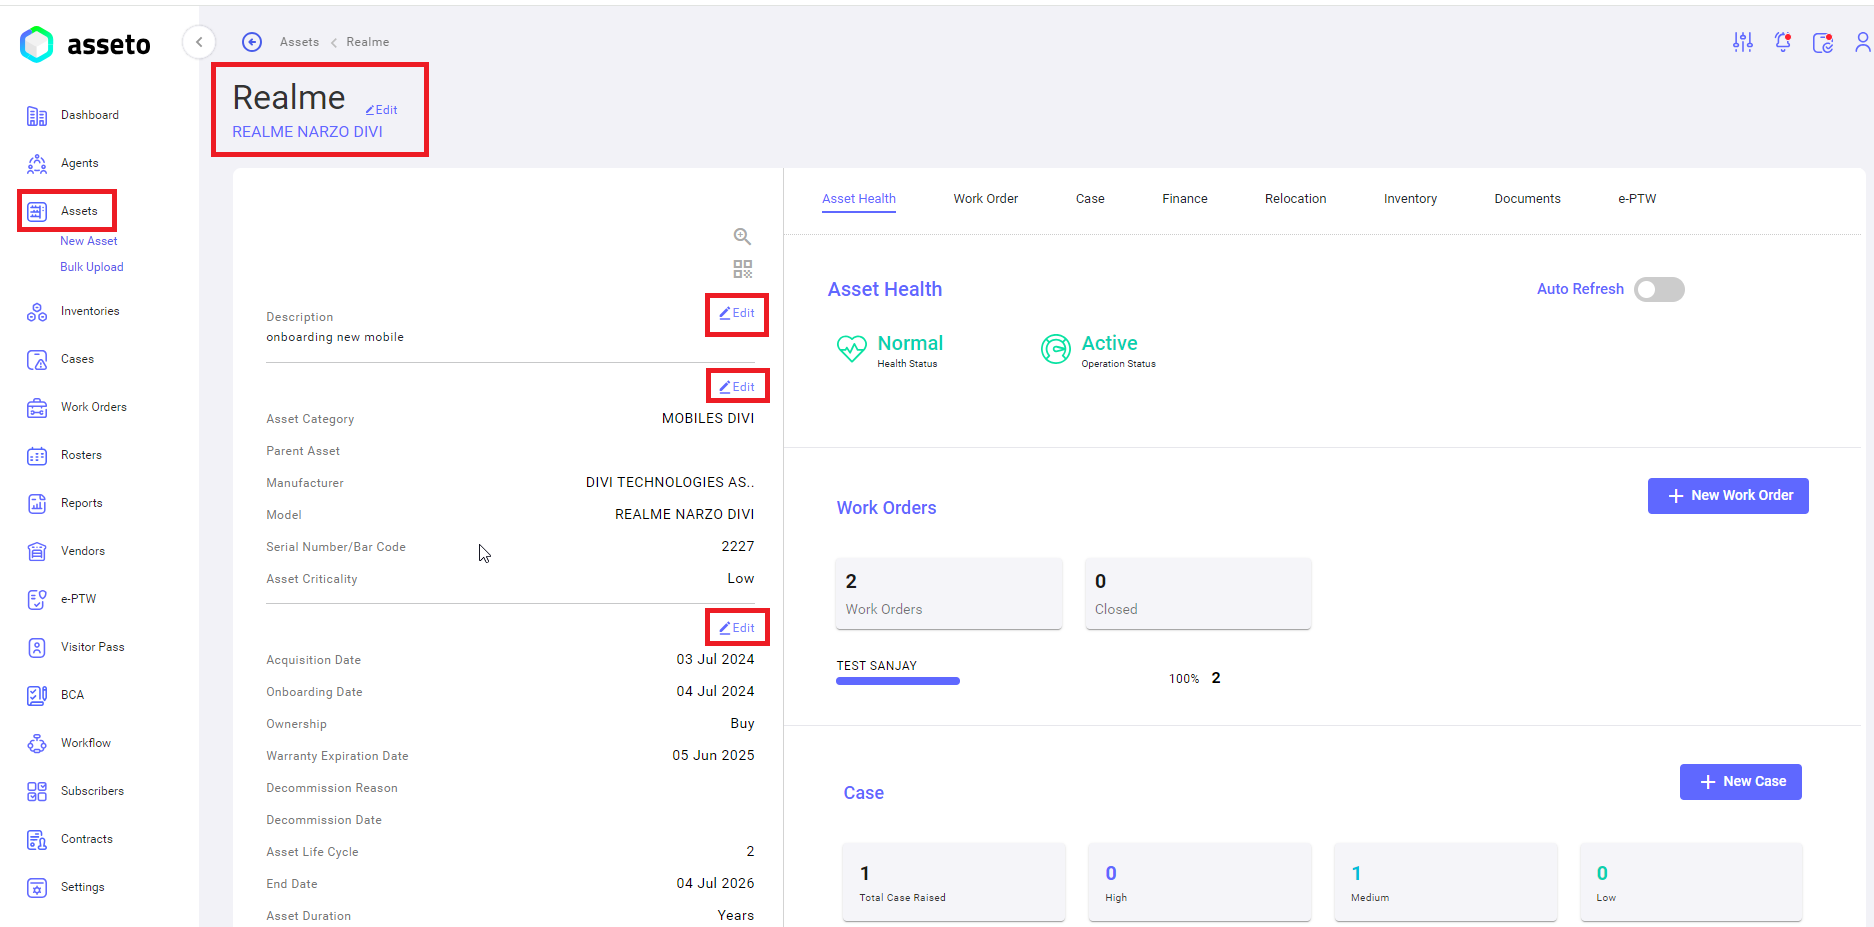
Clicking on the edit icon will direct users to the "Edit Asset Info" page, where users can update the asset details. This page provides fields to modify the asset's core information, allowing users to make necessary changes.
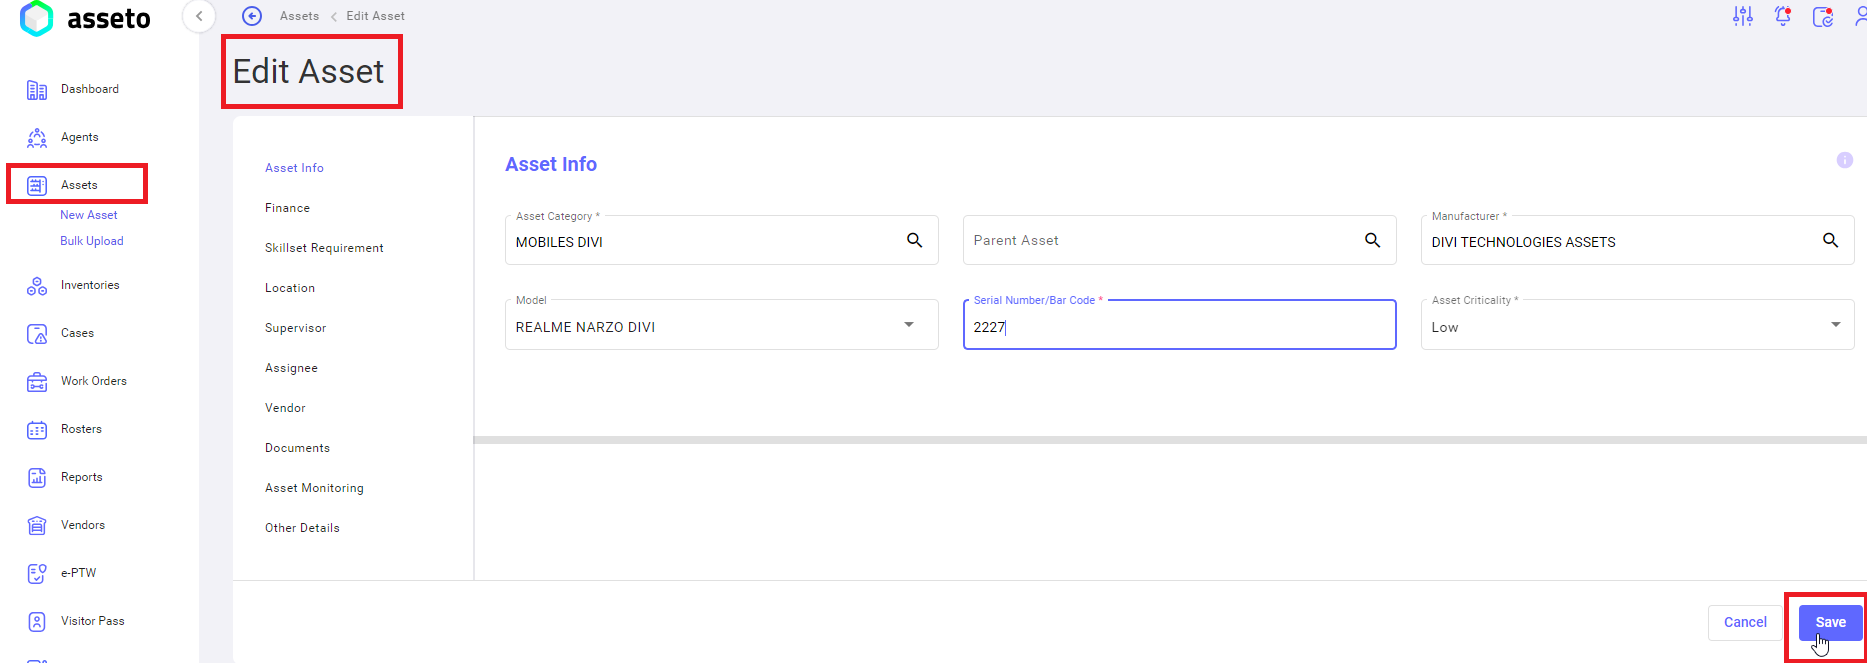
You can edit the asset information by updating the relevant data and then clicking on the "Save" button.
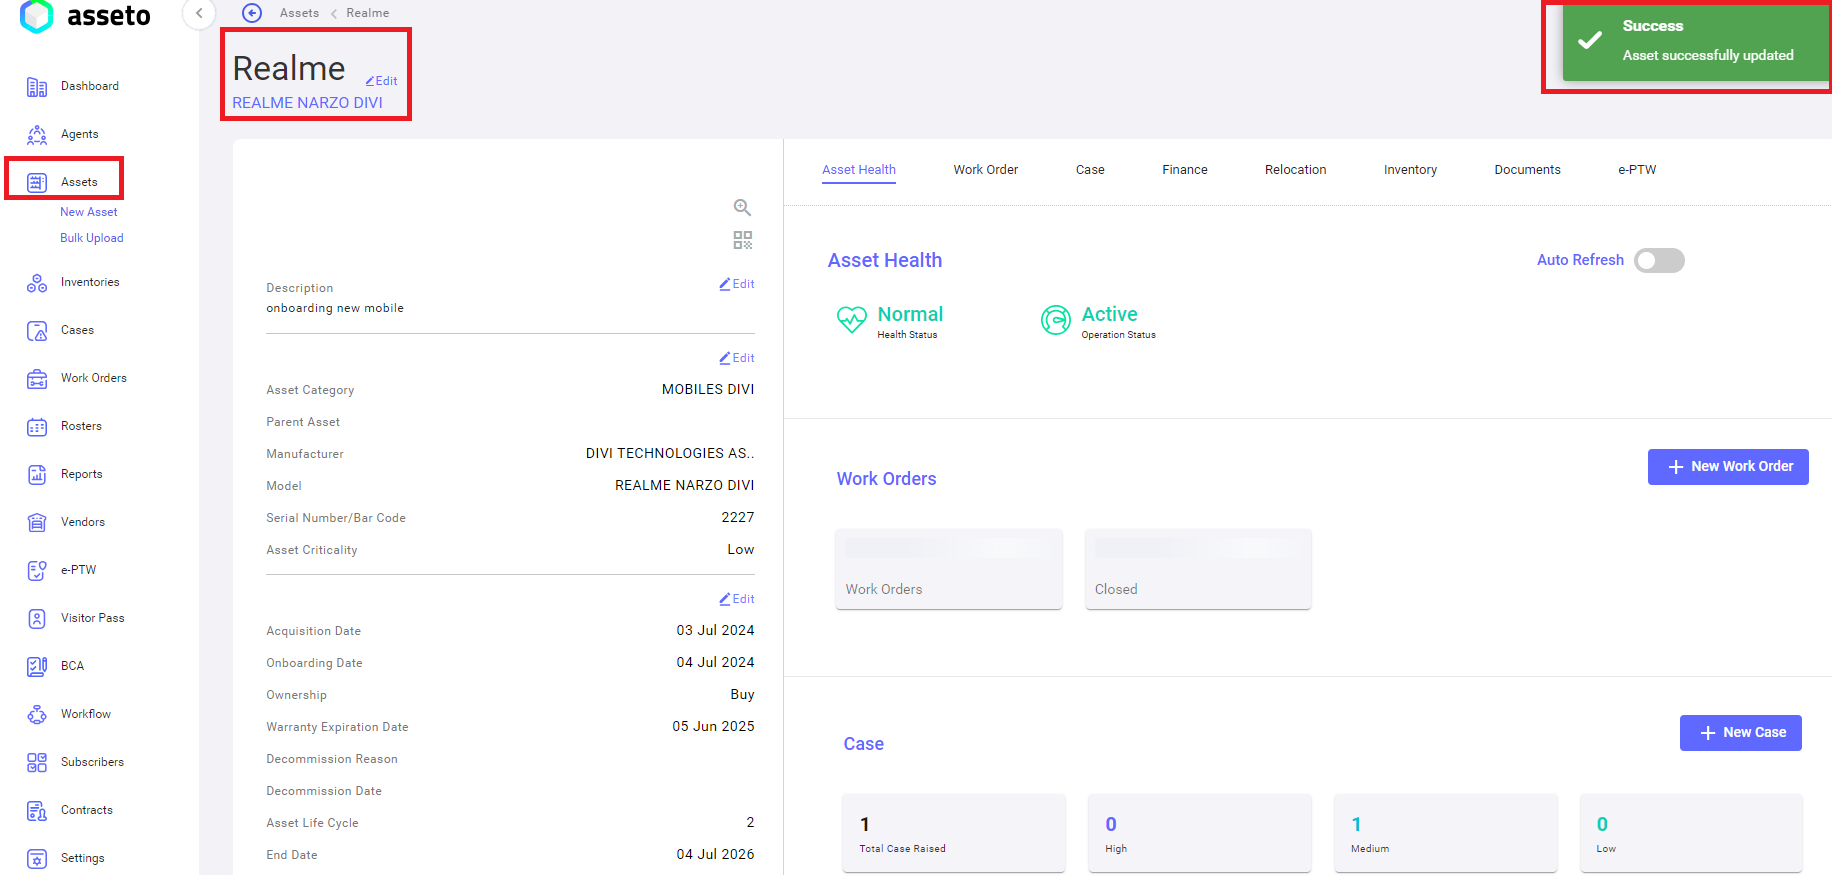
To edit asset details, users need to click on the edit icon, which will navigate them to the Edit Asset page. Here, users can update the asset information by modifying the relevant fields and then clicking on the "Save" button. After saving, a confirmation message "Asset successfully updated" will be displayed, and the page will redirect to the asset detail view page where the updated fields will be visible with the new data.
Similarly, users can edit other sections such as Description, Finance, Skillset, Location, Supervisor, Assignee, Vendor, and Asset Monitoring by clicking on the respective edit icons.